Taxonomy Editor
Use Taxonomy Editor to edit existing taxonomies or create new taxonomies by using Modules, Union, Intersect, Tag from endpoint, and related options. Taxonomies are usually created in Mining and assigned modules there, but Mining does not support building module chains from endpoints, columns, or tables. Taxonomy Editor lets you refine imported taxonomies or create new ones for microservice design.
Taxonomies tab
When you open Taxonomy Editor from the Decomposition section, the page opens on the Taxonomies tab. From there, you can view, create, edit, select, and delete taxonomies, and you can open the selected taxonomy directly in Taxonomy Graph.
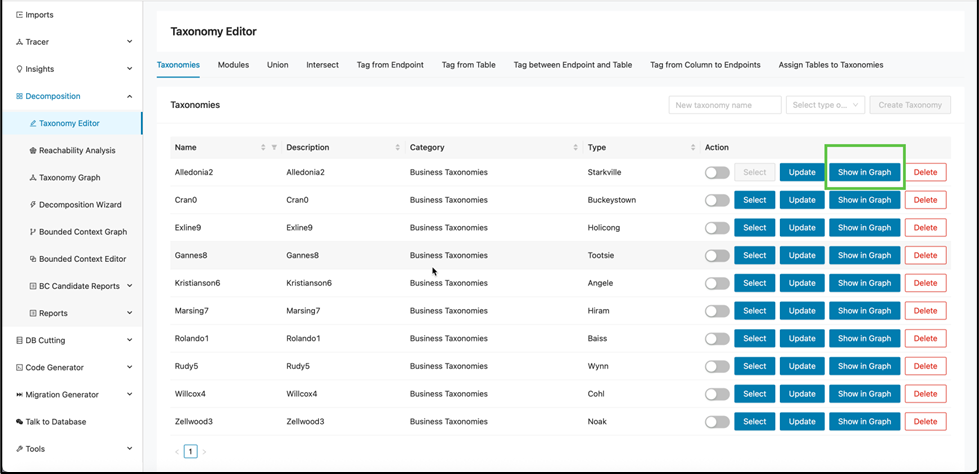
The taxonomies are displayed together with description, category, type and action options as below.
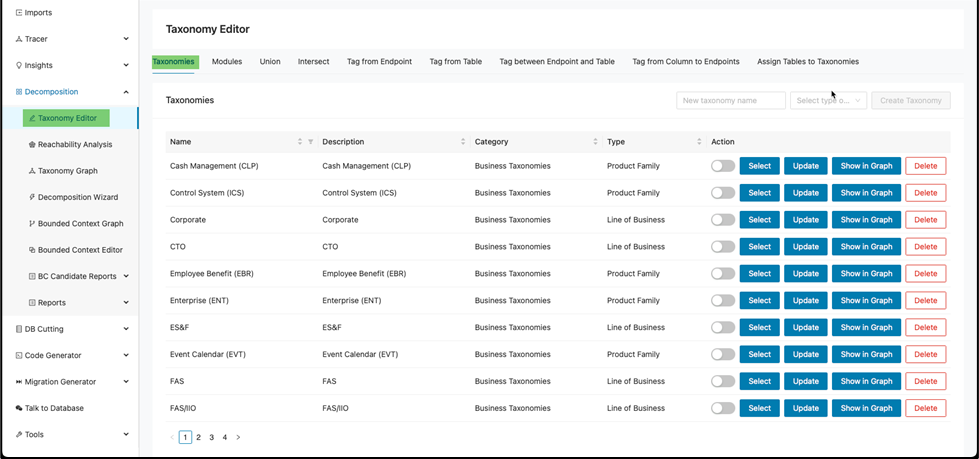
This information is loaded from the CSV files uploaded on the Import screen after you create a client and a project.
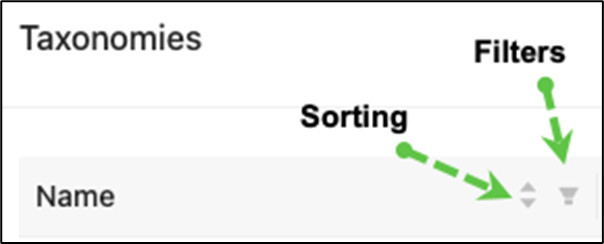
Each column supports filtering and sorting so you can narrow the results.
Creating a new taxonomy
To create a new taxonomy:
a. Enter an appropriate taxonomy name under the “New taxonomy name” text box.

b. Select the type under the “Select type of…” drop-down menu. Then select the appropriate choice.
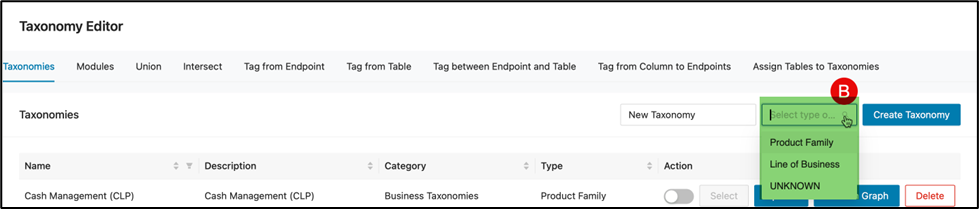
c. Finally, click Create Taxonomy.

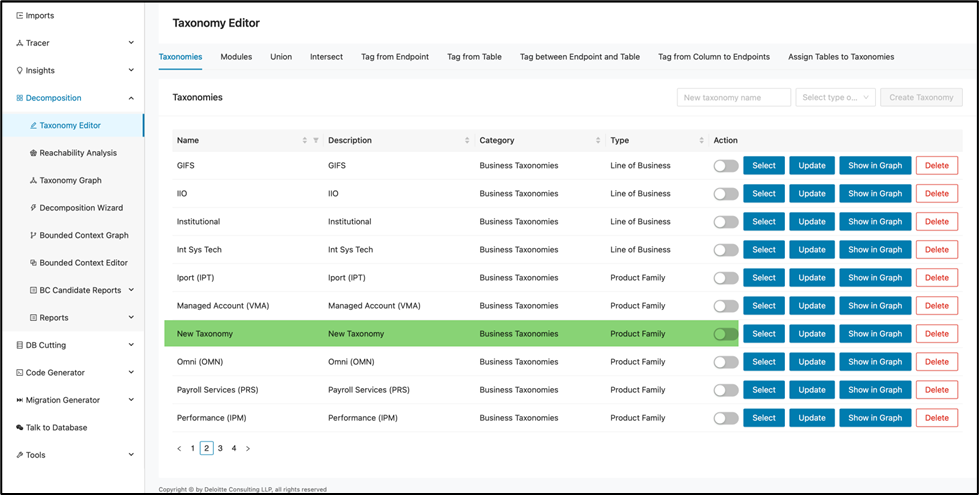
Locate the the new Taxonomy from the Taxonomies table to verify the creation.
Select or configure a taxonomy
Once a taxonomy is selected, its structure will inform what modules and groupings you see and work within subsequent tabs (such as Modules).
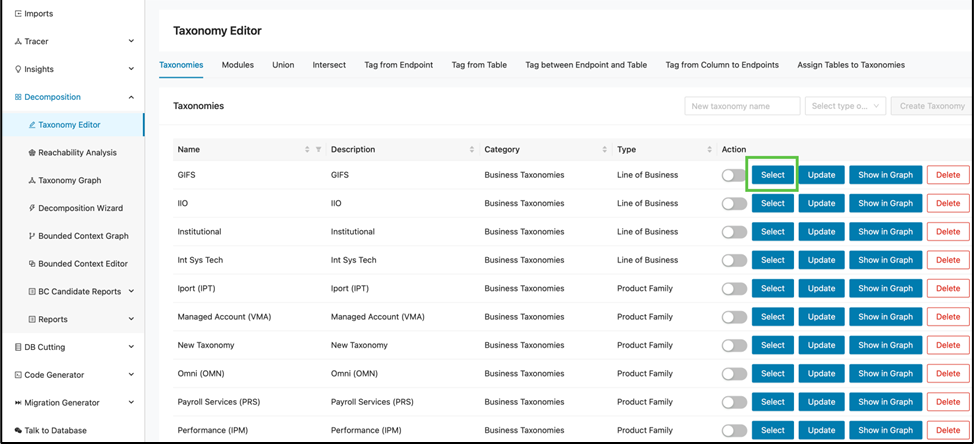
First, click Select to select a taxonomy.
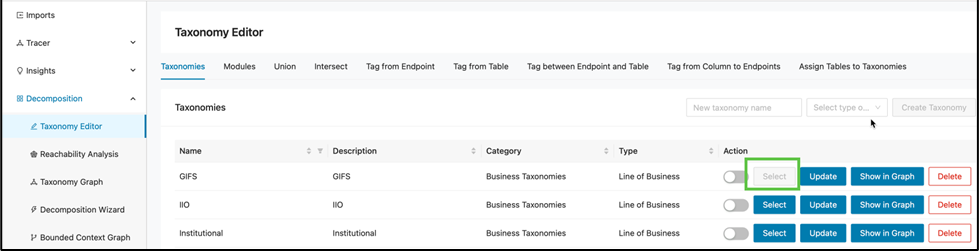
The Select button will be grayed out to indicate that the corresponding taxonomy has been selected.
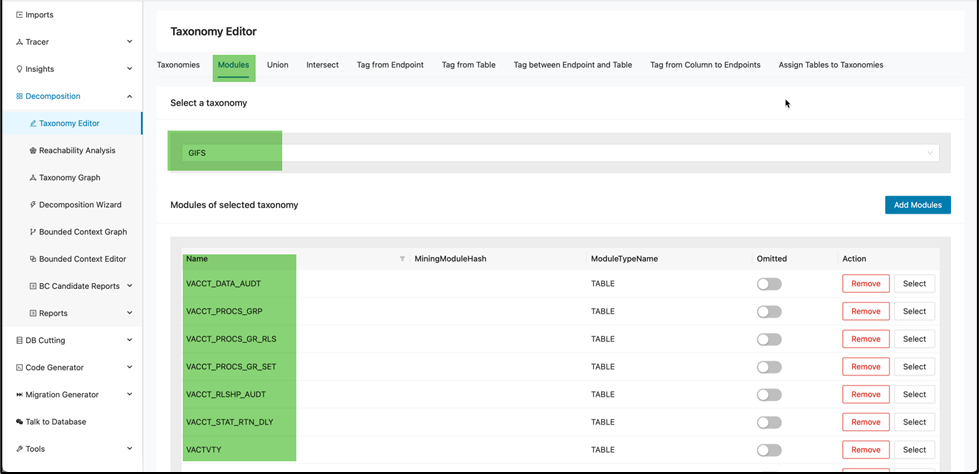
The selected taxonomy is reflected on other pages. For example, on the Modules tab, the taxonomy is selected automatically when you open the page for modules associated with that taxonomy.
Selecting a different taxonomy on the taxonomies tab will unselect the previously selected taxonomy.
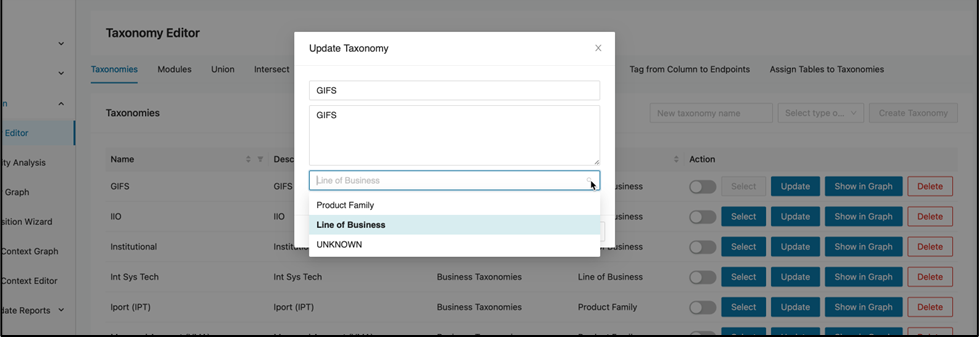
Updating a taxonomy
At times you may need to modify an existing taxonomy with a more appropriate description of business process.
Click Update to update a taxonomy.
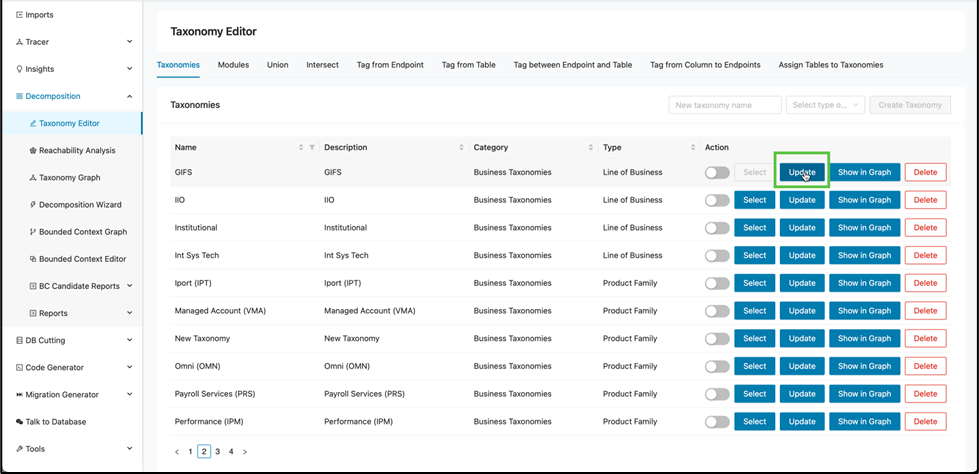
This opens a window for editing and saving changes. Edit and then click OK to save the changes.
Display graph of a taxonomy
Click Show in Graph to display the taxonomy in the graph.
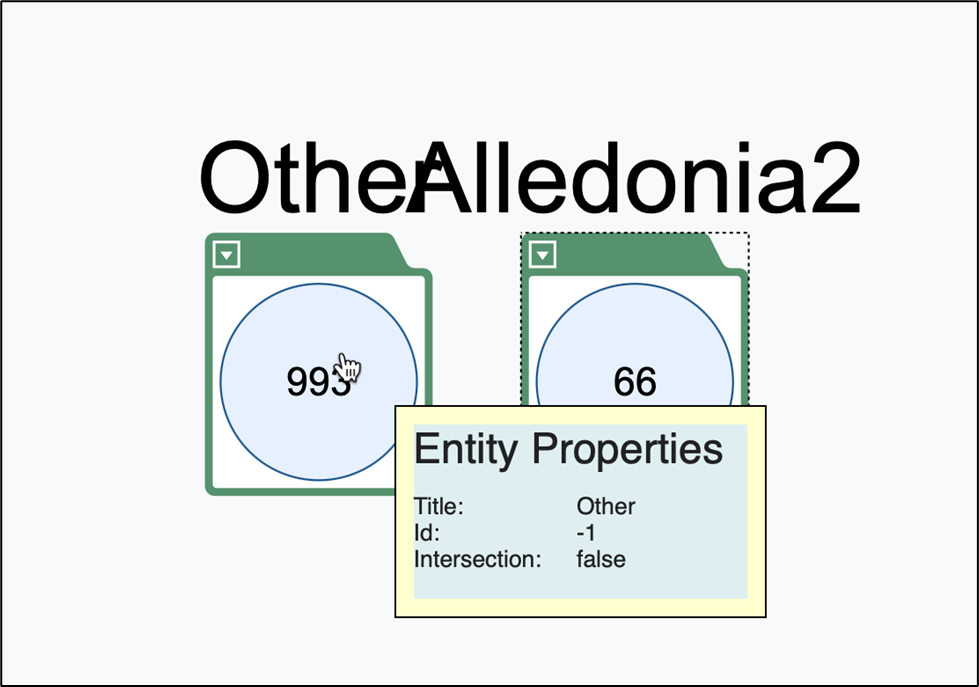
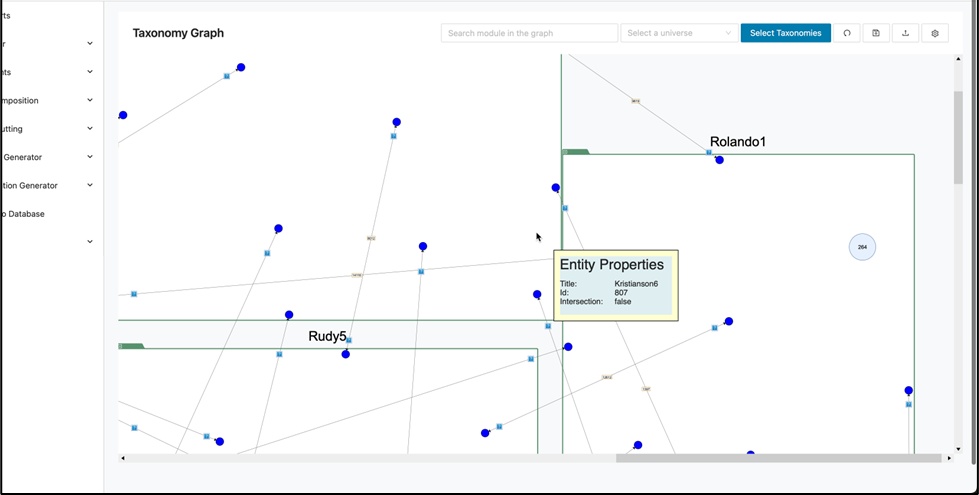
Afterwards, the “Taxonomy Graph” page will open and display the taxonomy you selected. You can also hover over elements within the graph to view the properties of each taxonomy:
-
The number of modules not expanded associated by circled number
-
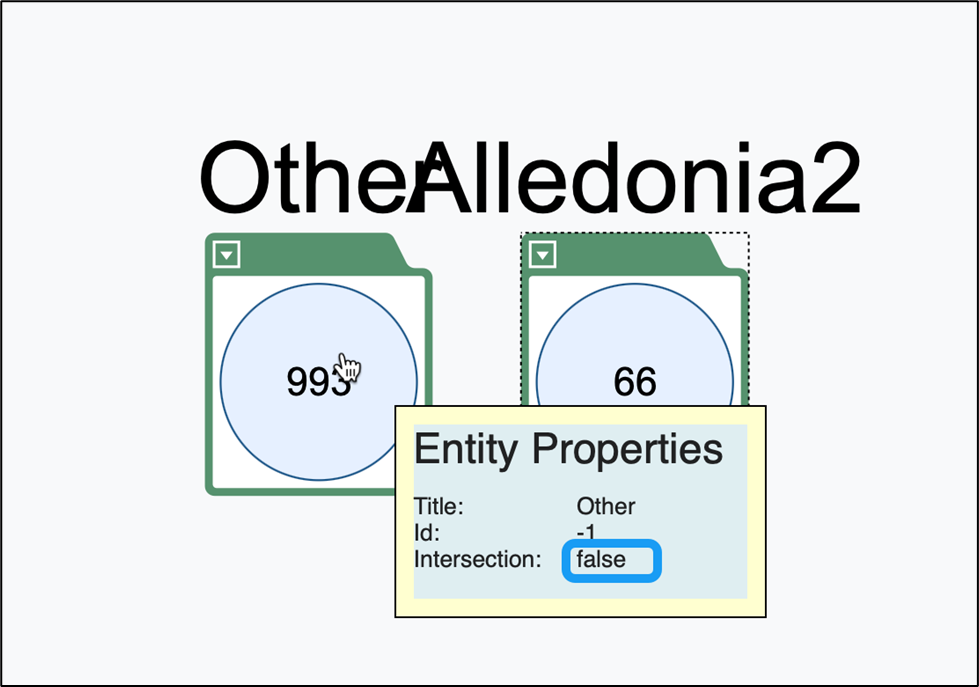
Intersections: whether it be true or false
-
The title of the taxonomy
-
ID: is just for developers such as the DB ID
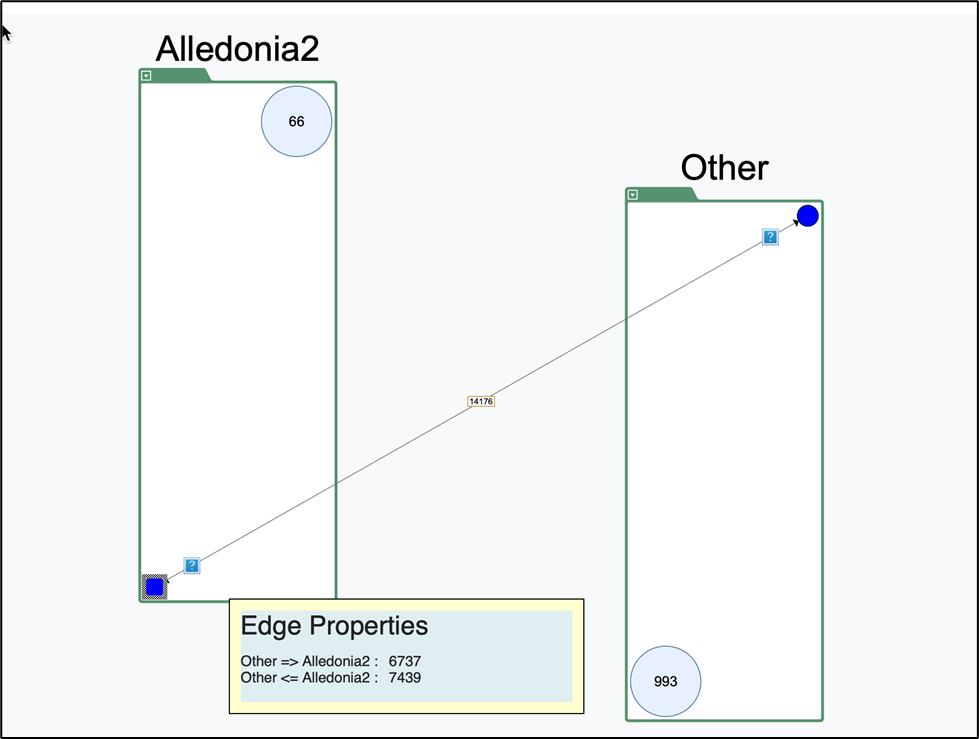
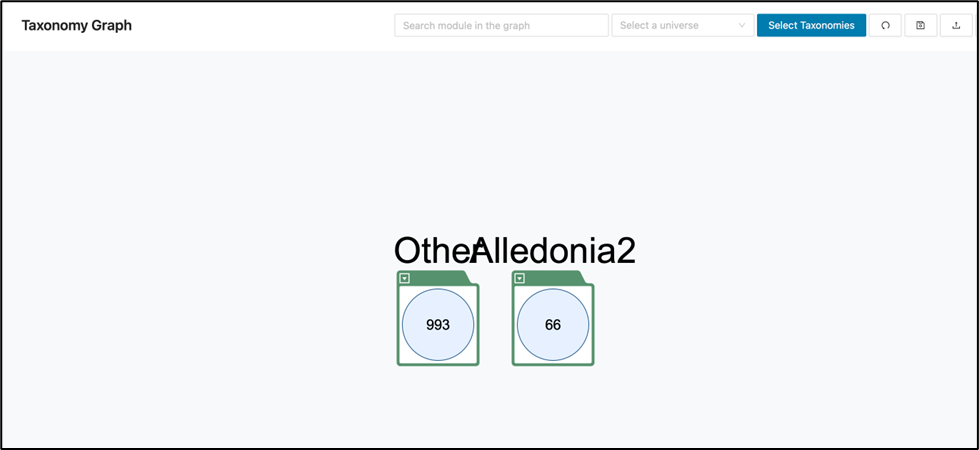
Below, the “Alledonia2” taxonomy is connected to “Other” taxonomy which in fact are other taxonomies in short. This is because we don’t want the graph to have a convoluted display. However, those taxonomies can be displayed.
It is also normal for taxonomy names to overlap or blend in the visualization, but this can be corrected by doing the following.
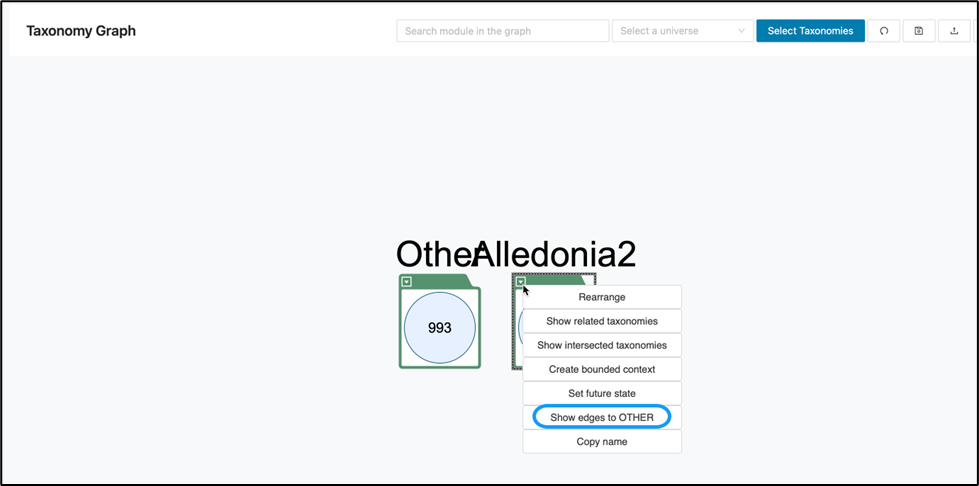
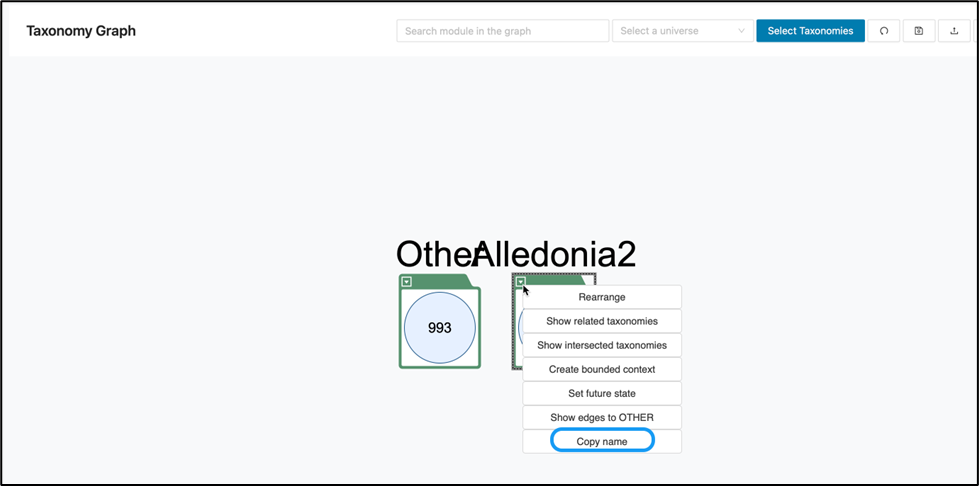
a. Right click on your selected taxonomy.
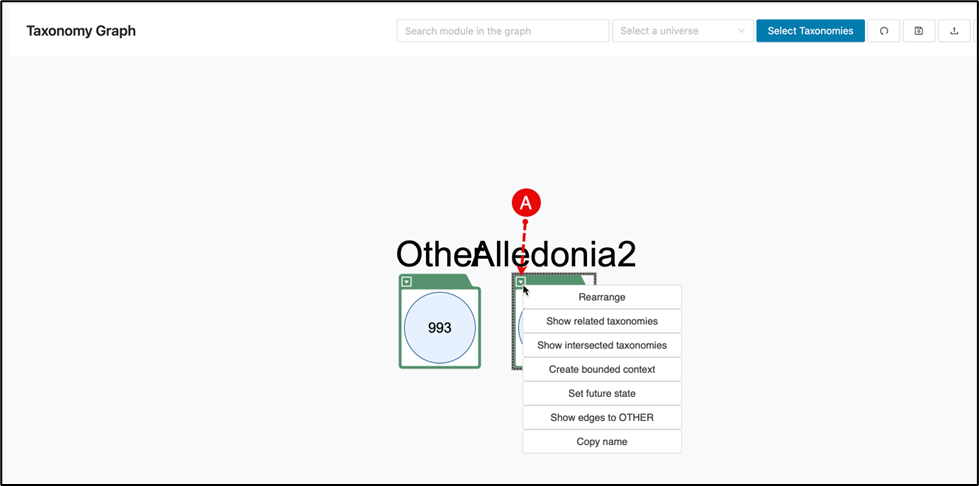
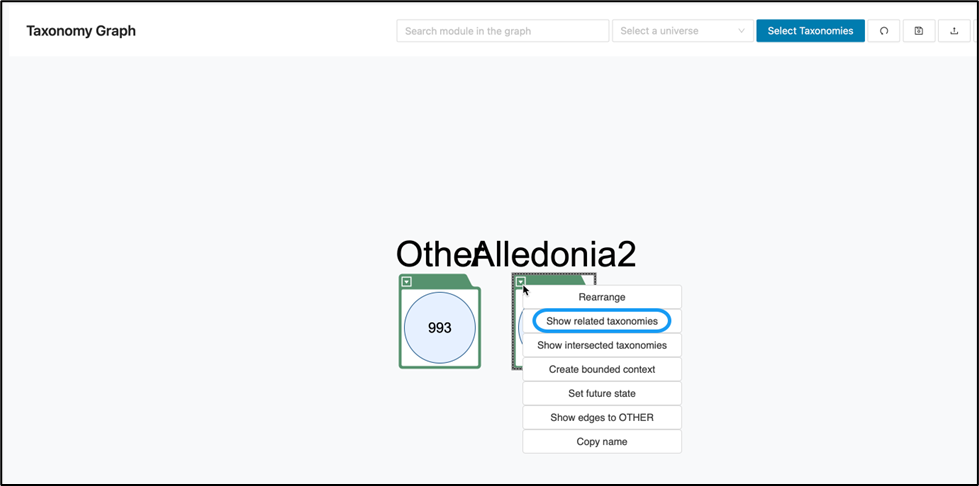
b. Rearrange: allows for the graph to be rearranged to a clearer view as below.
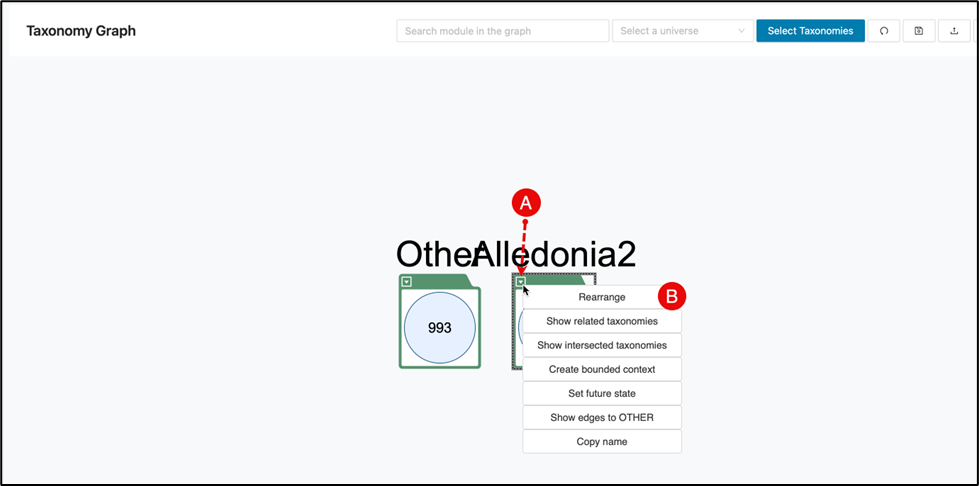
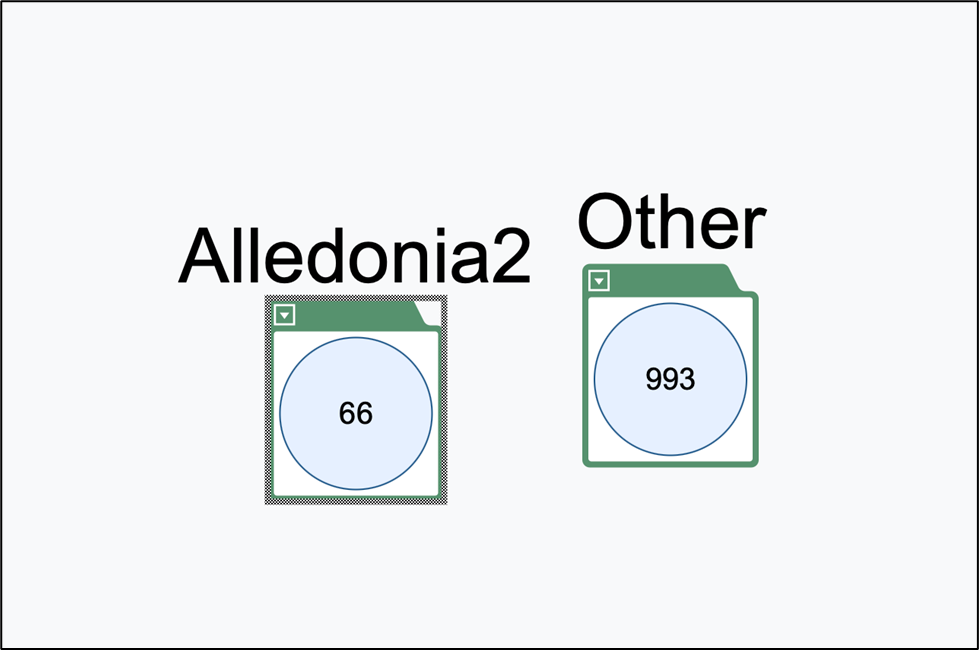
c. Show edges to OTHER: Will rearrange even further to show connected endpoints.
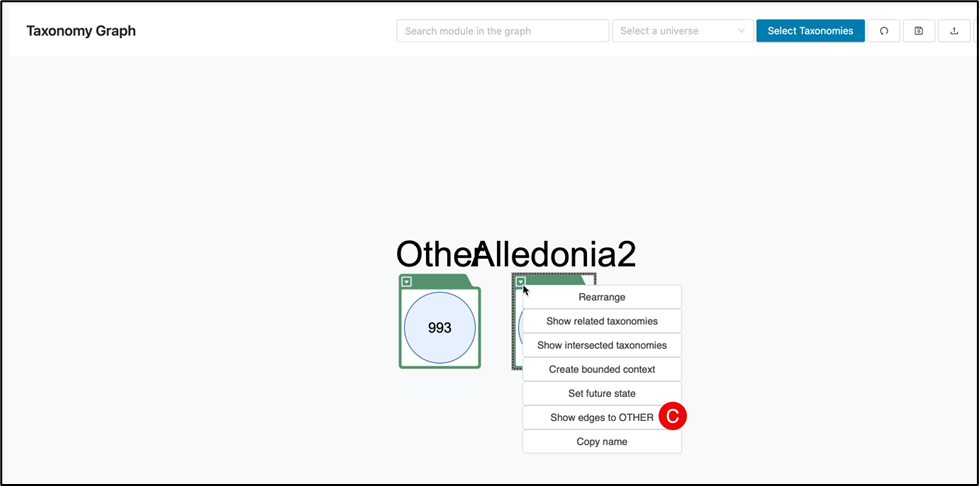
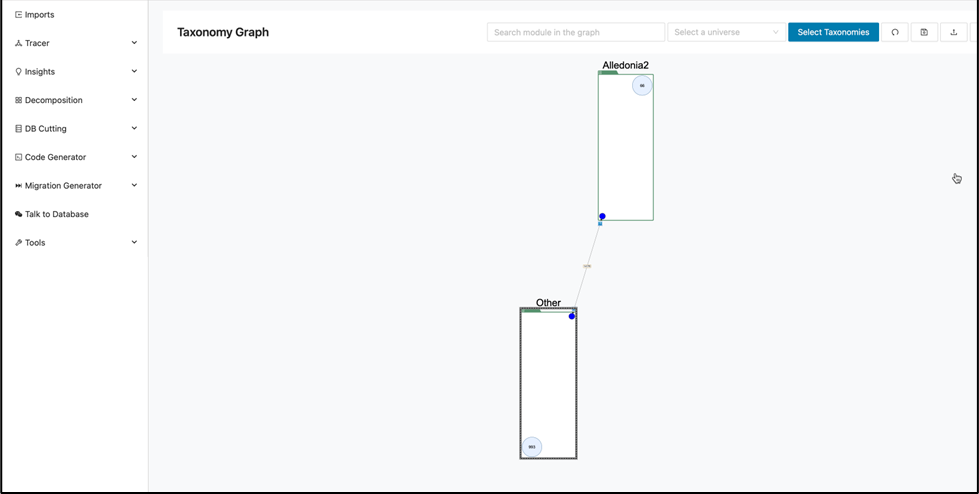
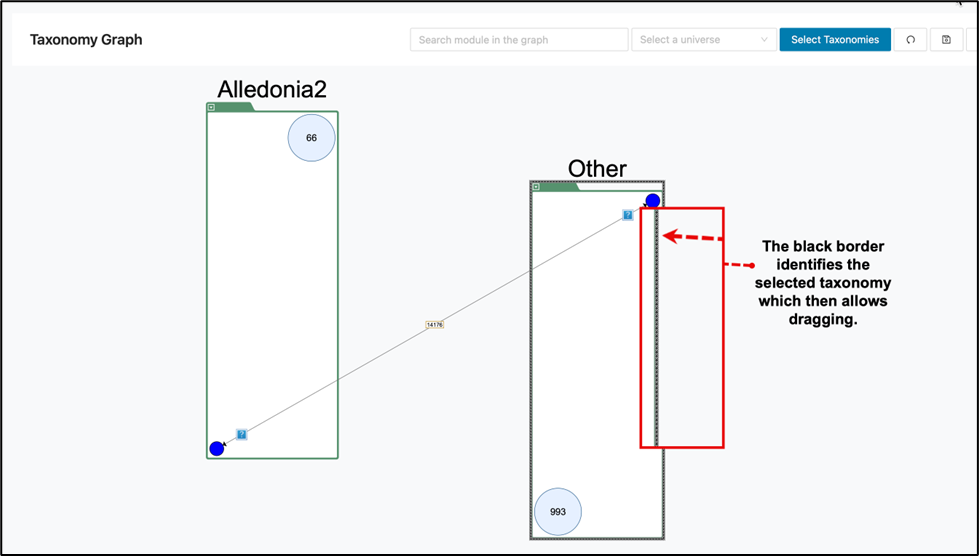
The graph layout can be customized by selecting a taxonomy and dragging it to your preferred position.
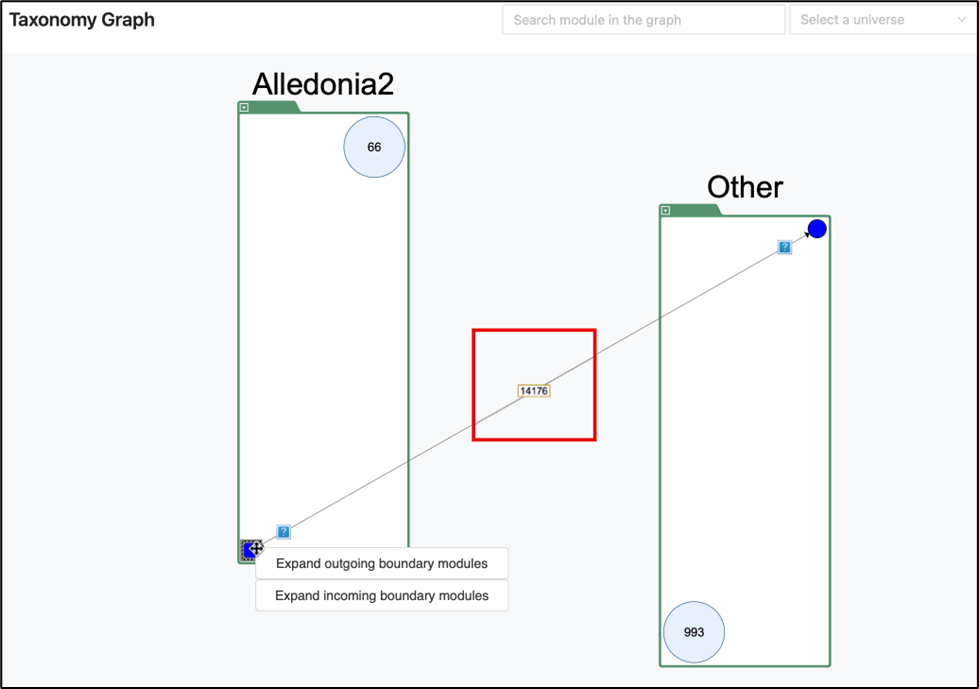
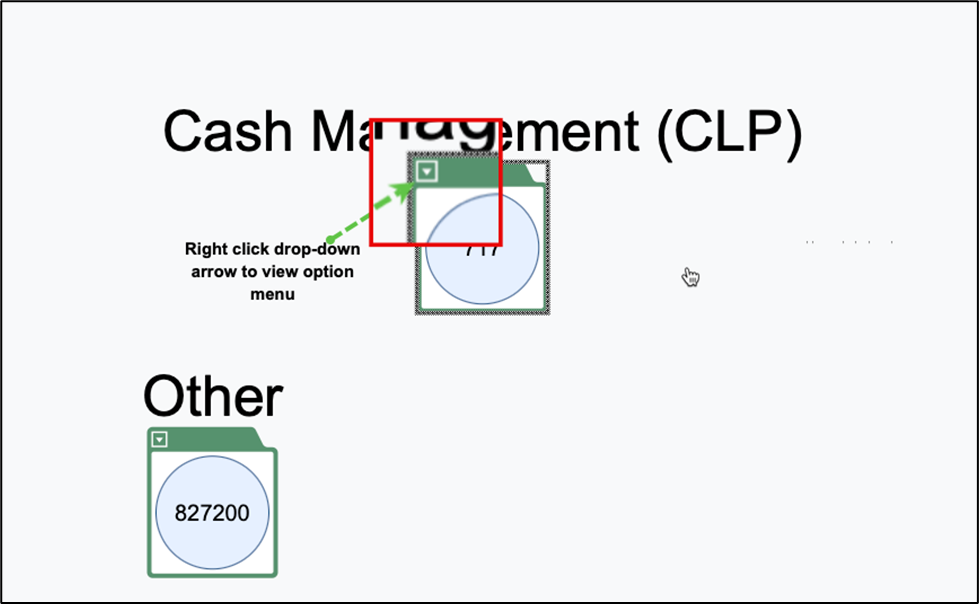
The "Show edges to OTHER” feature displays a blue dot on each taxonomy, which can be right clicked to access additional options. This view also highlights incoming and outgoing connections using arrows, and the total number of connections between the selected taxonomy and others is indicated by the magnified red box.
After clicking “Show edges to OTHER”, you can choose to expand outgoing or incoming boundary modules.
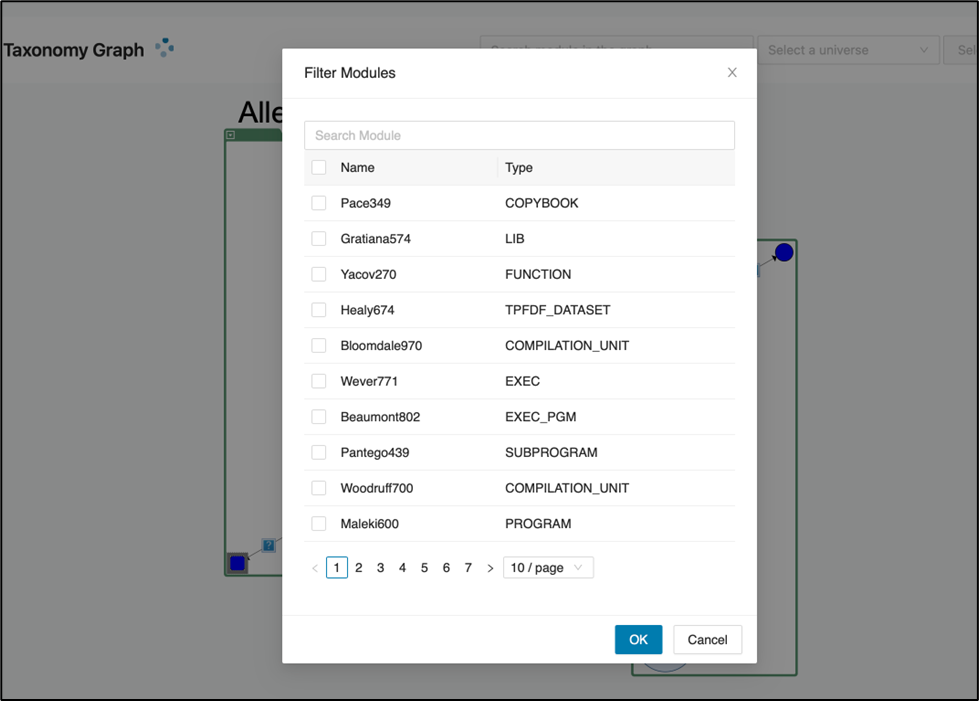
Be mindful of the number of modules within a taxonomy before expanding outgoing or incoming boundary modules, as this can make the view complex. If expansion is selected, a filter modules window will appear to help you limit and organize the display.
Edge properties
Hovering over the question marks on the connection arrow will display edge properties displaying the exact number of connections outgoing and incoming.
Other display options
Again, to show other display options for a taxonomy, right-click the taxonomy.
Show related taxonomies: will display a pop-up menu displaying related taxonomies not currently shown on the graph. By selecting any unrelated taxonomy from the table, you can instantly update the graph to include these elements.
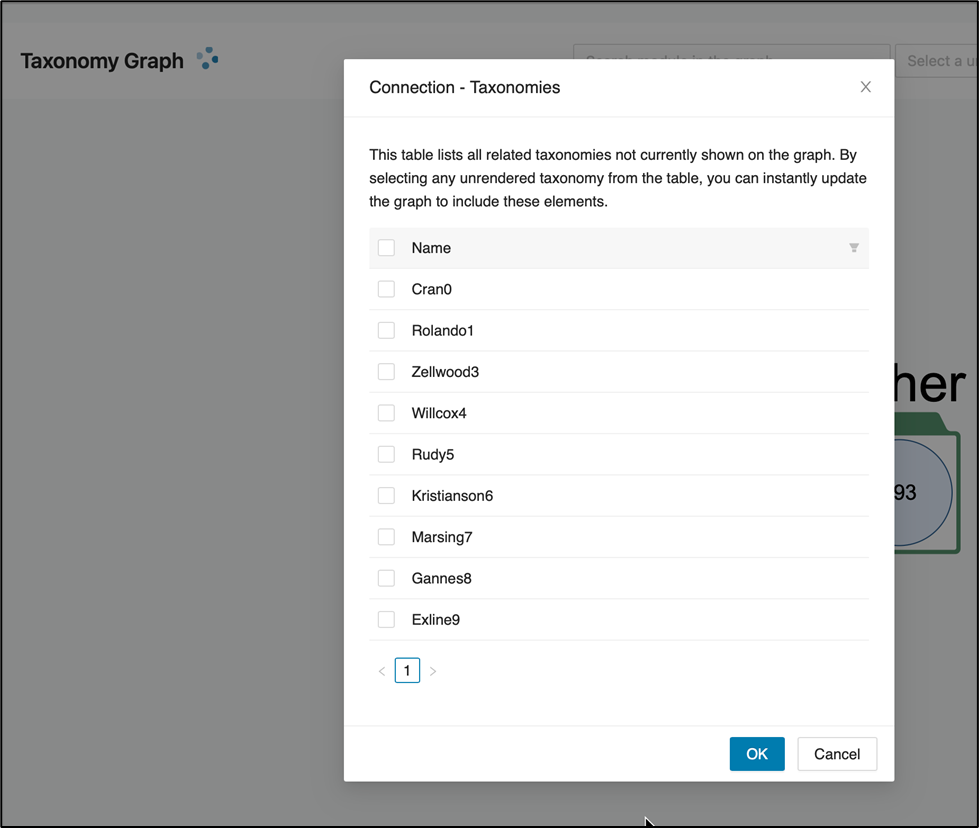
The example above only had 9 taxonomies so all nine were selected to display as below which gives you an idea on how to manage your displays.
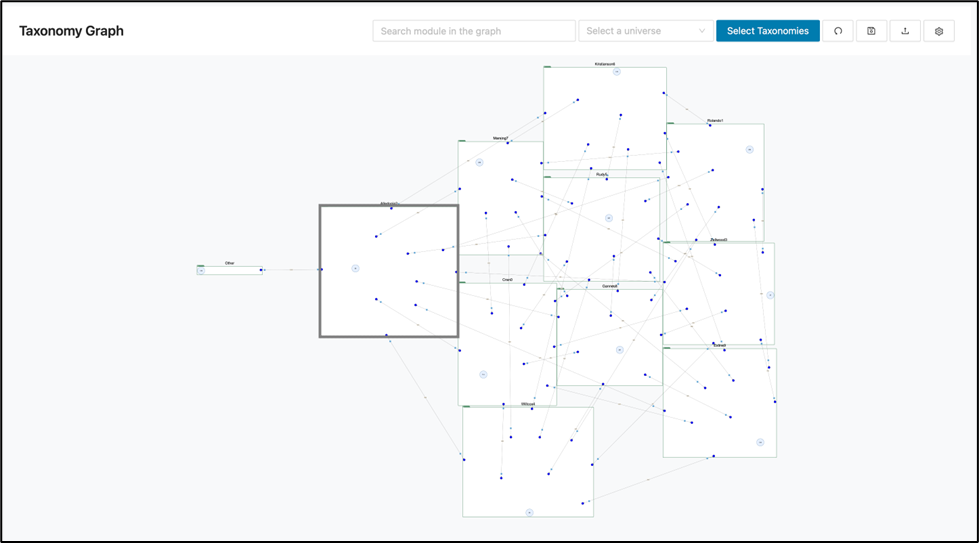
The operator can also enlarge a display with up and down dragging of your mouse.
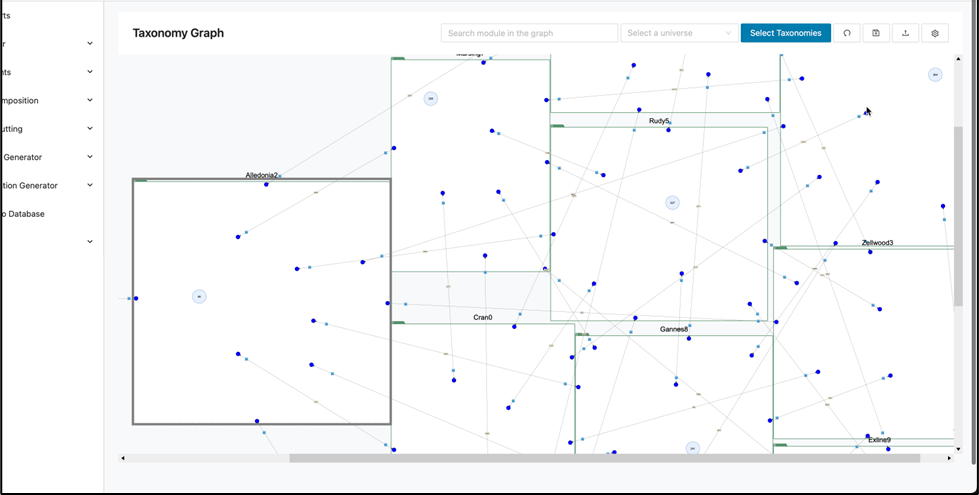
Left and right dragging of the mouse manipulates horizontal viewing.
Clicking out of the taxonomy graph menu to another menu and back will reset your view.
Show intersected taxonomies: When you hover over a taxonomy to view its properties, the interface will indicate whether it intersects with other taxonomies (intersection: true/false) as highlighted below.
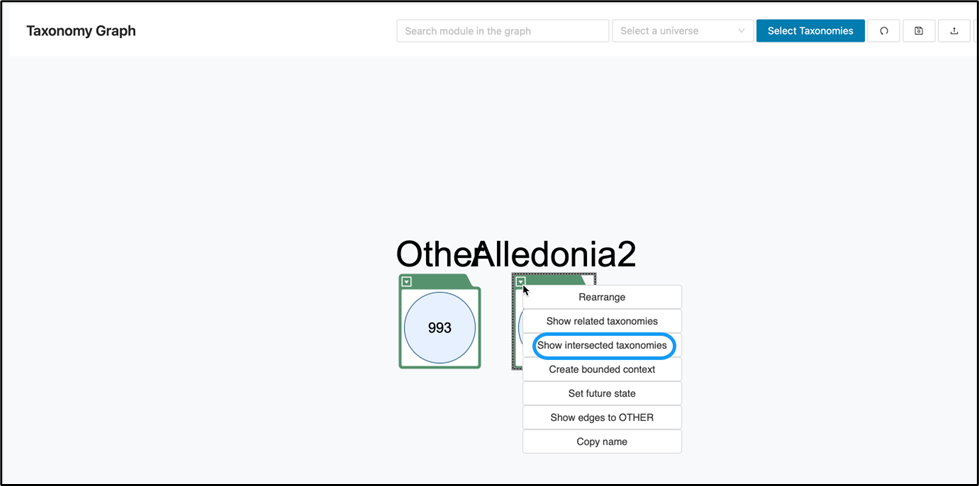
If intersection is false, selecting this option will display a banner stating, “The selected taxonomy does not have intersections with other taxonomies.”

If intersection is true, this means the selected taxonomy shares modules within it with another taxonomy. Displaying this intersection provides a clearer view of relationships within your system and may help identify opportunities to consolidate or harmonize related taxonomies.
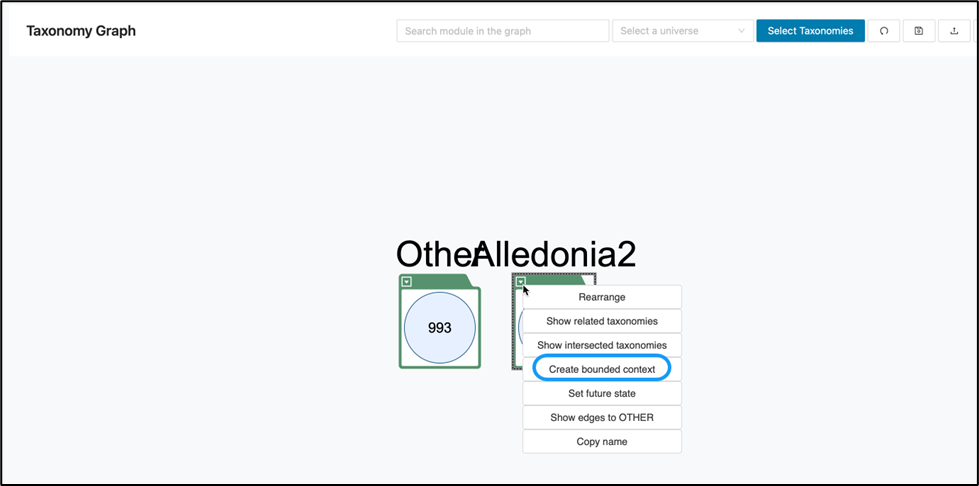
Create bounded context: Creates a new bounded context directly from the selected taxonomy node.
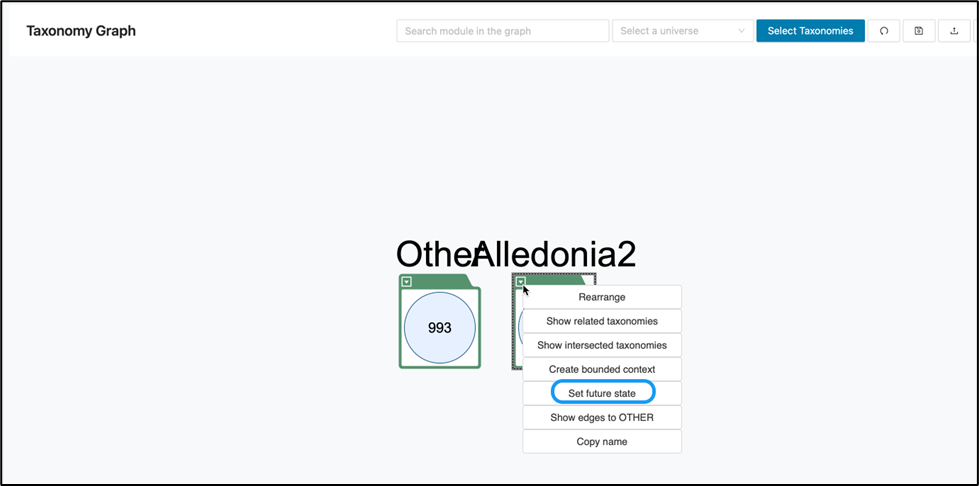
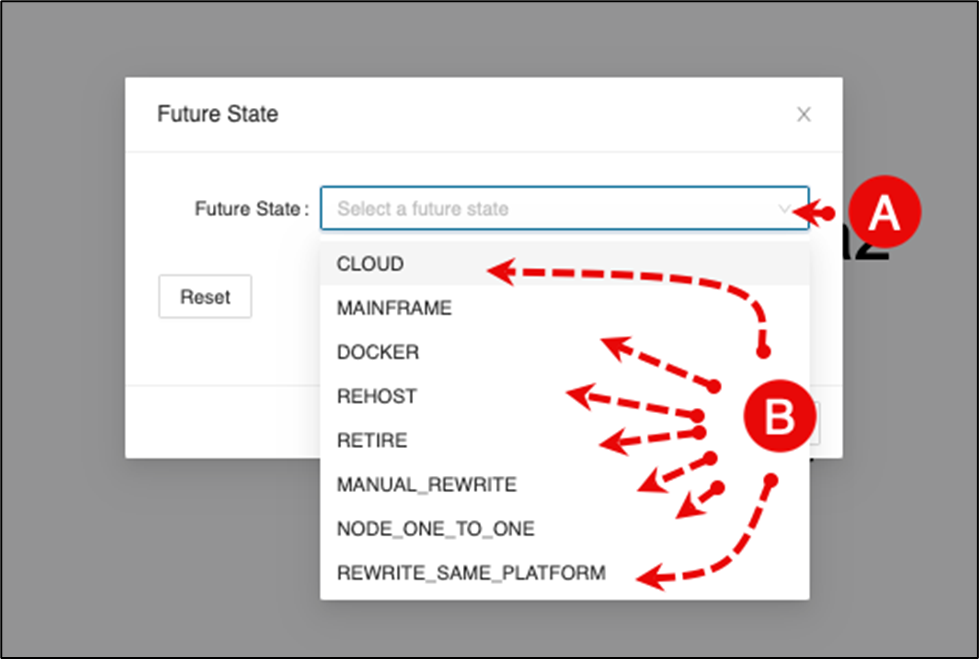
Set future state: Marks a taxonomy node with a future-state designation for planning and tracking architectural changes or migration paths.
-
Click the drop-down arrow to select a future state.
-
Select a future state from the list.
Copy name: This option copies the name of the selected taxonomy node to the clipboard, making it easy to reference or use the taxonomy name in other contexts or documentation.
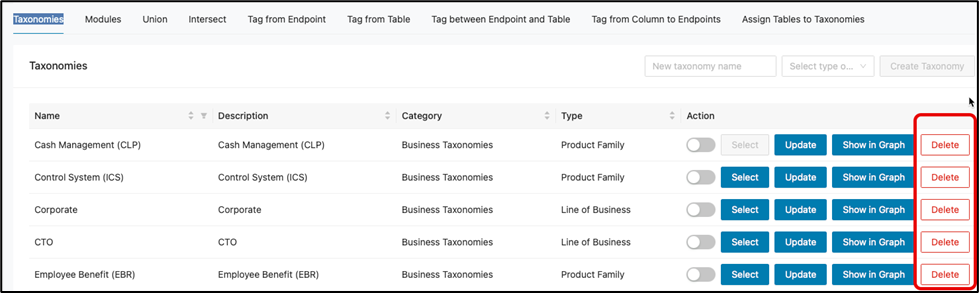
Deleting a taxonomy
Deleting a Taxonomy will remove it from the Project. Click Delete within the Action column of a taxonomy. This action will remove an entire taxonomy and its associated modules from your project if it’s no longer needed so be mindful before doing this.
Modules tab
Modules are configurable components containing logic, rules, or data transformations that you can apply to taxonomies within the Decompose suite. The Modules tab lets you manage these building blocks to create flexible, reusable processing routines.
The most recently selected taxonomy in the Taxonomies tab automatically becomes the default selection in the Modules tab, together with all modules currently associated with that taxonomy. Within this workspace, you can:
-
Edit Taxonomies by Managing Modules: Add new modules or remove existing ones to customize how your taxonomy processes data.
-
Omit Modules from the Taxonomy Graph: Temporarily exclude specific modules from being represented in the taxonomy visualization for a cleaner or targeted view.
-
Render the Edited Taxonomy Graph: Instantly display changes and see how edits affect the structure directly within the Taxonomy Graph.
-
Delete a Taxonomy from the Project: Remove an entire taxonomy and its associated modules from your project if it’s no longer needed.
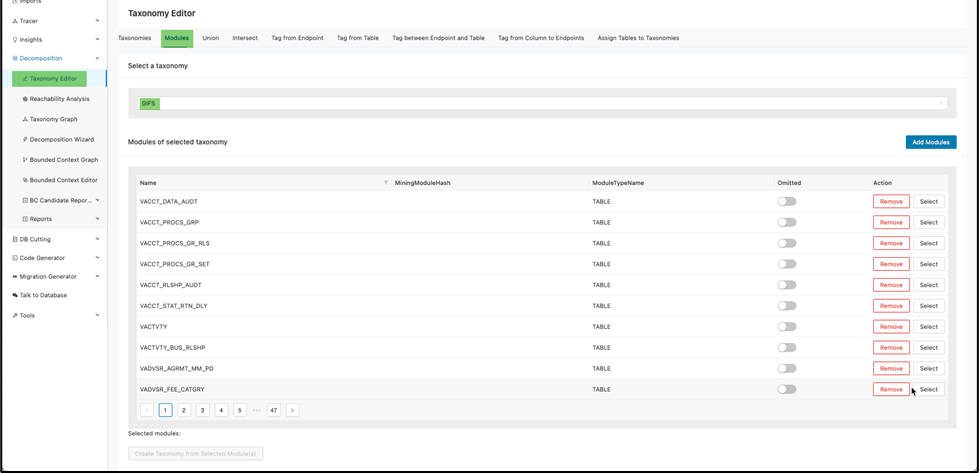
How to add modules to a taxonomy
To add a module within a taxonomy, start by ensuring the correct taxonomy is selected. You can do this in two ways:
a. Click the drop-down arrow in the “Select a taxonomy” search field under the Modules tab to choose from available taxonomies.
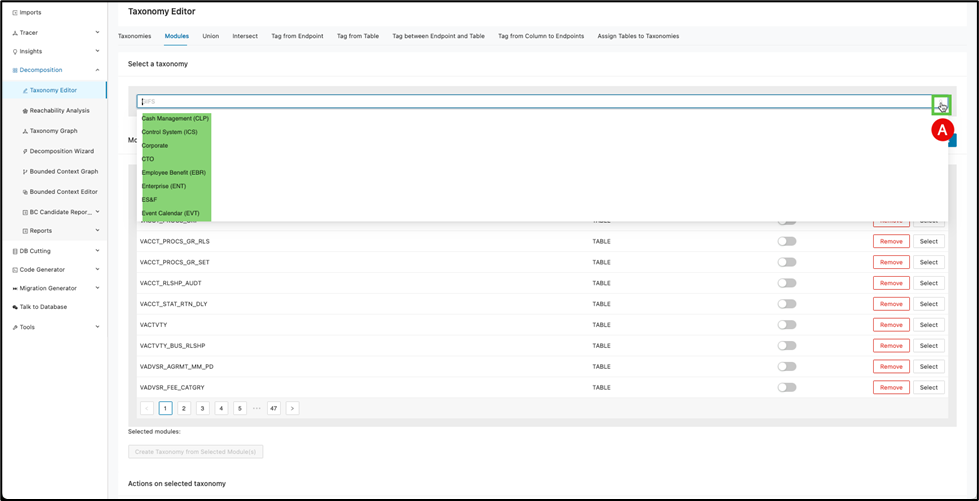
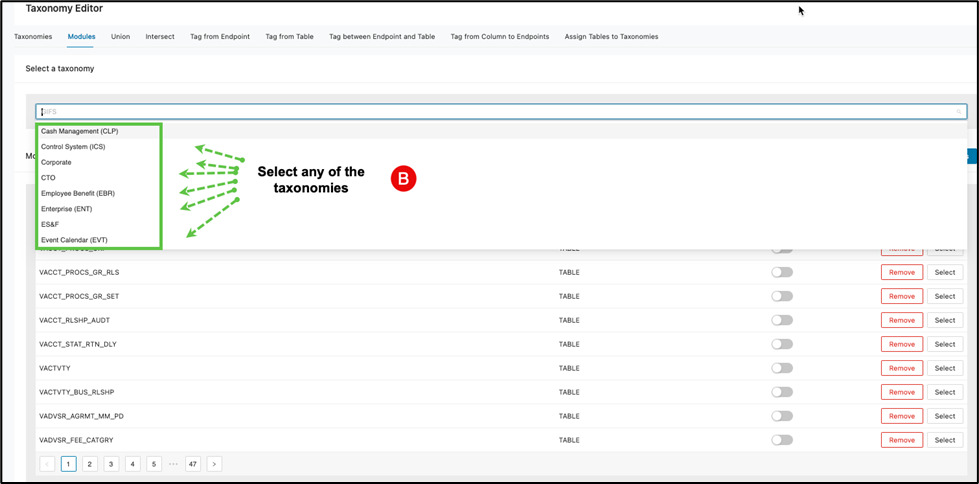
b. Select your desired taxonomy from the list.
After a brief processing period, the Modules tab will display all modules currently associated with that taxonomy. For example, choosing the “Control System (ICS)” taxonomy may show hundreds of modules, organized 10 per page.
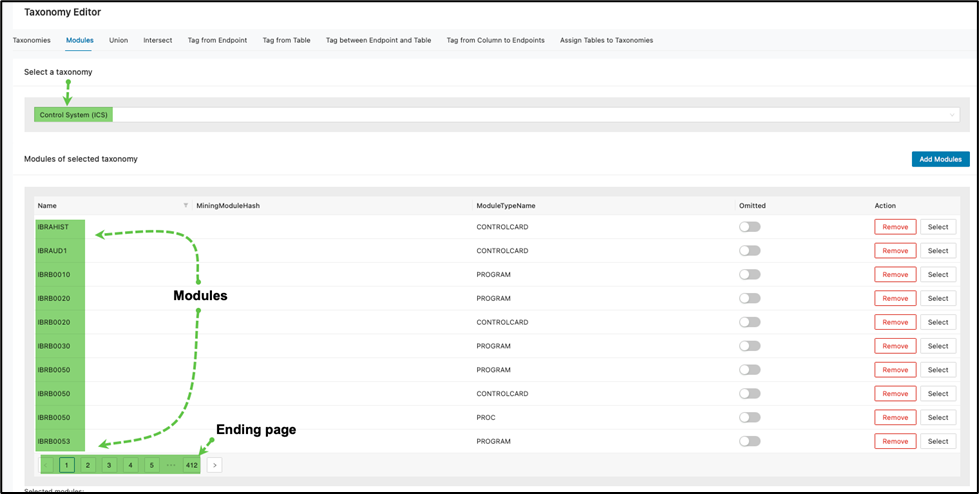
c. To add more modules, click Add Modules .

A pop-up window will appear, listing additional modules available for selection.
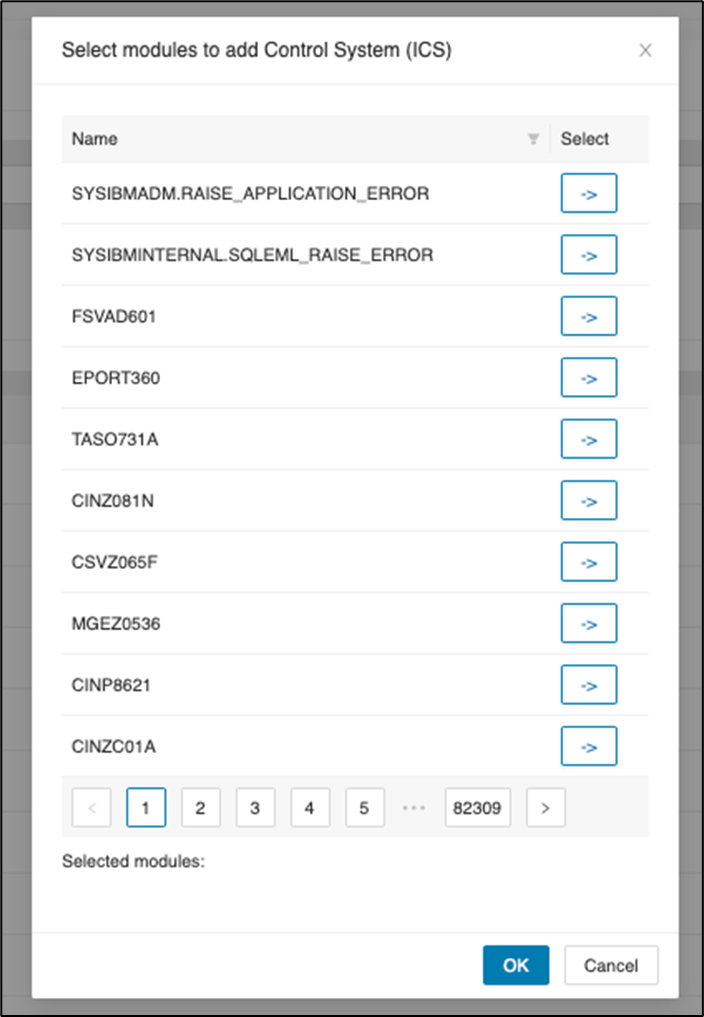
d. Click -> beside any module to select it. Once selected, the module will be grayed out and will appear in the list of selected modules at the bottom of the window.
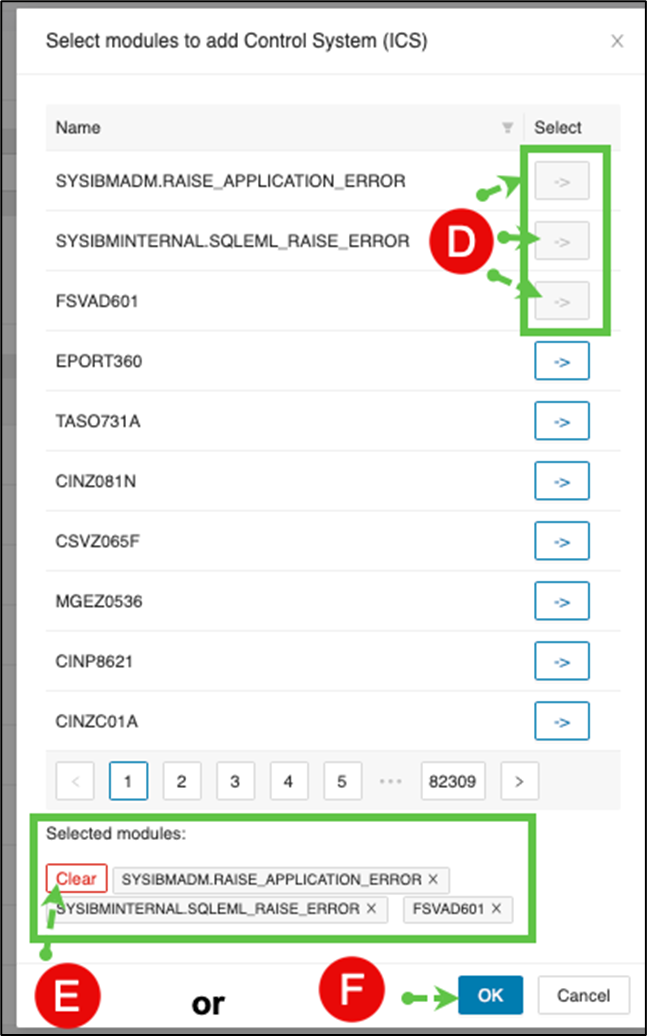
e. If you wish to remove selections, click Clear to remove all chosen modules, or click beside individual modules to remove them from your selection.
Or
f. When satisfied with your selections, click OK to add the selected modules to the taxonomy.
Omitting a Module from a Taxonomy
To omit (temporarily exclude) a module from a taxonomy:
-
Follow steps a and b above to select your taxonomy and display its associated modules.
-
Locate the module you wish to exclude, then toggle the “Omitted” slider next to that module.
This action will remove the module from being displayed in the taxonomy graph, allowing you to control which modules appear in visual representations without permanently deleting them.
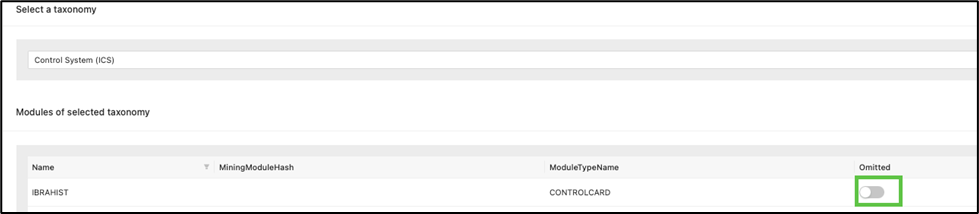
The selected module when then switch to blue symbolizing on.

Removing a Module from a Taxonomy
If a module isn’t needed, you can simply remove it by clicking Remove corresponding to the module.
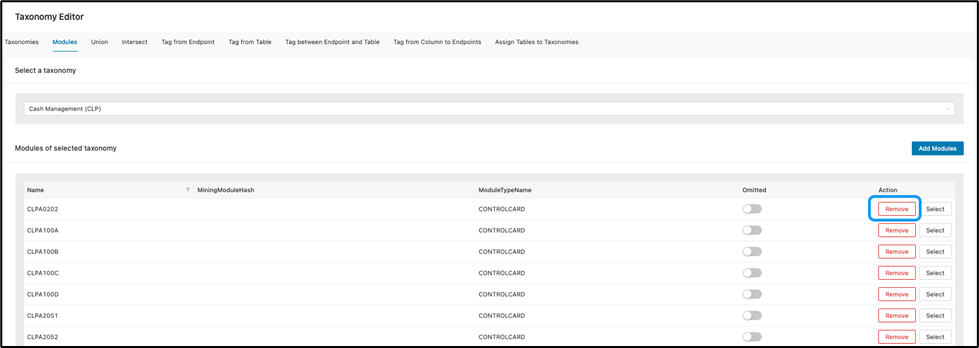
However, the same can be added back by clicking Add Module and search for the deleted item. For instance, CLPA0202 was removed but you decided to add it back.
- Click Add Modules .

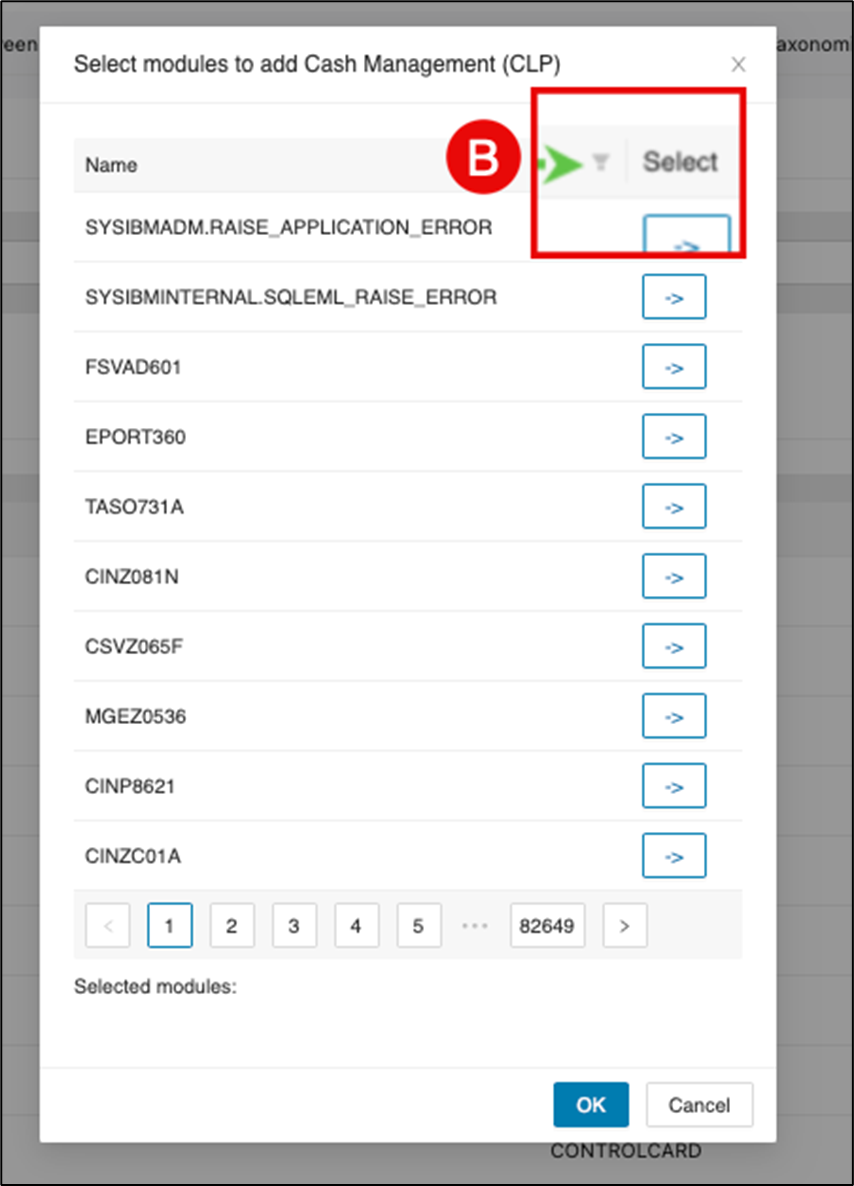
The select modules to add to the taxonomy window will display listing modules.
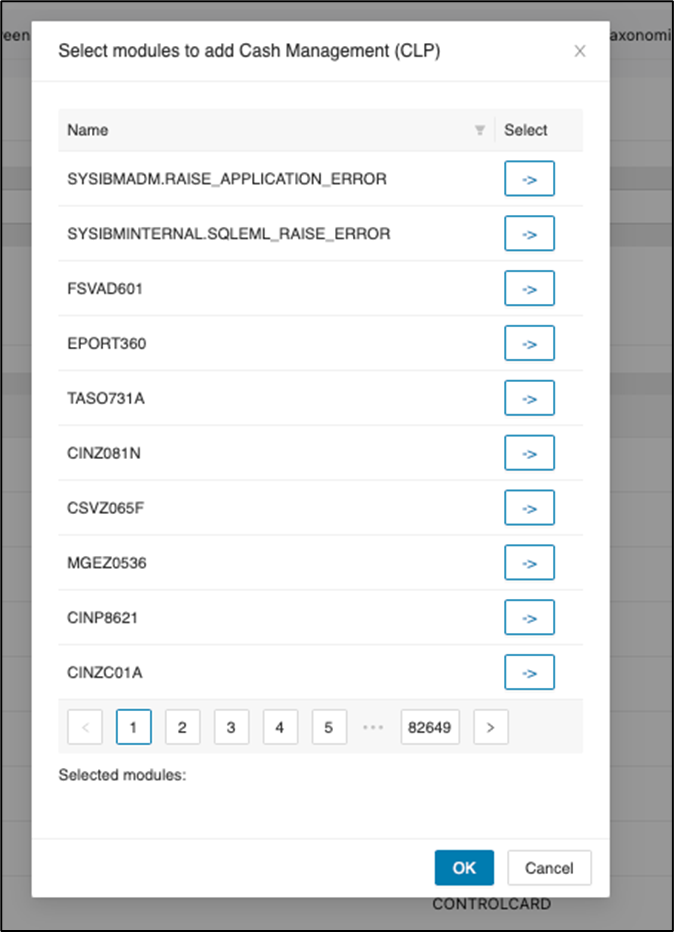
b. Click on the filter icon to limit the search to the deleted module.
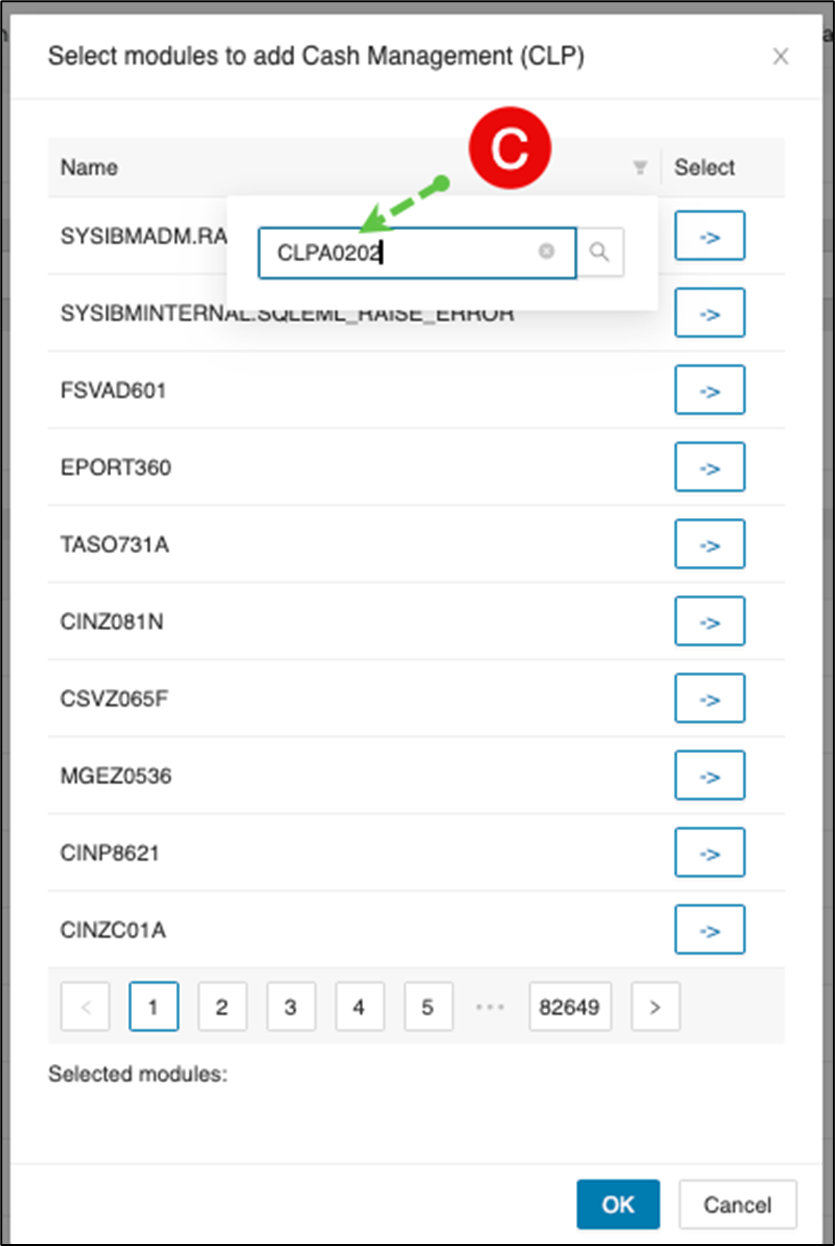
c. Enter the deleted module name in the filter window to search and then click the search icon.
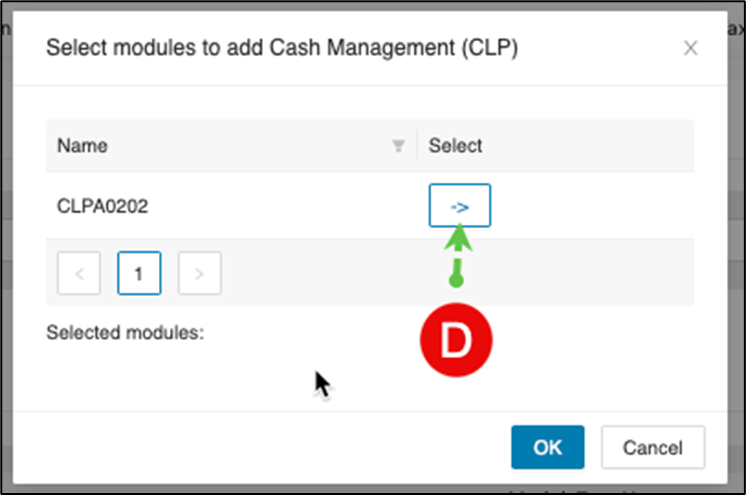
d. The deleted module should then display as below. Click -> to add the module back to the taxonomy.
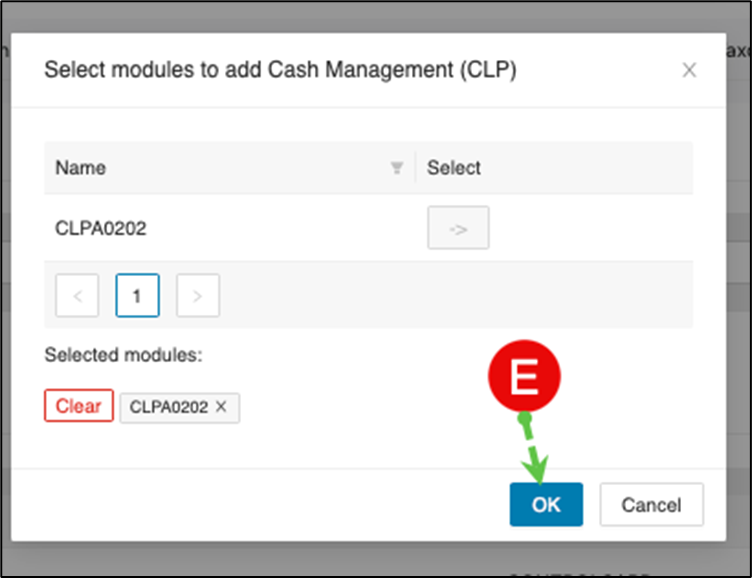
e. After you click ->, the module name appears under the selected modules section. You can clear that module or add more modules before you finish. When you are satisfied, click OK.
Actions on selected Taxonomy
The Modules tab provides a section at the bottom of the page to delete the selected taxonomy or render it.
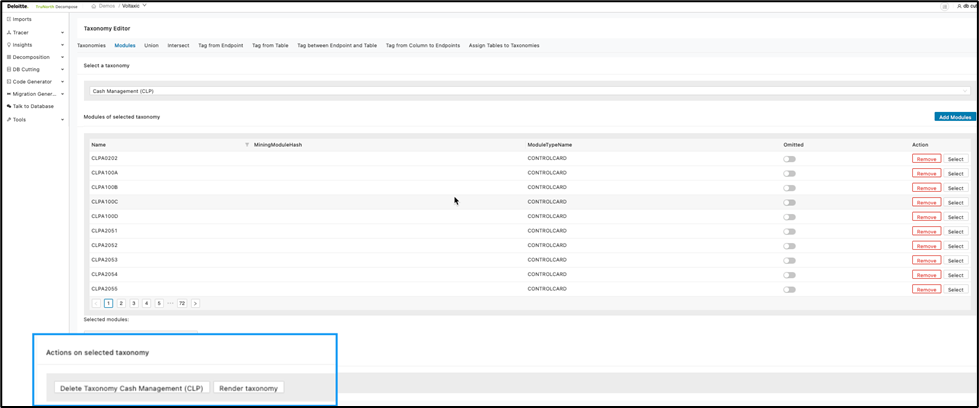
Again, deletion of a taxonomy is irreversible so be mindful before performing this action.
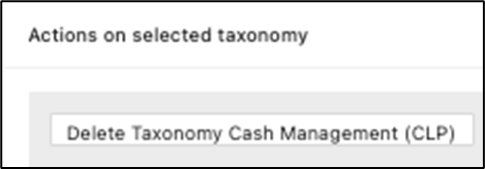
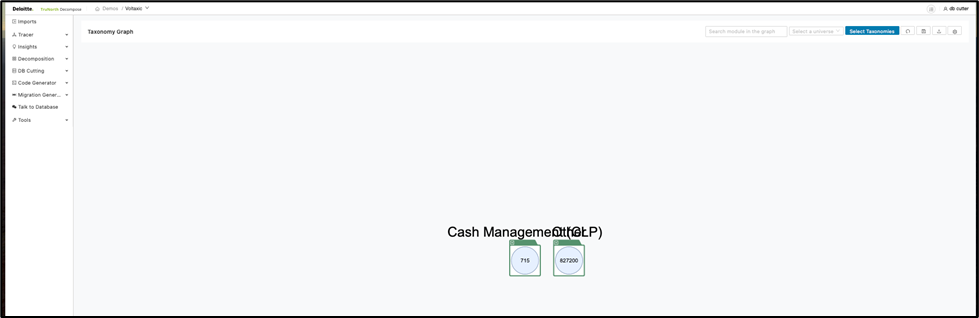
Rendering a taxonomy opens the Taxonomy Graph page and shows the selected taxonomy.
As below:
This completes the Modules tab section.
Union tab
The “Union” function, as the name suggests, is used to generate a taxonomy that is a combination of all existing taxonomies. Essentially, it sums up all the modules present across these taxonomies. The relationship between the modules inside the taxonomy will be copied to the union taxonomy.
When selecting the Union tab within the Taxonomy Editor, all taxonomies will display on given pages.
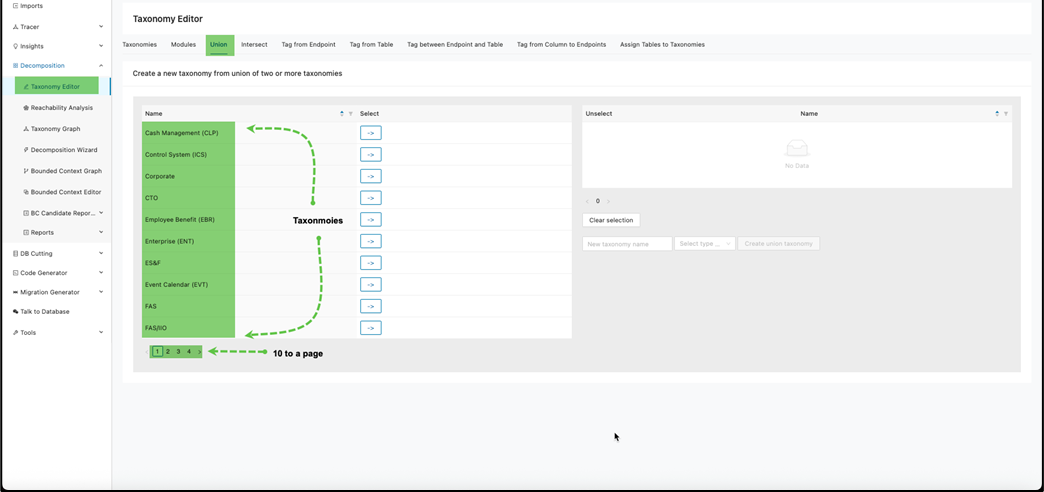
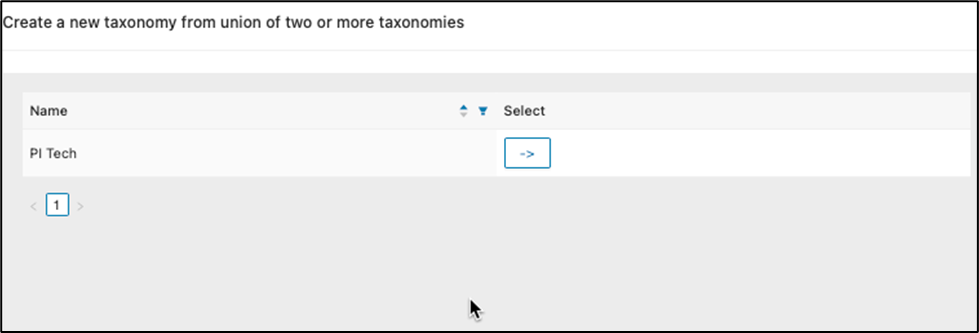
To combine taxonomies that have similar modules you could search for taxonomies to select or click -> corresponding to a taxonomy name.
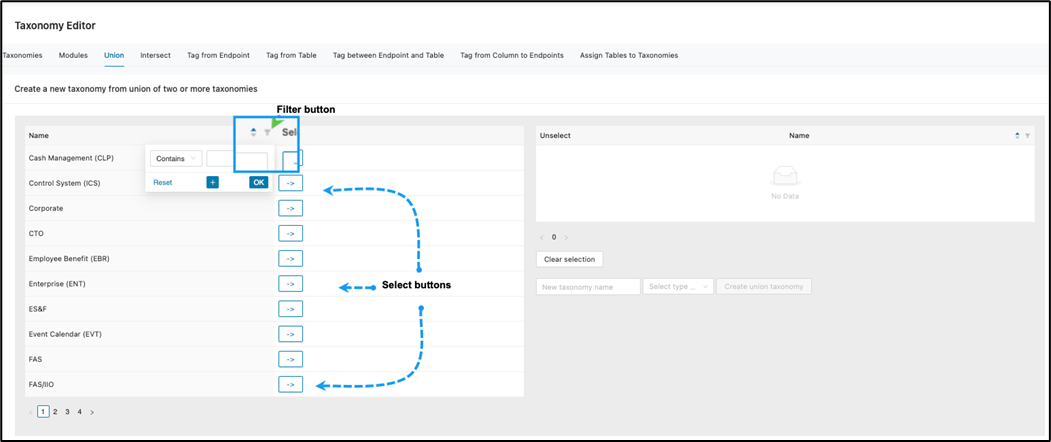
Search for taxonomy using filtering
a. Click on the filter icon.
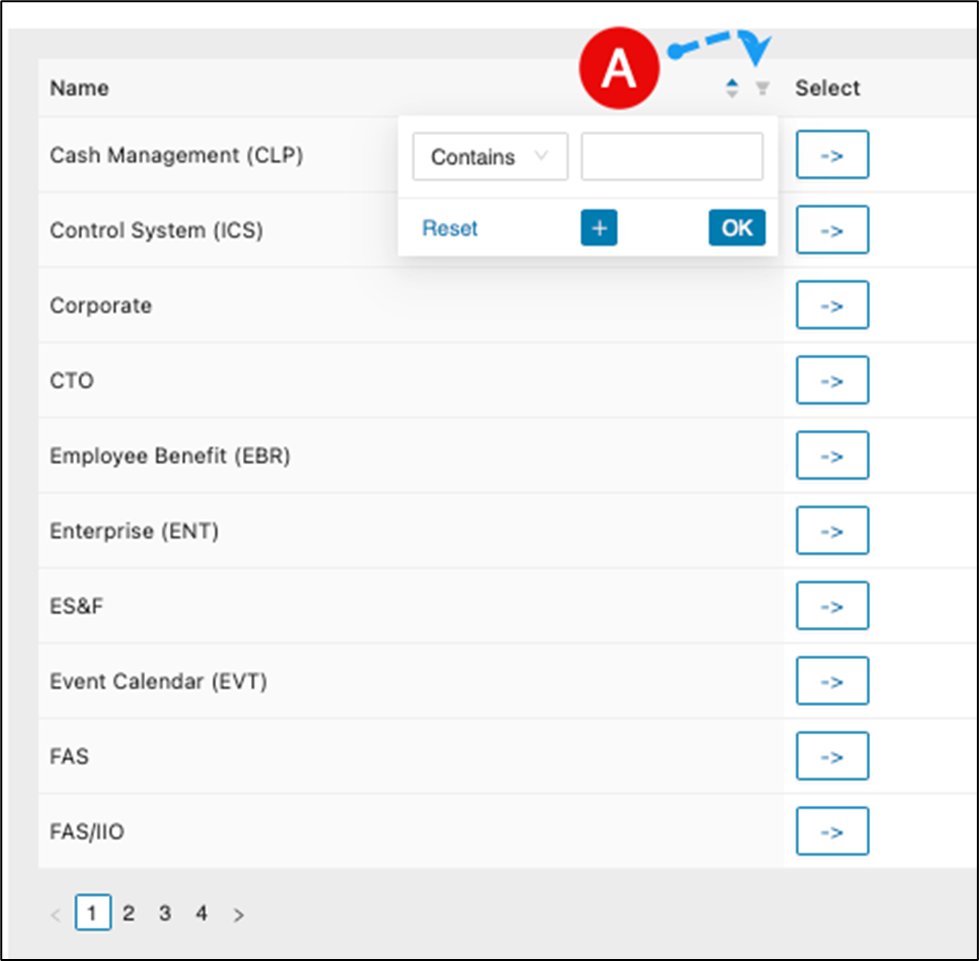
b. Select the preferred “how to filter” mechanism by clicking the drop-down arrow and select an option.
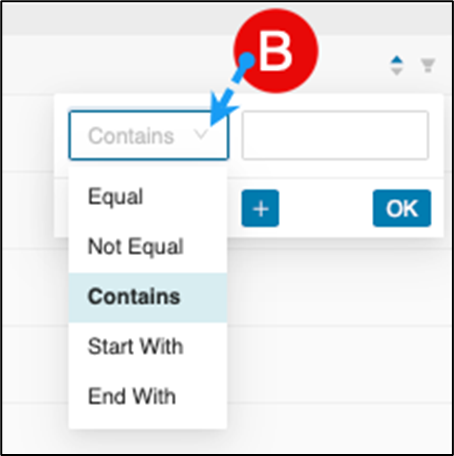
c. Enter the taxonomy name you are searching.
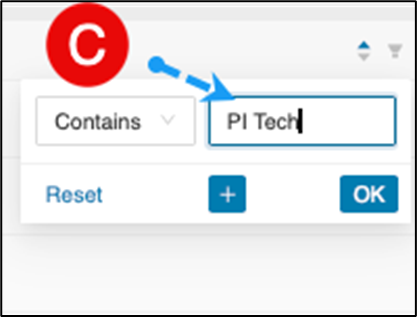
d. Optionally, click the if additional conditions is needed for a refined search of a taxonomy.
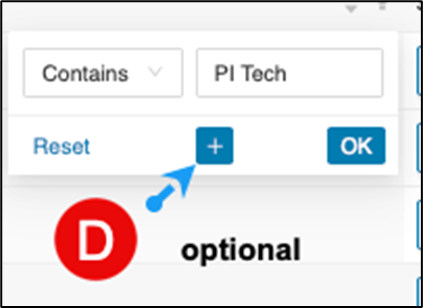
If selected, an additional search field will display as below. If selected, an additional search field will display as below.
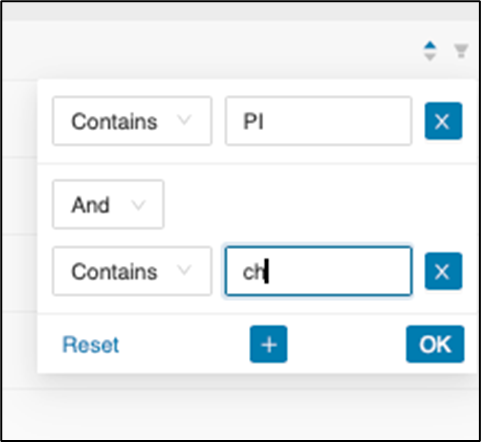
You can add as many conditions as needed.
e. Once satisfied, click on OK .
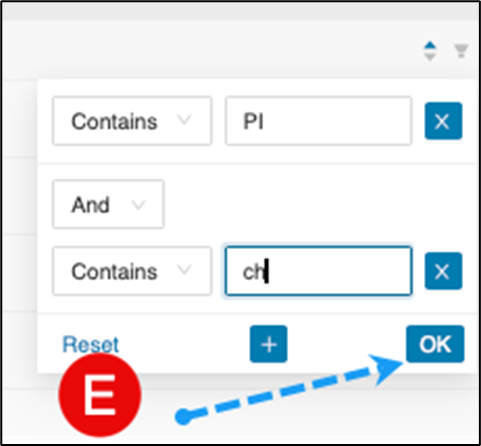
The search will then display the result.
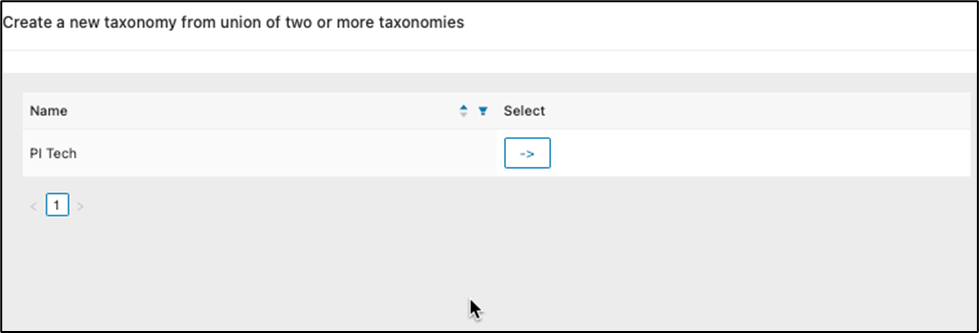
Combining taxonomies to add a union
a. Select the taxonomies from the list of available taxonomies by clicking -> . -> will gray out once a taxonomy has been selected.
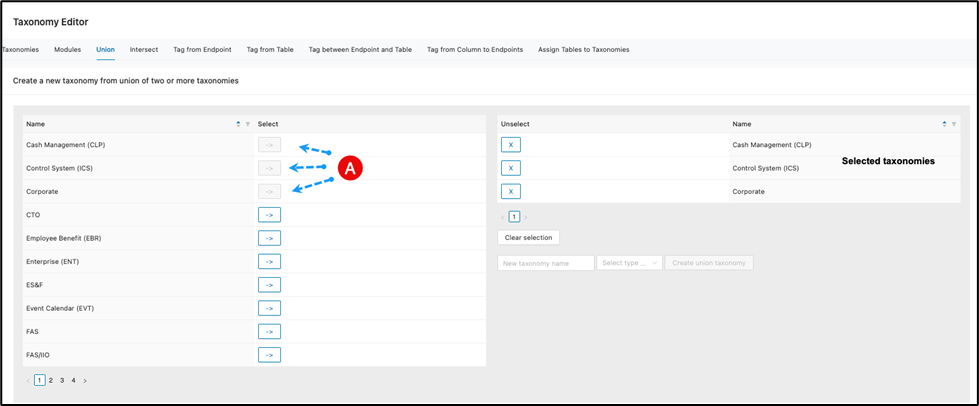
To deselect a taxonomy from the union, click Clear selection or click beside the taxonomy. To clear every taxonomy on the right-hand side, click Clear Selection.
If you are okay with your selections, move to the next step.
b. Enter a new taxonomy name, select the type from the dropdown and then click Create union taxonomy .
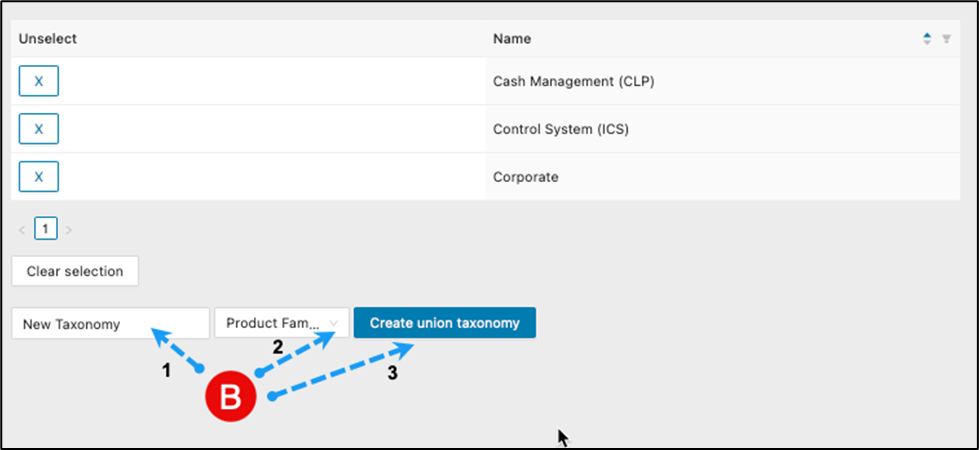
The tool will process and then create a new taxonomy.
c. Search for the new taxonomy to verify the creation.
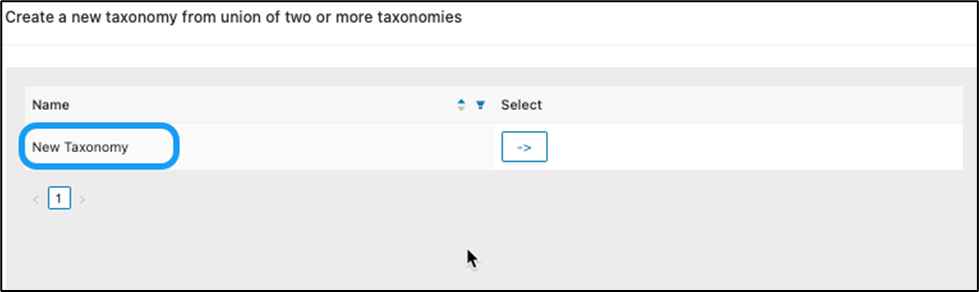
This completes the Union Tab section.
Intersect tab
In this tab, you identify and extract overlapping elements between two or more taxonomies. This is valuable for focus work—such as finding commonalities, redundancies, or shared features—in your data sets or classification schemes.
When selecting the “Intersect” tab within the Taxonomy Editor, all taxonomies will display on given pages.
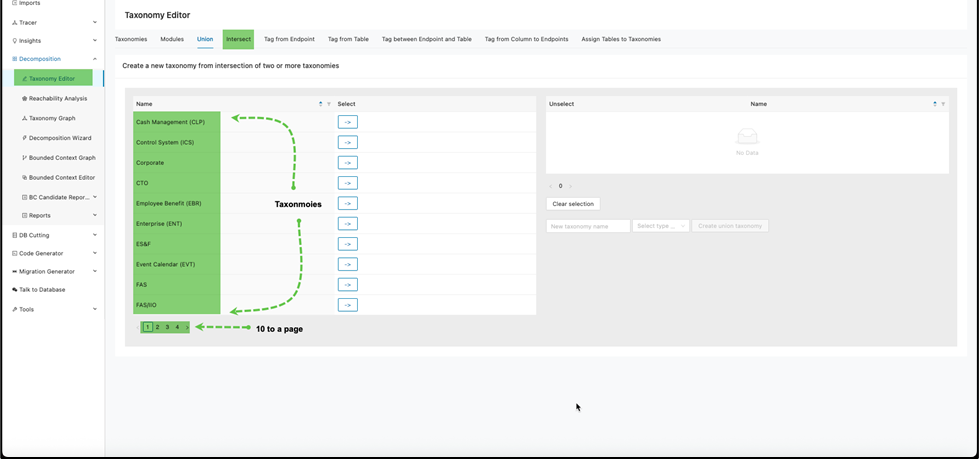
To combine taxonomies that have similar modules you could search for taxonomies to select or click on -> corresponding to a taxonomy name.
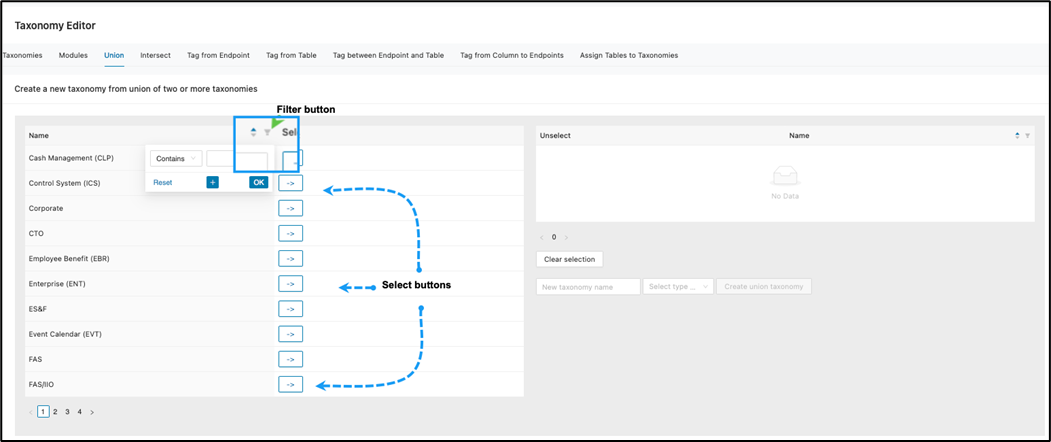
Search for taxonomy using filtering
a. Click on the filter icon.
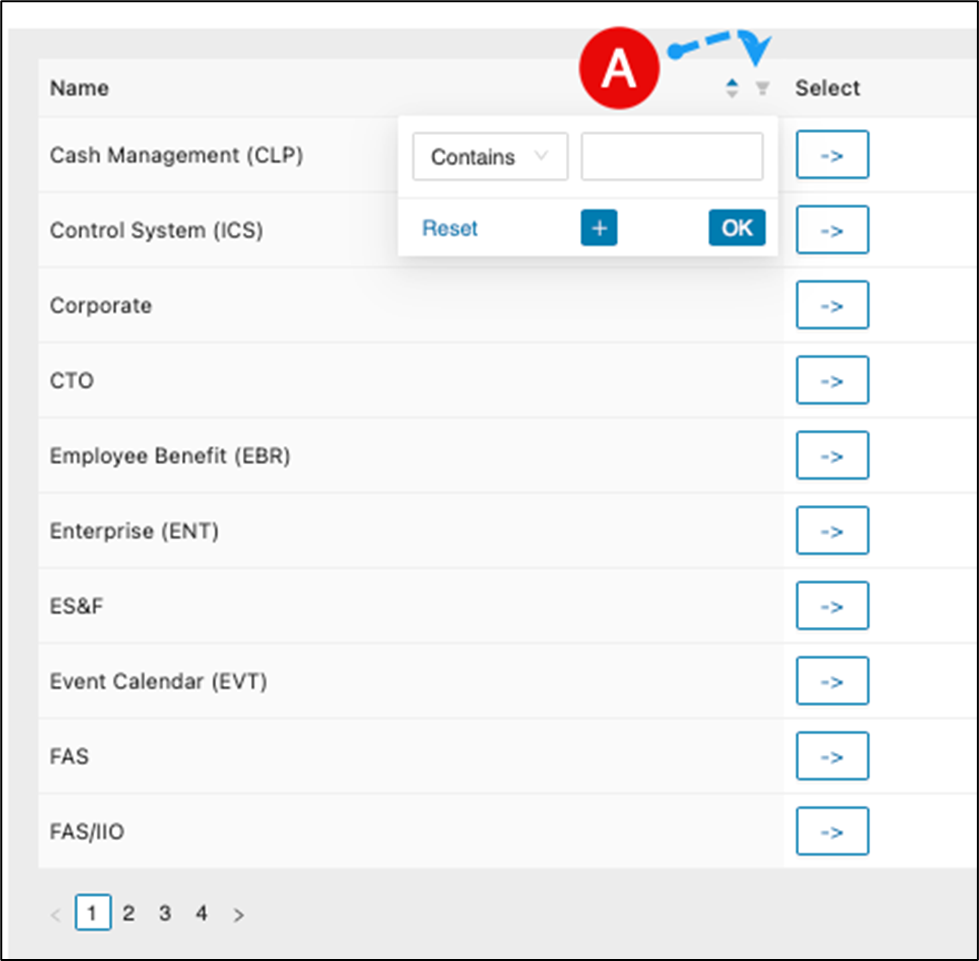
b. Select the preferred “how to filter” mechanism by clicking the drop-down arrow and select an option.
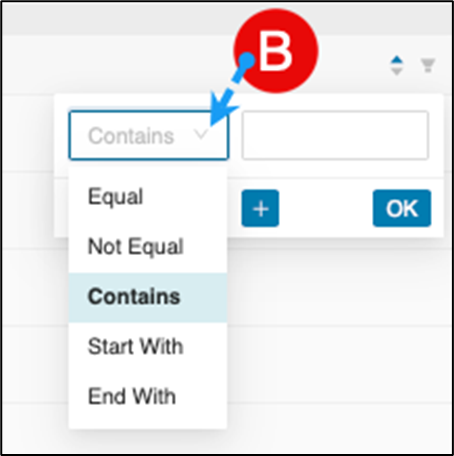
c. Enter the taxonomy name you are searching.
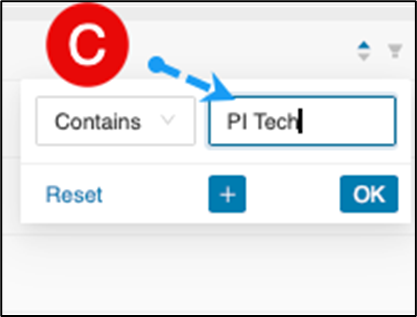
d. Optional, click the if additional conditions is needed for a refined search of a taxonomy.
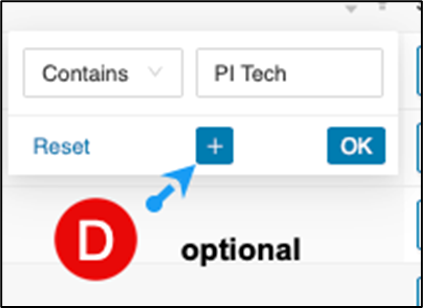
If selected, an additional search field will display as below.
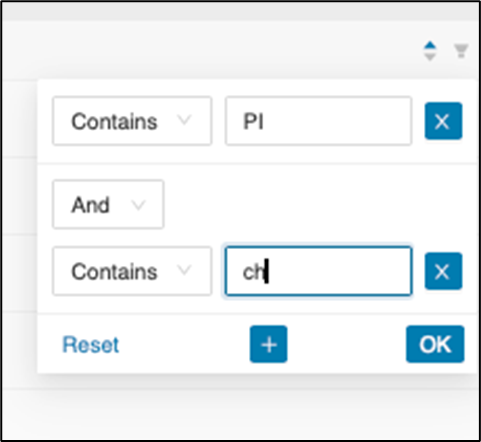
You can add as many conditions as needed.
e. Once satisfied, click on OK .
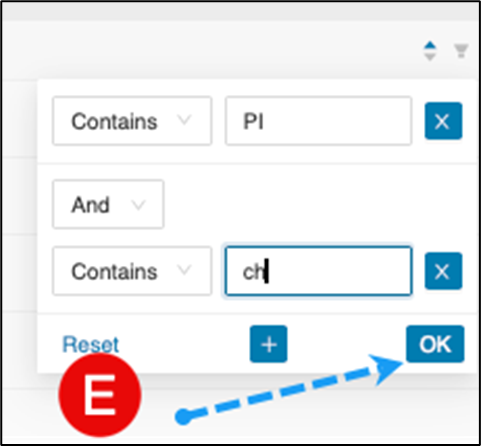
The search will then display the result.
Tag from endpoint tab
Use this feature to create or edit a taxonomy by building a module chain that starts at an endpoint module and follows the endpoint connections until no more connections are possible. This feature determines the module where the chain starts.
When selecting the “Tag from Table” tab, one needs to understand what is being displayed.
-
Incoming relations (the number of incoming relations to other modules)
-
Outgoing relations (the number of outgoing relations to other modules)
-
Read Queries (the number of read queries to databases)
-
Write Queries (the number of write queries to databases)
-
Total number of pages which capsulates the total number of modules as 10 modules displays per page.
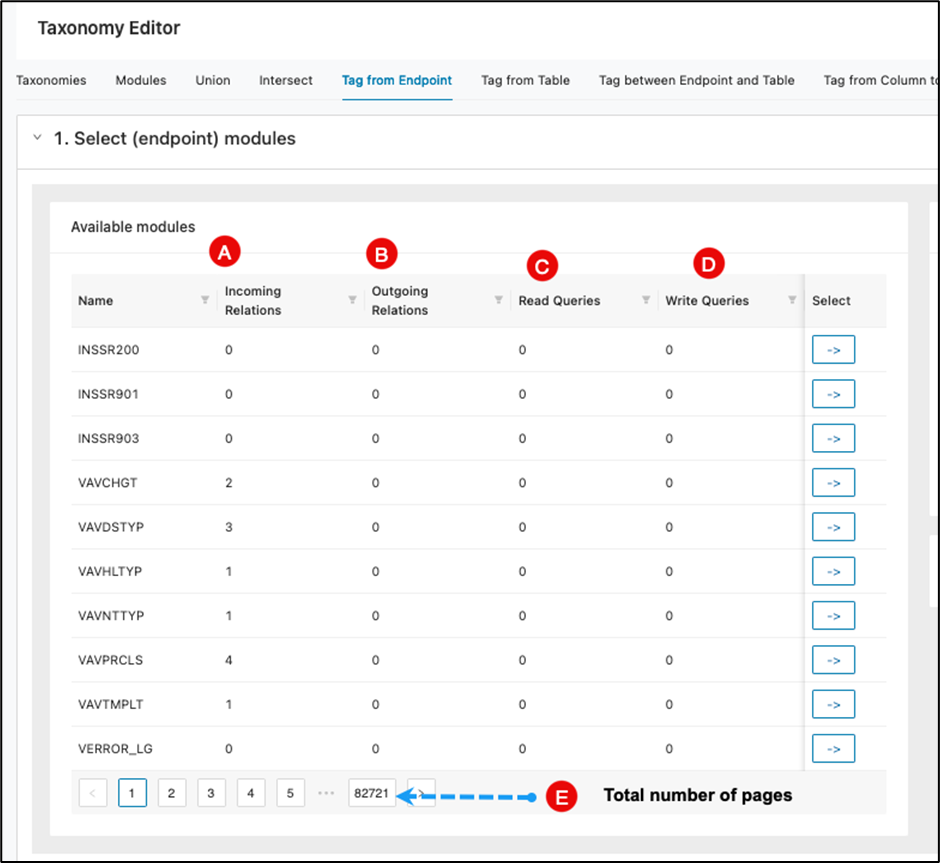
One needs to have a strategy on where to begin when dealing with an extremely high number of modules. You can start small or large so in the following scenario, we will start small to give an idea on how to use “tag from endpoint”.
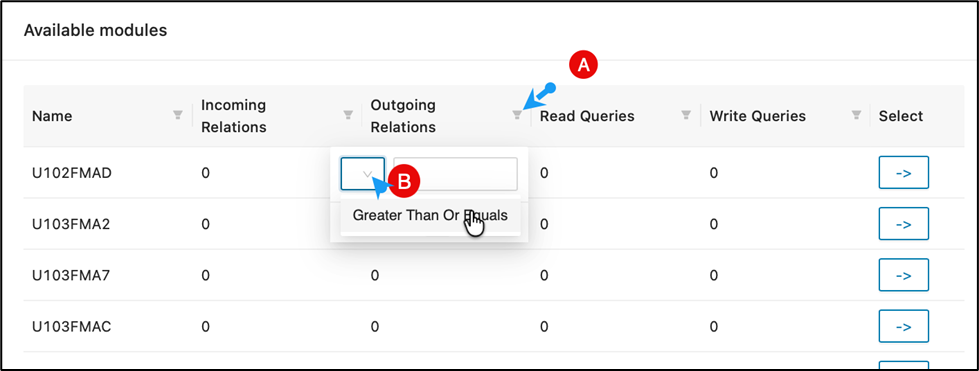
Each column header has filtering which has currently has an option to display “greater than or equals to” to be set for incoming\outgoing relations and read\write queries.
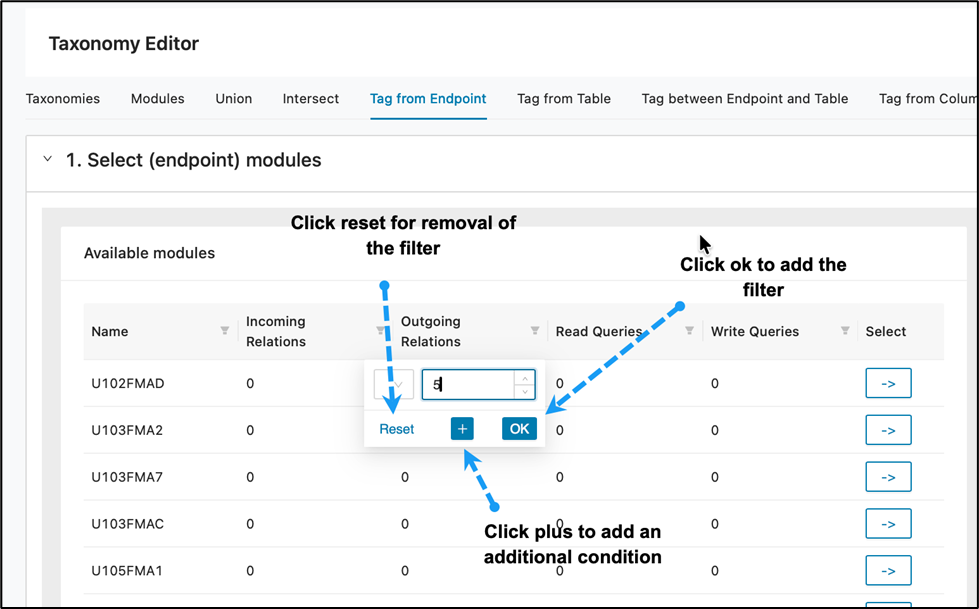
Adjust the filtering for outgoing relations to 5. You can remove the filter by clicking on "Reset" or adding additional conditions by clicking the plus symbol. Once everything looks okay with your filter click OK .
Upon clicking OK , your results should display as below:
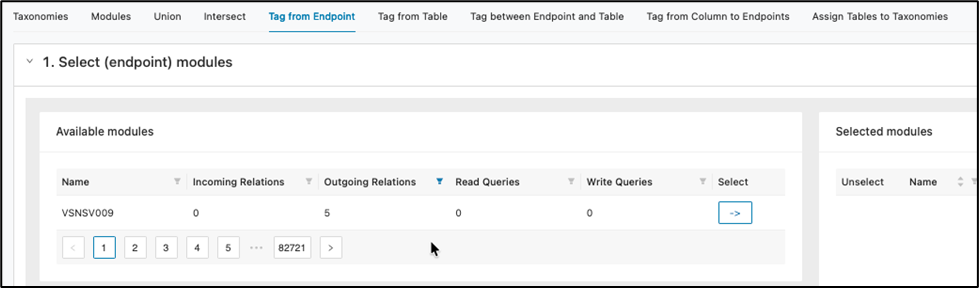
Next, click on -> .

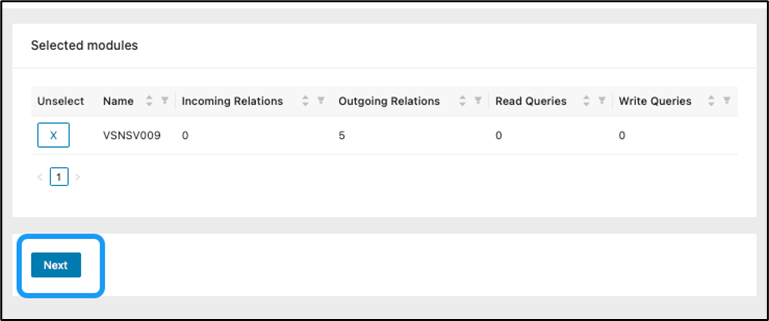
Module VSNSV009 will now appear in the selected modules pane. Click Next to continue.
You will now choose or create a taxonomy. This module is already linked to an existing taxonomy, which you may select, or you can opt to create a new, more specific taxonomy if needed. For demonstration purposes, let’s define a new taxonomy with an easily identifiable name. The name can always be changed later after completing the tagging process.
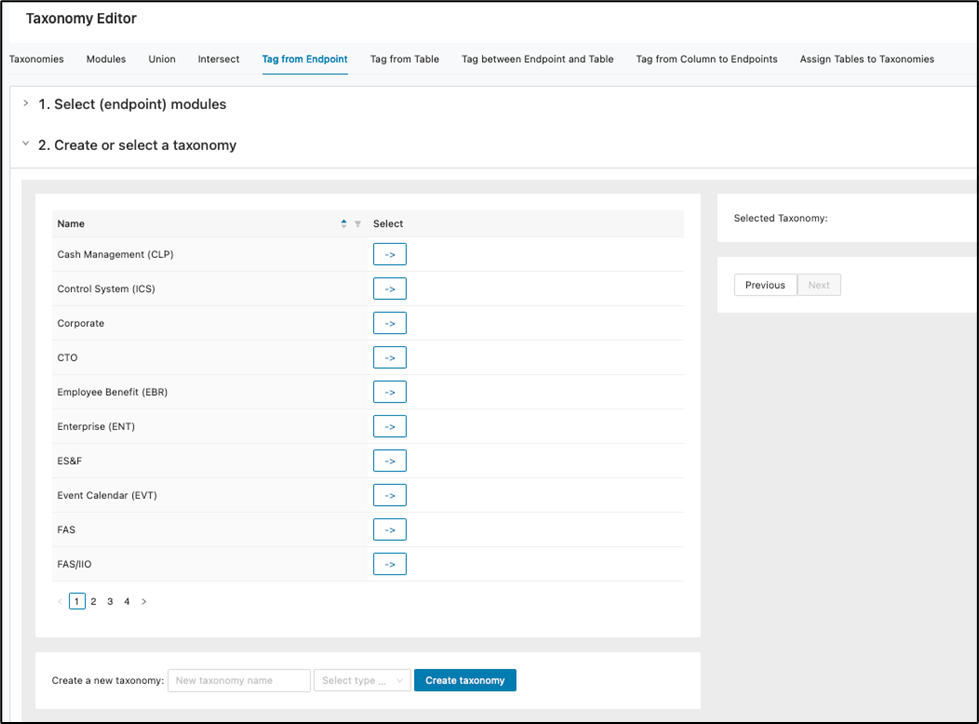
At the bottom of the main windowpane, enter “Tag From Endpoint Taxonomy”, select the “Product Family” type and then click Create taxonomy .

The newly created taxonomy will then show as being selected. Click Next .
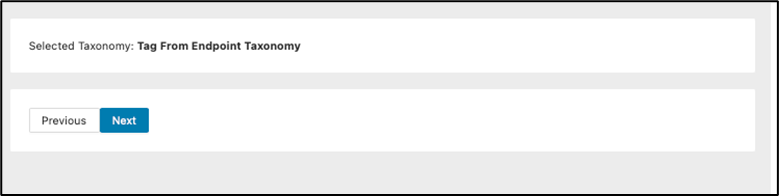
The screen will now display the assigned taxonomy and tag all modules being called by the module you selected. Click Assign taxonomy to begin tagging from VSNSV009 to the last chained module.
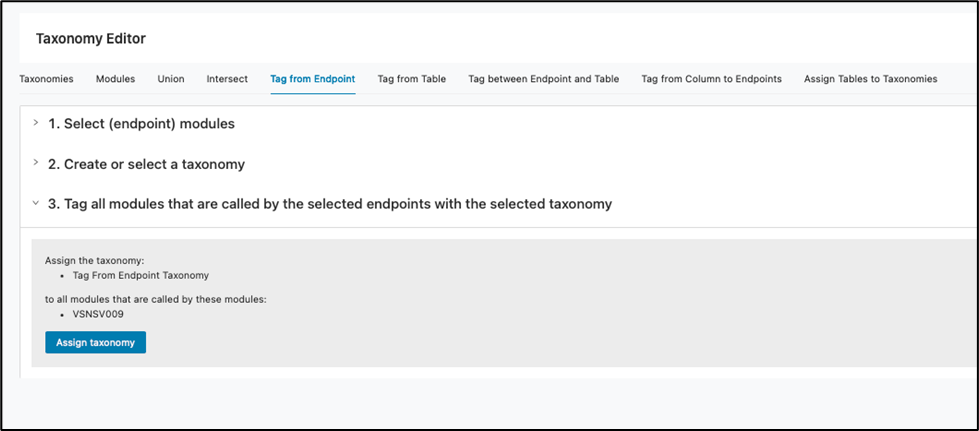
The process will then display a banner message indicating the number of modules tagged.

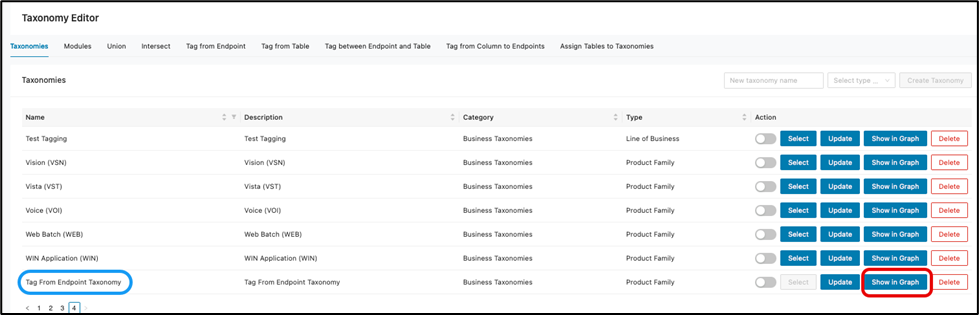
You may then go to the taxonomies tag to select your new taxonomy and then click Show in graph to get a visual display.
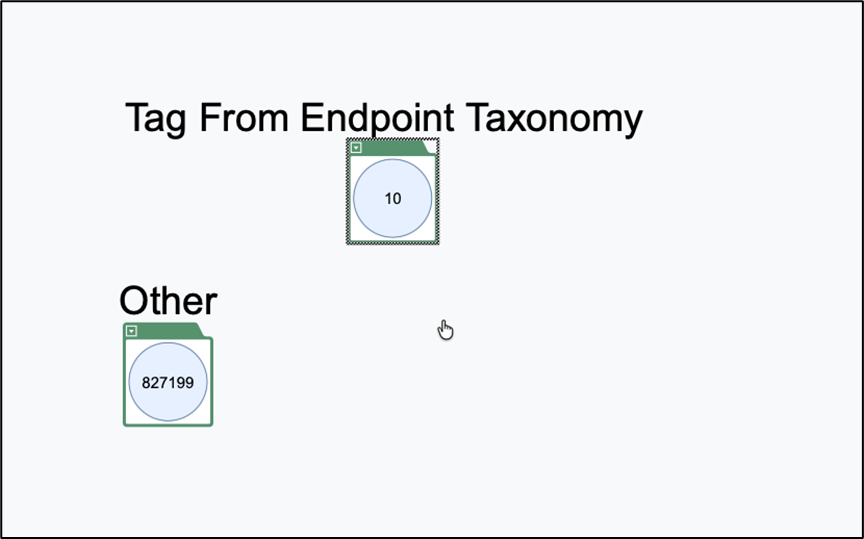
Below, you will see the taxonomy you created displaying 10 modules as specified by the tagging.
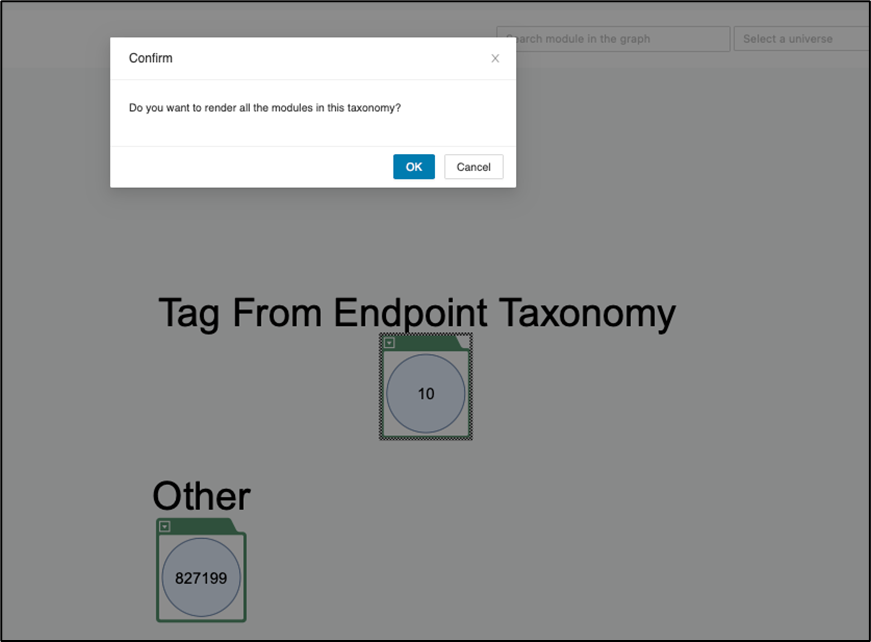
Double-click anywhere on the green bar to render all modules in the taxonomy, then click OK to continue.
Below, you will see the highlighted module with directional arrows pointing to all related modules, whether they are linked in a chain or have direct connections.
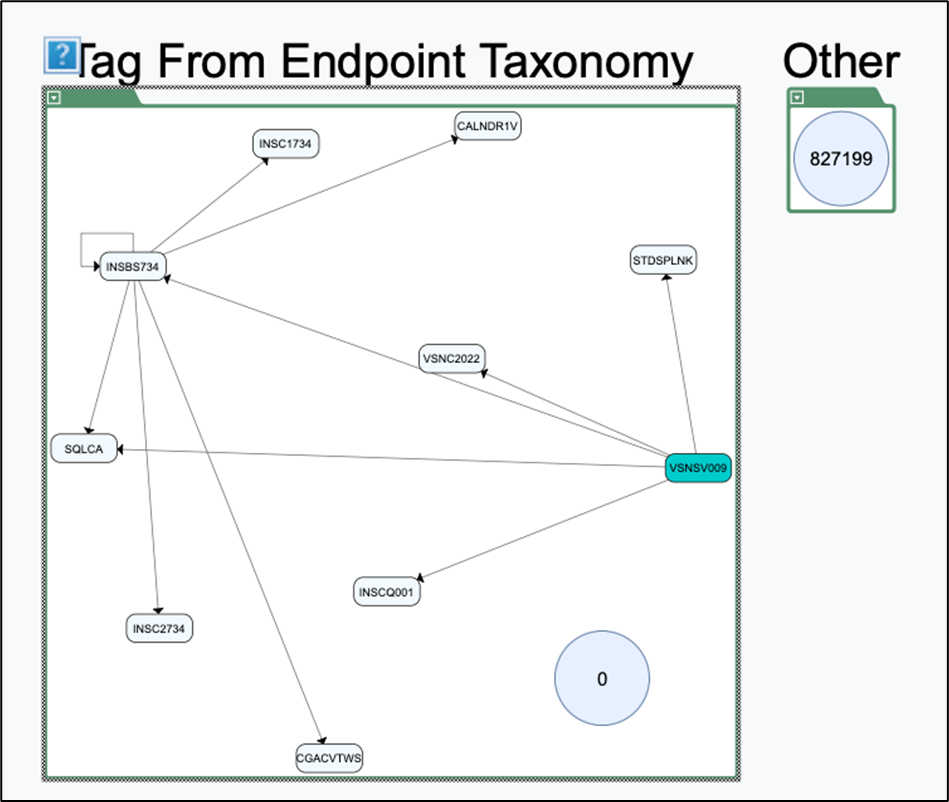
One could even go further to see relations with other taxonomies by showing edges to others.
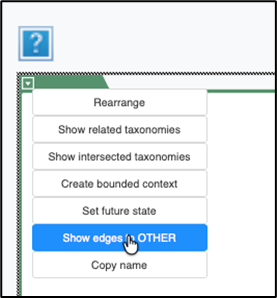
This will then display a bi-directional line to the other taxonomy group.
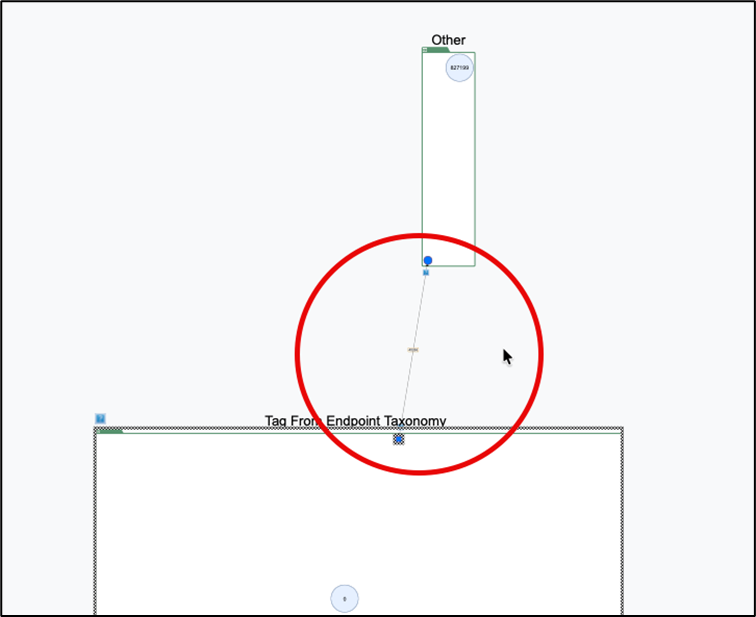
We also see a number on the bi-directional line which indicates the total number of incoming and outgoing connections which tallies to over 47 thousand.
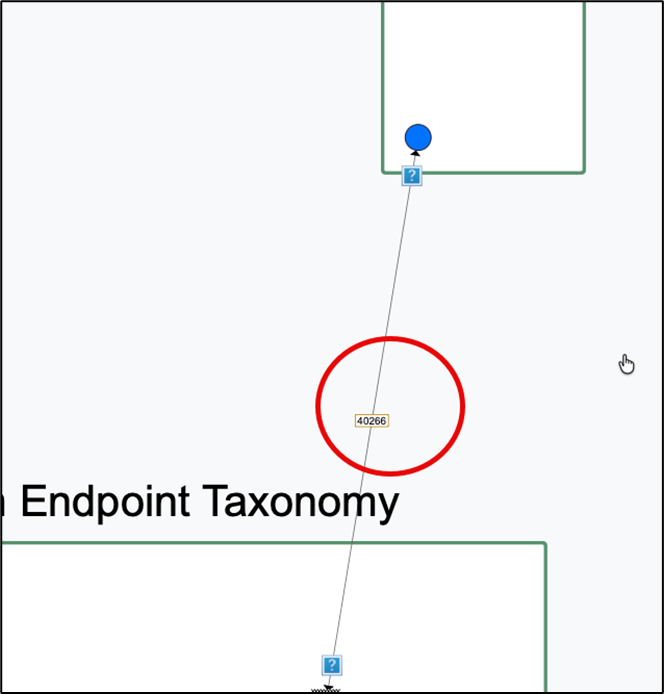
We can explore the connections further by right-clicking on the blue dot within the “Tag from Endpoint Taxonomy”. This will then display two options:
-
Expand outgoing boundary modules
-
Expand incoming boundary modules
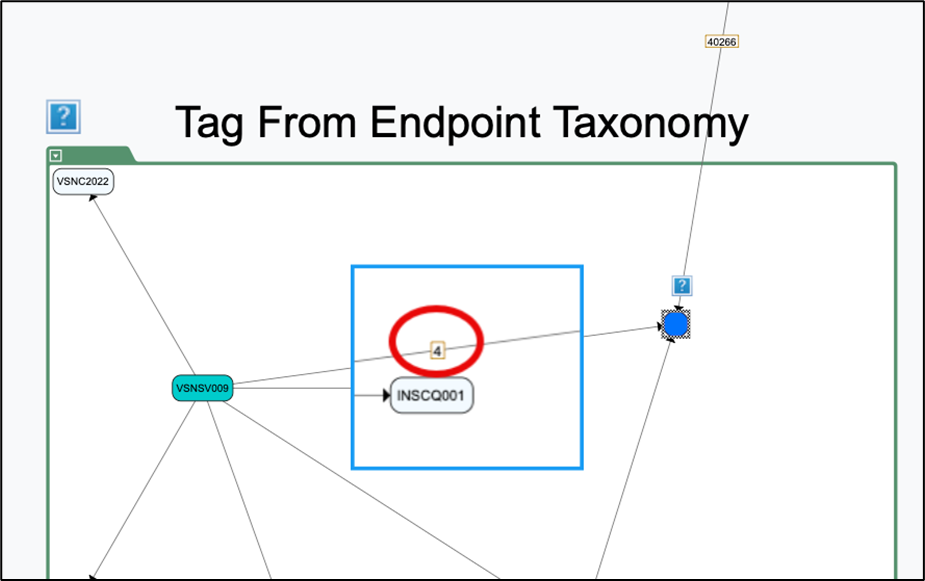
When expanding outgoing boundary modules, we see four connections going out from the original “VSNSV009” module selected when initiating tagging.
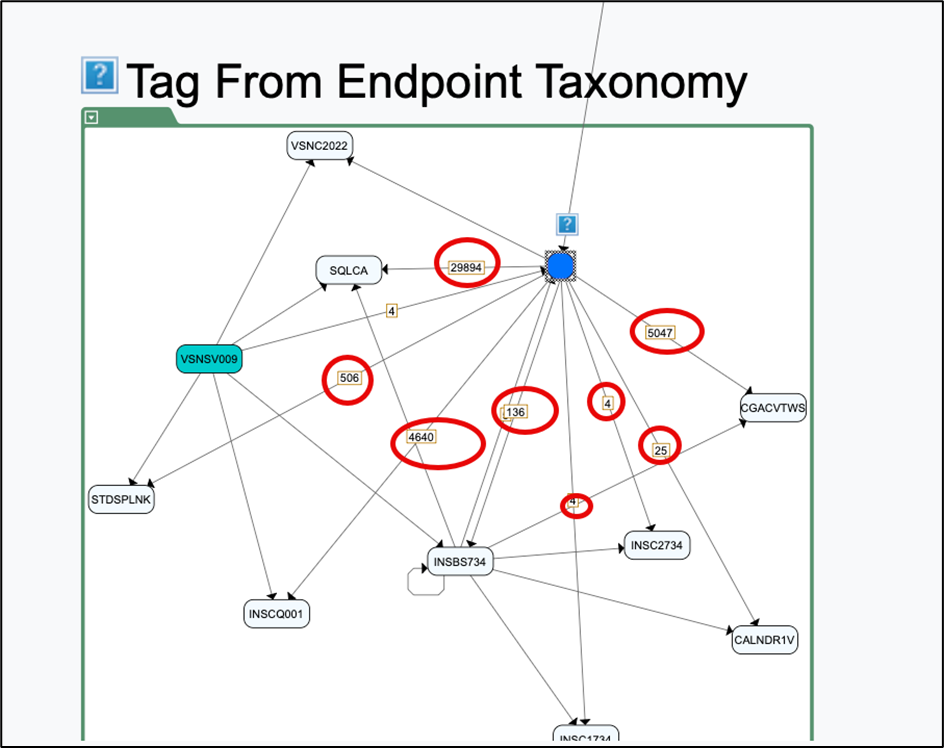
When you expand the incoming connections, you’ll see the total count for each connected module. These connections can be discussed further with the customer, and it may be possible to move the module to a different taxonomy based on the customer’s preferences.
Tag from table
Use this feature to create or edit a taxonomy by building a chain that starts from a module with no incoming relation and ends at a module associated with a table in the module queries file. The chain traverses all modules in between. This feature determines the module where the chain ends.
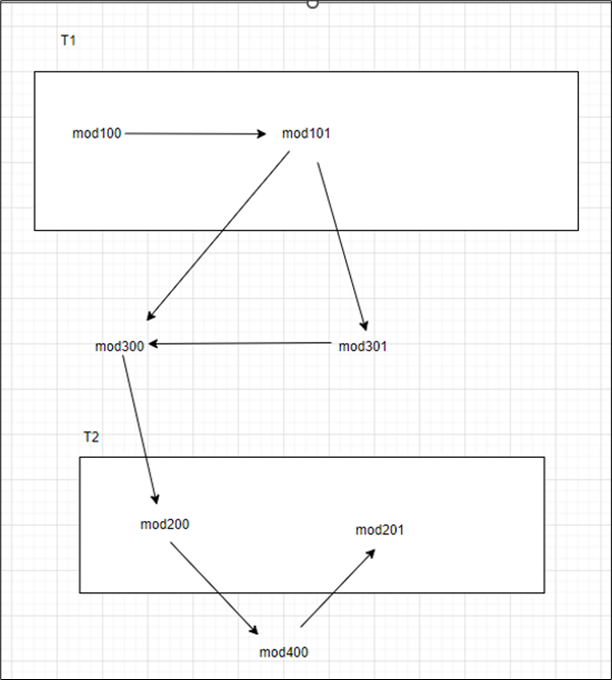
From the module relations and taxonomies modules file, if the above module relationship diagram is considered, as an example and the module queries file is observed as below.
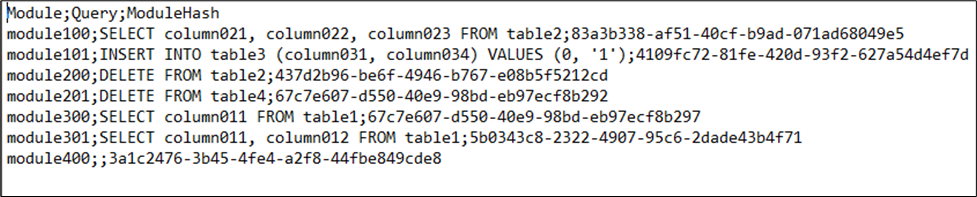
For example, the below chain of modules can be created and assigned to an existing taxonomy or a new taxonomy.
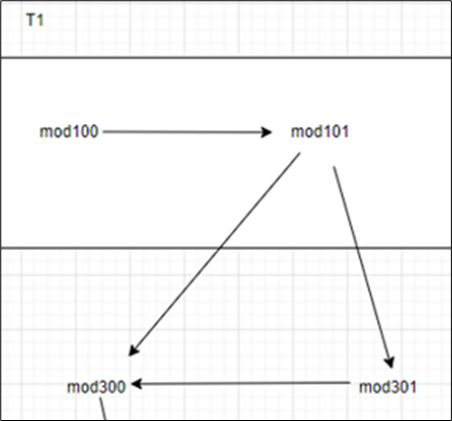
In this case the ending module would be module300 that is associated with table1 from the module queries file. So, in this case it should be tagged from table1.
In the left navigation panel, navigate to Decomposition > Taxonomy Editor and switch to the "Tag from Table" tab.
From the Available tables table on the left-hand side, select the tables using the -> .
The tables can be sorted or filtered based on the Name to narrow down your search. If you need to reset the filter, simply click Reset , and it will display all available tables.
Select the tables using the -> alongside the table.
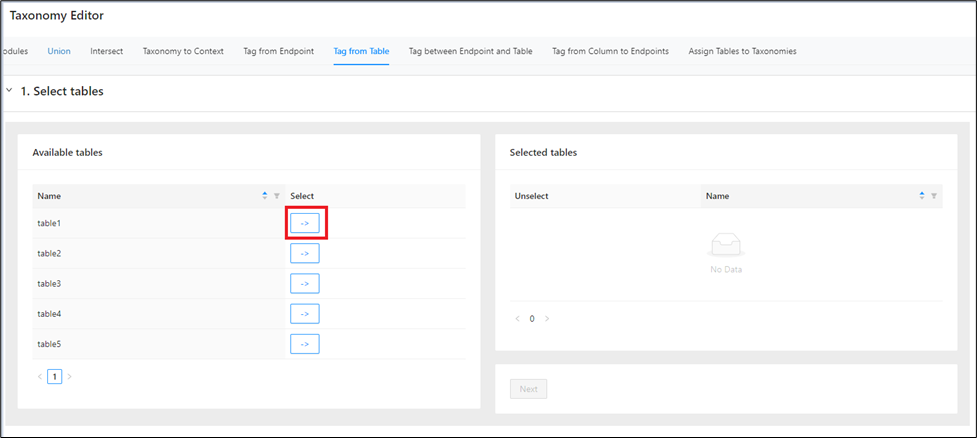
Once the tables move to the Selected tables window, it can be filtered or sorted based on the Name to narrow down your search. If you need to reset the filter, simply click Reset , and it will display all available tables.
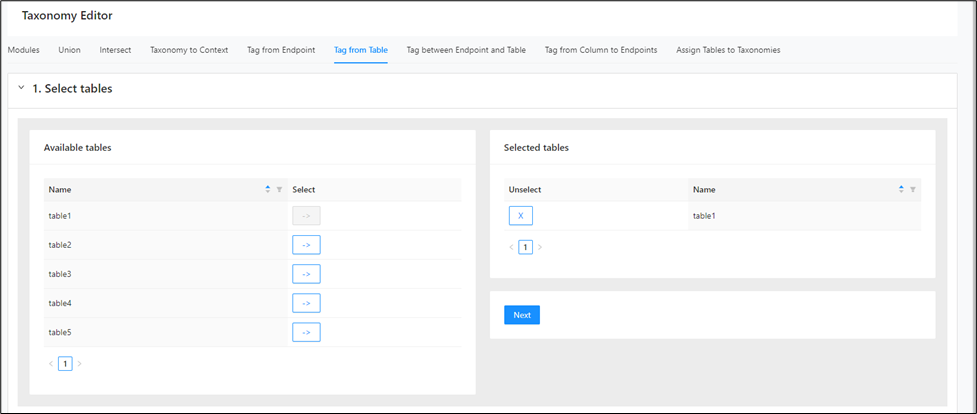
If you wish to deselect any table listed on the right-hand side, click the next to it. It will move from the right side to the left side, indicating that it is deselected.
Then, click Next .
Or create a new taxonomy by entering a name, selecting a type.
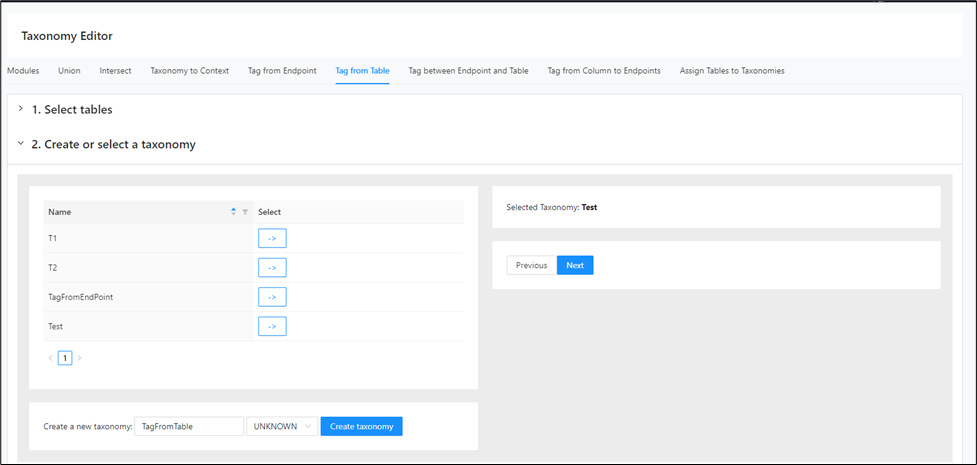
And then click Create taxonomy .
Once the taxonomy is selected (either new or an existing), it will appear on the right-side window.
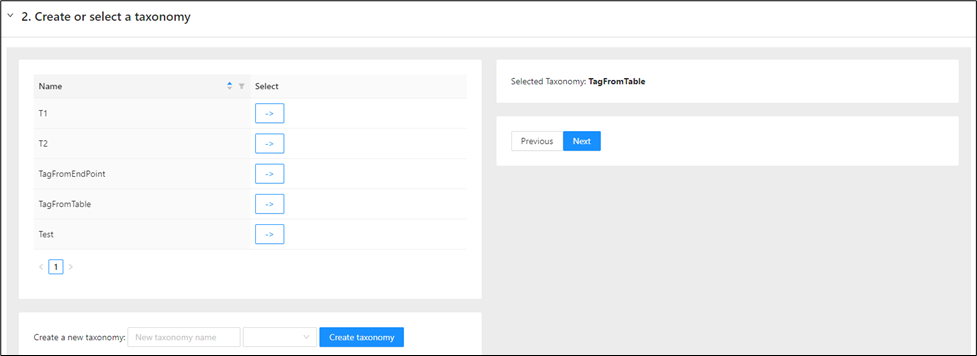
Click Next .
A message appears indicating the module assignment.
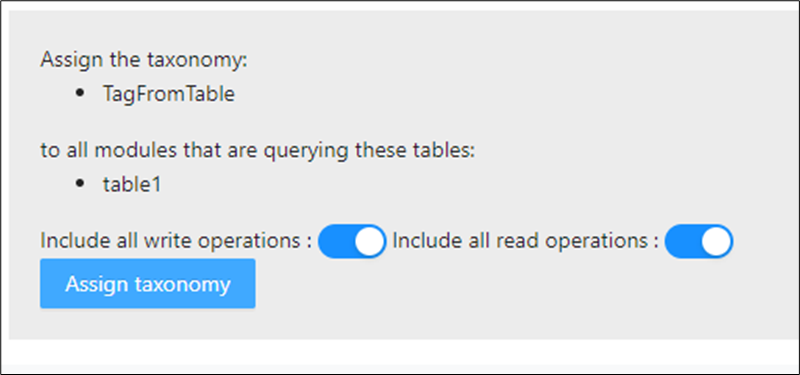
Here either the read (SELECT) queries or Write (INSERT, UPDATE, DELETE) queries associated with the table can be selected or both.
Finally click on Assign Taxonomy .
After the assignment, a message appears indicating how many modules are assigned to the taxonomy.
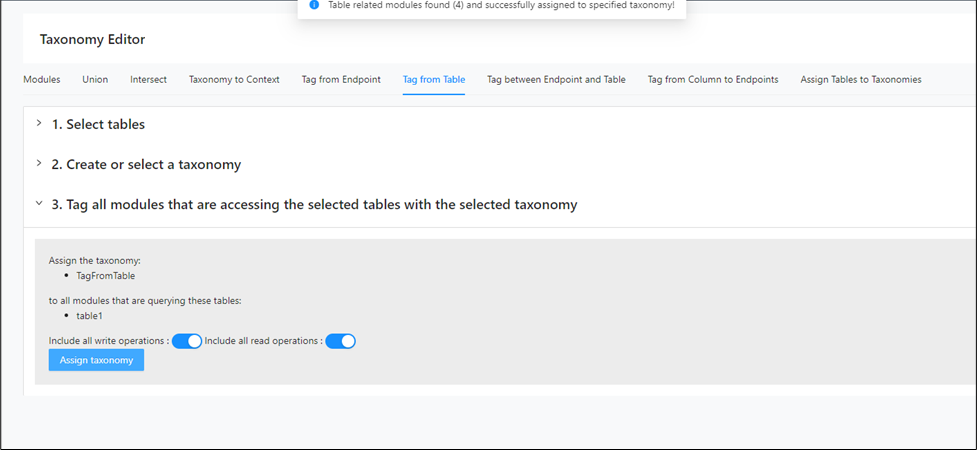
You can verify the assignment from the Taxonomy Graph.
Tag between endpoint and table
Use this feature to create or edit a taxonomy by building a chain that starts from an endpoint module and ends at a module associated with a table in the module queries file. The chain traverses all modules in between. This feature determines both the start and end modules.
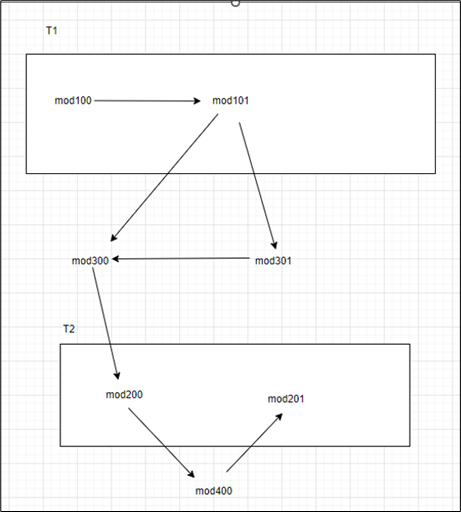
From the module relations and taxonomies modules file, if the above module relationship diagram is considered, as an example and the module queries file is observed as below.
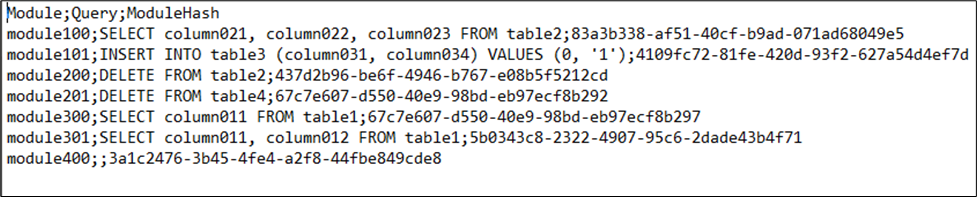
For example, the below chain of modules can be created and assigned to an existing taxonomy or a new taxonomy.
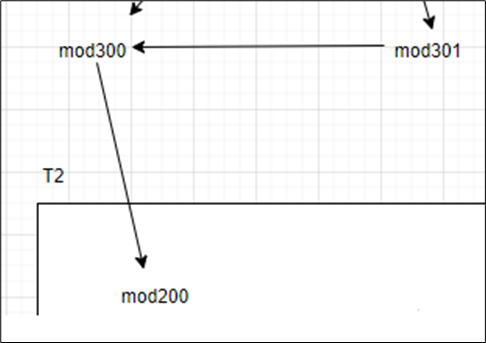
In this case the starting module would be mod301 (endpoint module) and ending module would be module200 that is associated with table2 (DELETE query) from the module queries file. So, in this case it Should be tagged from table1 with Only Write Query.
Should be tagged from table1 with Only Write Query.
In the left navigation panel, navigate to Decomposition > Taxonomy Editor and switch to the "Tag between Endpoint and Table" tab.
From the Available modules table in the left-hand side, select the modules using the -> .
The modules can be filtered based on the Name, Incoming Relations, Outgoing Relations, Read Queries and Write Queries to narrow down your search. If you need to reset the filter, simply click Reset , and it will display all available modules.
Select the modules using the -> alongside the module.
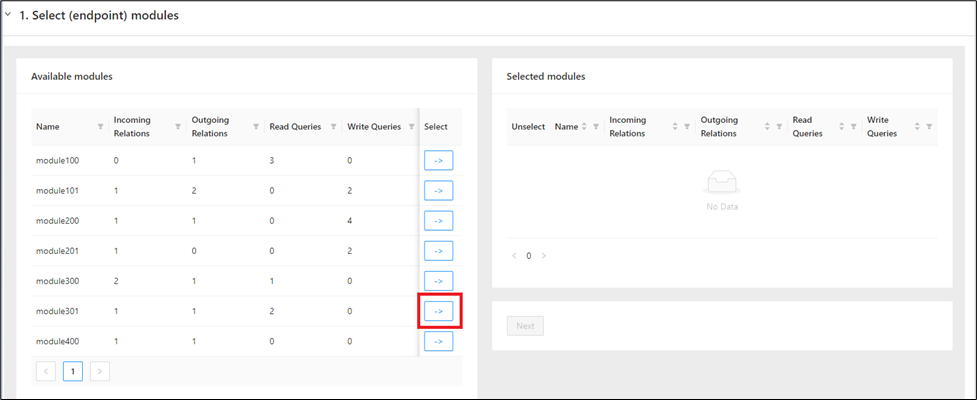
Once the modules move to the Selected Modules window, it can be filtered based on the Name, Incoming Relations, Outgoing Relations, Read Queries and Write Queries to narrow down your search. If you need to reset the filter, simply click Reset , and it will display all available modules.
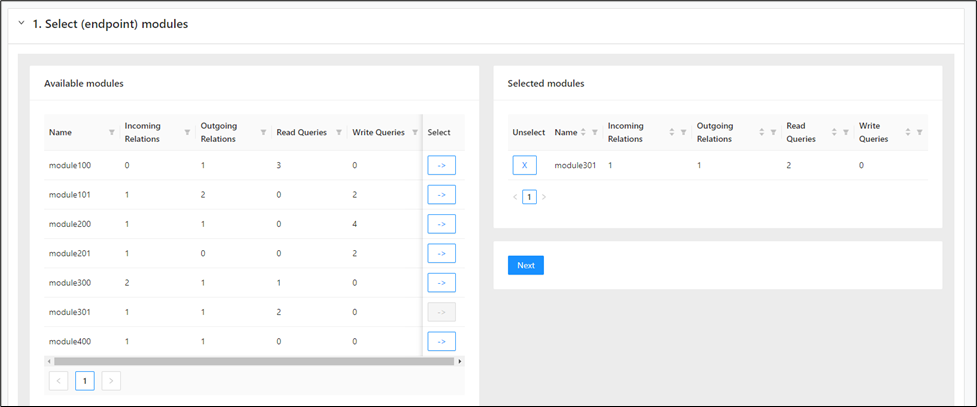
If you wish to deselect any module listed on the right-hand side, click the next to it. It will move from the right side to the left side, indicating that it is deselected.
Then, click Next .
From the Available tables table in the left-hand side, select the tables using -> .
The tables can be sorted or filtered based on the Name to narrow down your search. If you need to reset the filter, simply click Reset , and it will display all available tables.
Select the tables using the -> alongside the table.
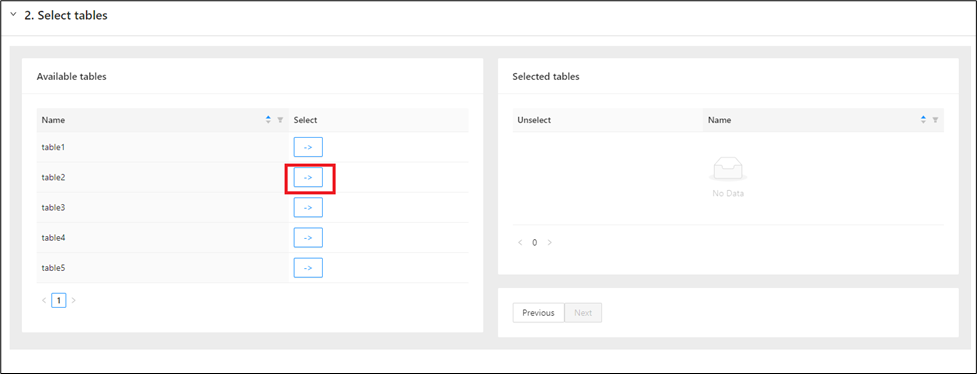
Once the tables move to the Selected tables window, it can be filtered or sorted based on the Name to narrow down your search. If you need to reset the filter, simply click Reset , and it will display all available tables.
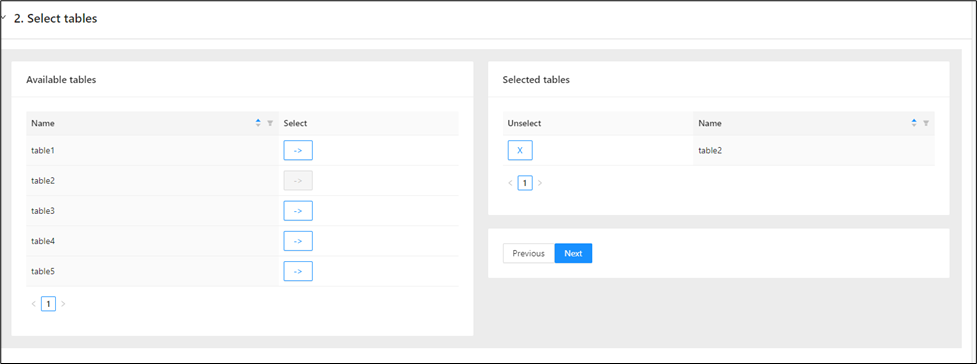
If you wish to deselect any table listed on the right-hand side, click the next to it. It will move from the right side to the left side, indicating that it is deselected.
Then, click Next .
From the taxonomy table, select either an existing taxonomy clicking -> .
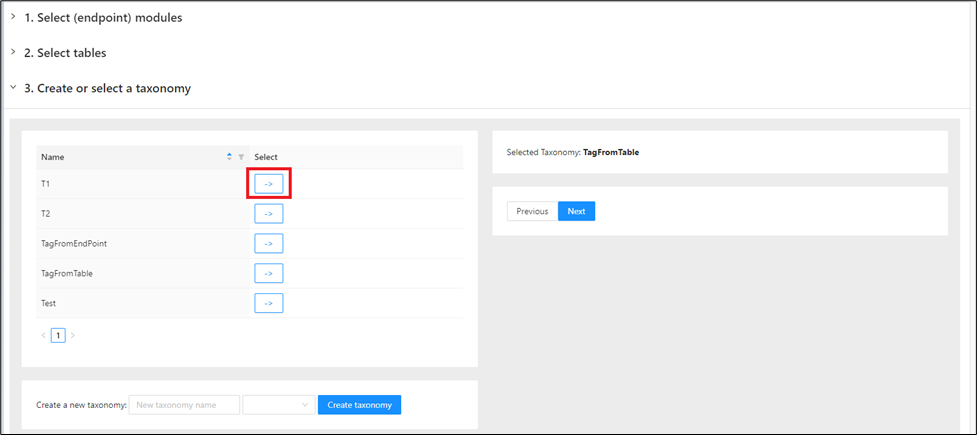
Or create a new taxonomy by entering a name, selecting a type.
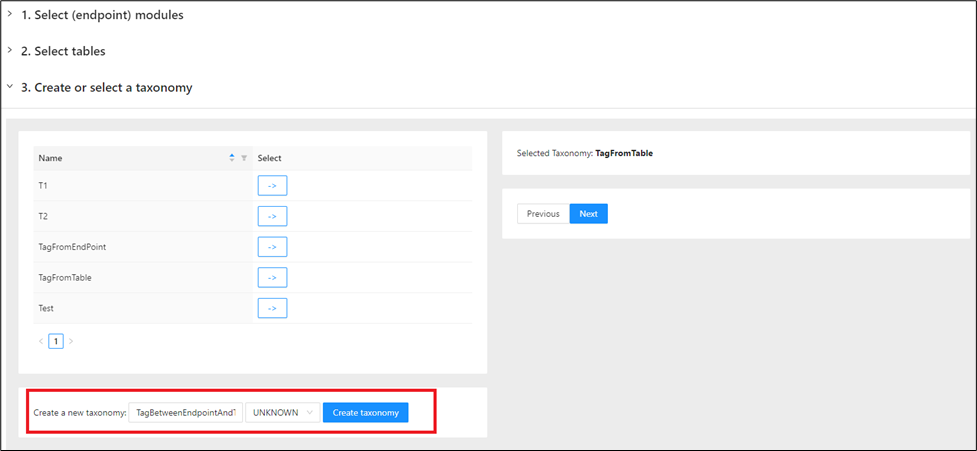
And then click Create taxonomy .
Once the taxonomy is selected (either new or an existing), it will appear on the right-side window.
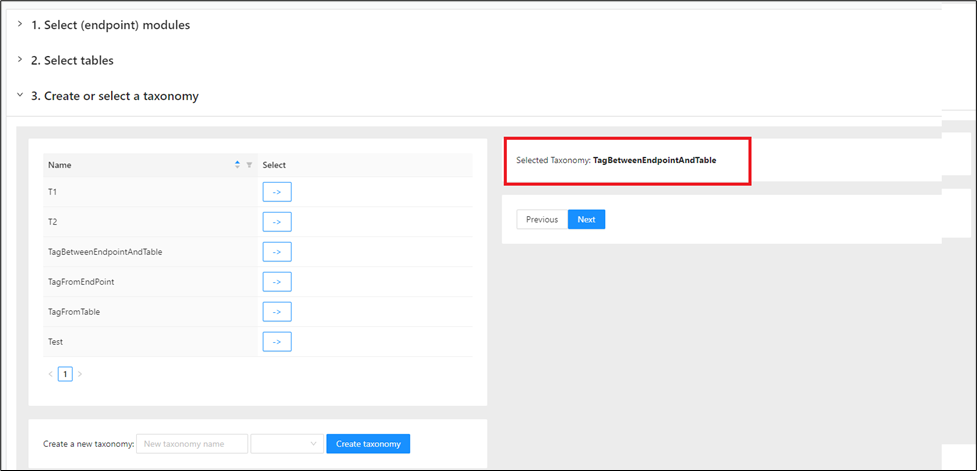
Then, click Create taxonomy .
A message appears indicating the module assignment.
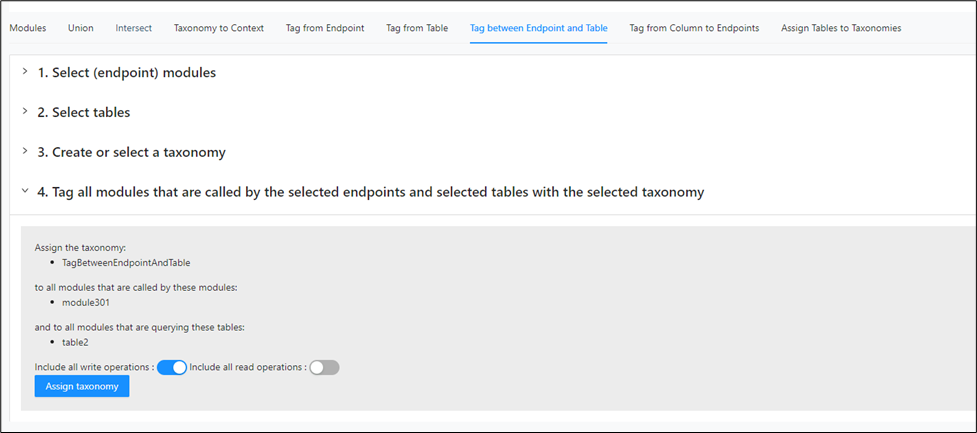
Here either the read (SELECT) queries or Write (INSERT, UPDATE, DELETE) queries associated with the table can be selected or both.
Finally click Assign Taxonomy .
After the assignment, a message appears indicating how many modules are assigned to the taxonomy.
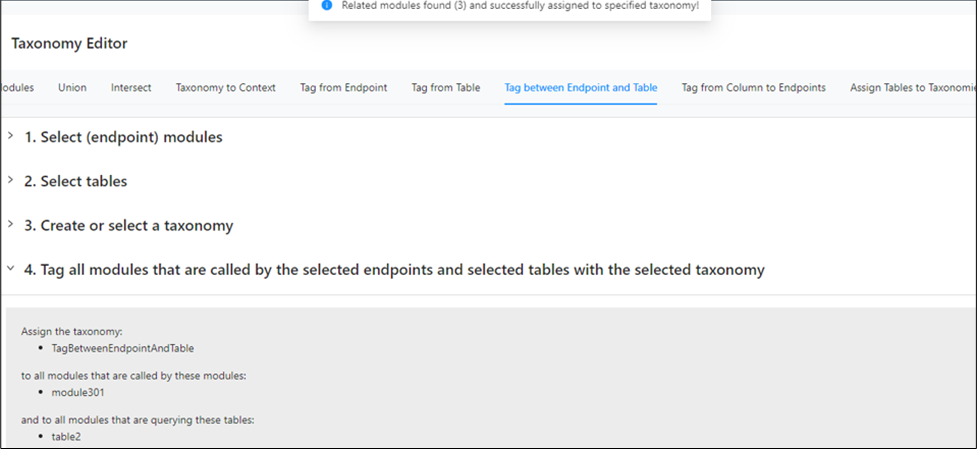
You can verify the assignment in Taxonomy Graph.
Tag from column to endpoints
Use this feature to create or edit a taxonomy by building a chain that starts from an endpoint module and ends at a module associated with a column in a table in the module queries file. The chain traverses all modules in between. This is a more detailed approach than Tag between endpoint and table because it considers columns in the query.
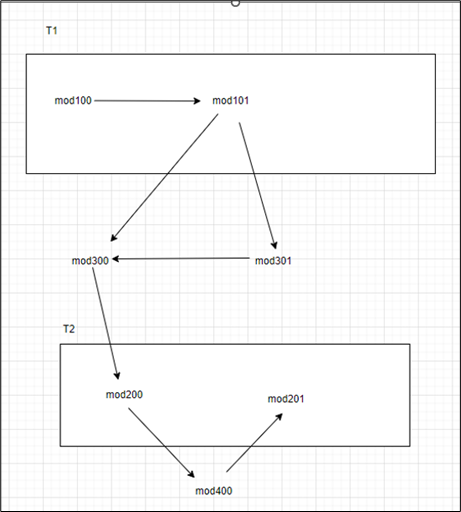
From the module relations and taxonomies modules file, if the above module relationship diagram is considered, as an example and the module queries file is observed as below.
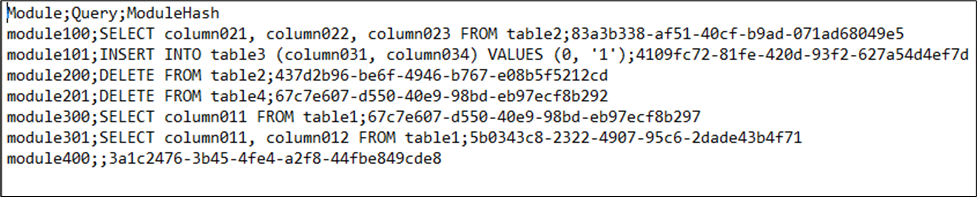
For example, the below chain of modules can be created and assigned to an existing taxonomy or a new taxonomy.
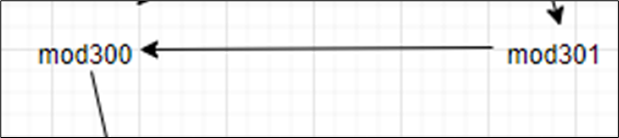
In this case the starting module would be mod301 (endpoint module) and ending module would be module300 that is associated with column011 in table1 as per the module queries file. So, in this case it should be tagged from column011.
In the left navigation panel, navigate to Decomposition > Taxonomy Editor and switch to the "Tag from Column to Endpoints" tab.
From the Select Columns in the left-hand side window, expand schema using , expand the table and then select the column using the -> .
The schema, tables and columns can be sorted or filtered based on the Name to narrow down your search. If you need to reset the filter, simply click Reset , and it will display all available schema, tables, and columns.
Select the column using the -> alongside the column.
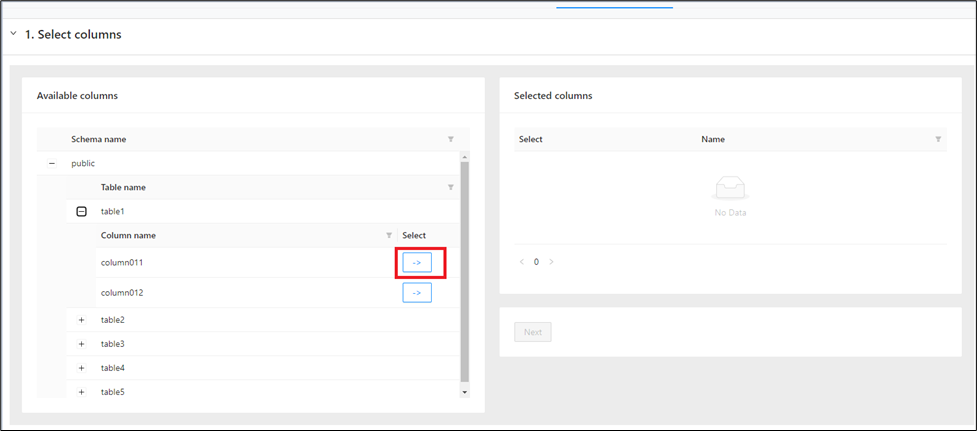
Once the columns move to the Selected columns window, it can be filtered based on the Name to narrow down your search. If you need to reset the filter, simply click Reset , and it will display all available columns.
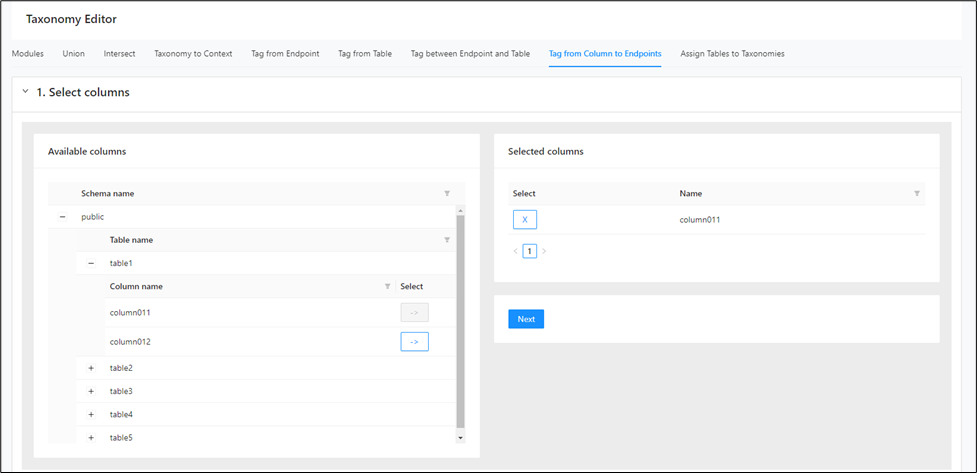
If you wish to deselect any column listed on the right-hand side, click the next to it. It will move from the right side to the left side, indicating that it is deselected.
Then, click Next .
From the Available modules table in the left hand side, select the modules clicking -> .
The modules can be filtered based on the Name, Incoming Relations, Outgoing Relations, Read Queries and Write Queries to narrow down your search. If you need to reset the filter, simply click Reset , and it will display all available modules.
Select the modules using the -> alongside the module.
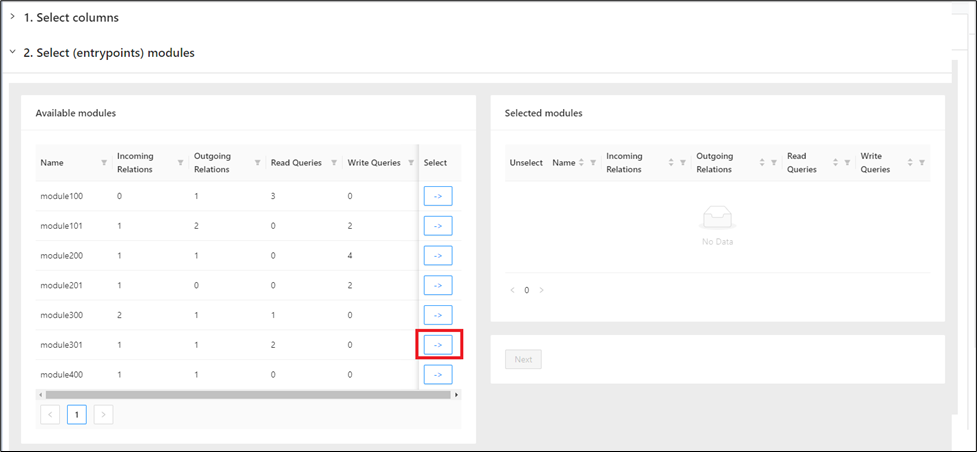
Once the modules move to the Selected Modules window, it can be filtered based on the Name, Incoming Relations, Outgoing Relations, Read Queries and Write Queries to narrow down your search. If you need to reset the filter, simply click Reset , and it will display all available modules.
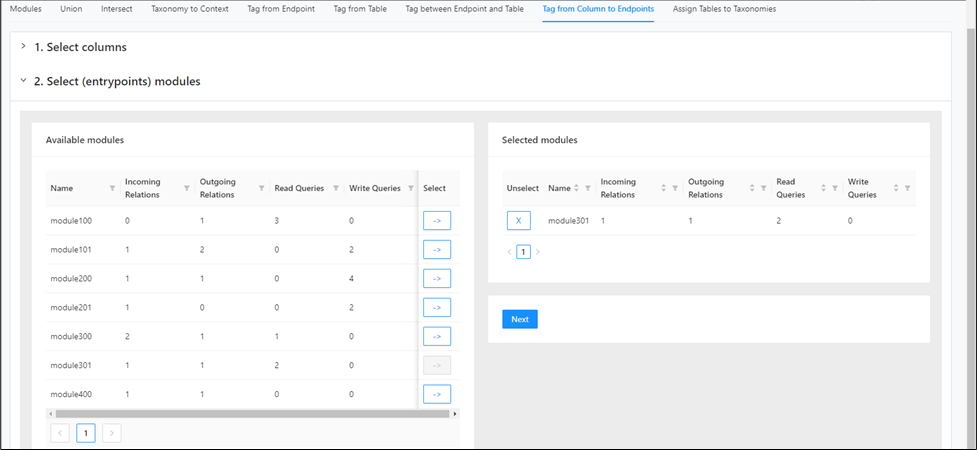
If you wish to deselect any module listed on the right-hand side, click the next to it. It will move from the right side to the left side, indicating that it is deselected.
Then, click Next .
From the taxonomy table, select either an existing taxonomy clicking the -> .
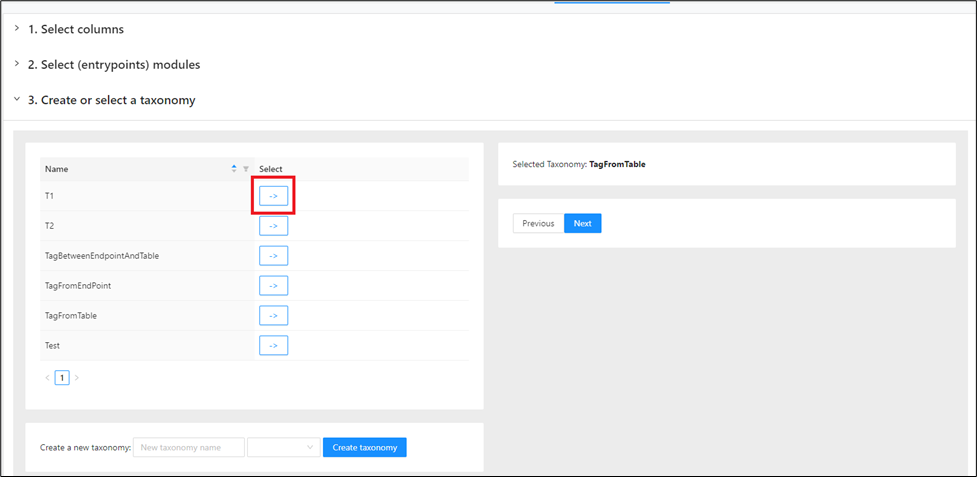
Or create a new taxonomy by entering a name, selecting a type.
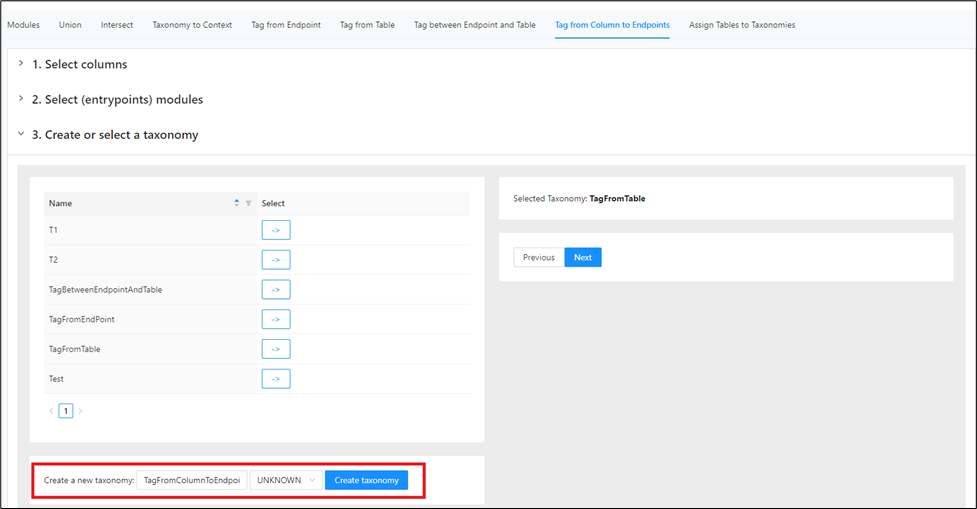
And then click Create taxonomy .
Once the taxonomy is selected (either new or an existing), it will appear on the right-side window.
Click Next .
A message appears indicating the module assignment.
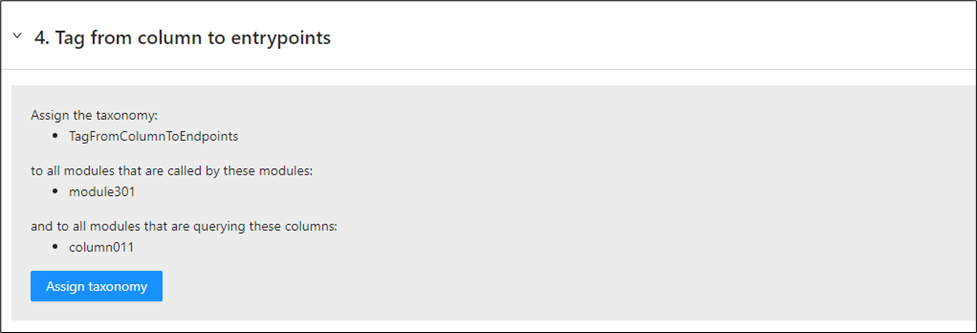
Finally click Assign Taxonomy .
After the assignment, a message appears indicating how many modules are assigned to the taxonomy.
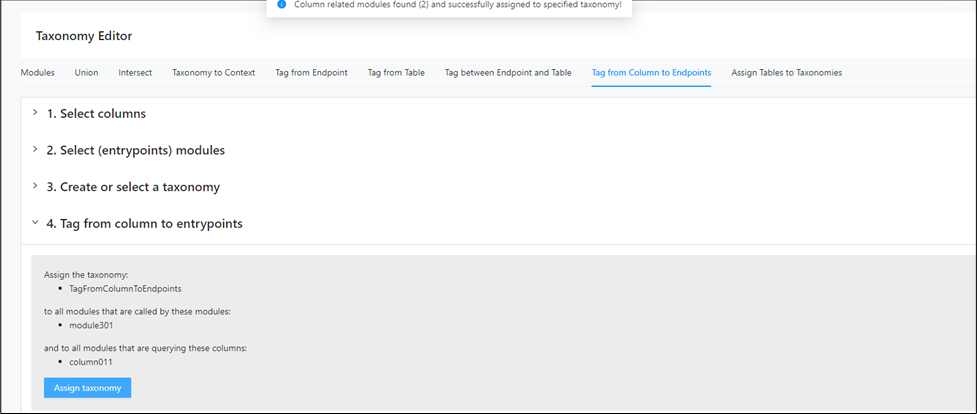
You can verify the assignment in Taxonomy Graph.
Assign table to taxonomies
Use this feature to assign tables to taxonomies instead of modules. It is useful when table ownership is a better starting point than module grouping for the taxonomy you want to build. Use this workflow to connect database objects directly to a taxonomy before moving into later graph and bounded context steps.
In the left navigation panel, navigate to Decomposition > Taxonomy Editor and switch to the "Assign Tables to Taxonomies" tab.
From the Available tables table in the left-hand side, select the tables using the -> .
The tables can be sorted or filtered based on the Name to narrow down your search. If you need to reset the filter, simply click Reset , and it will display all available tables.
Select the tables using the -> alongside the table.
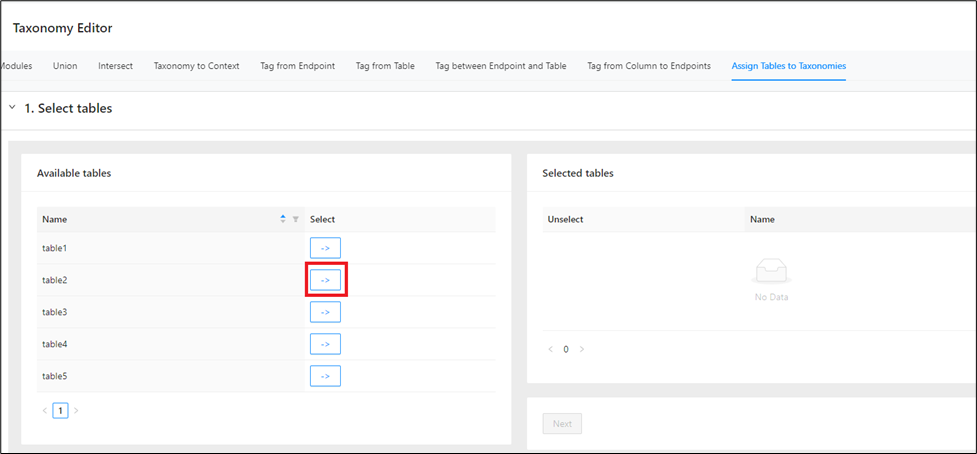
Once the tables move to the Selected tables window, it can be filtered or sorted based on the Name to narrow down your search. If you need to reset the filter, simply click Reset , and it will display all available tables.
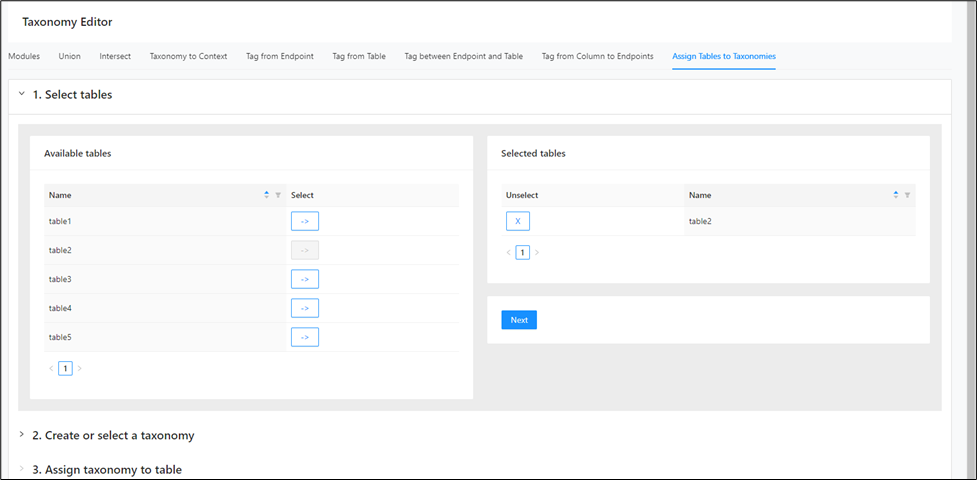
If you wish to deselect any table listed on the right-hand side, click the next to it. It will move from the right side to the left side, indicating that it is deselected.
Then, click Next .
From the taxonomy table, select either an existing taxonomy clicking the -> .
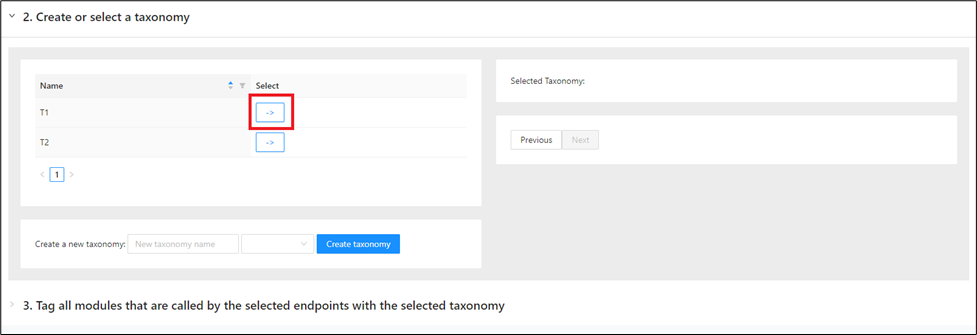
Or create a new taxonomy by entering a name, selecting a type.
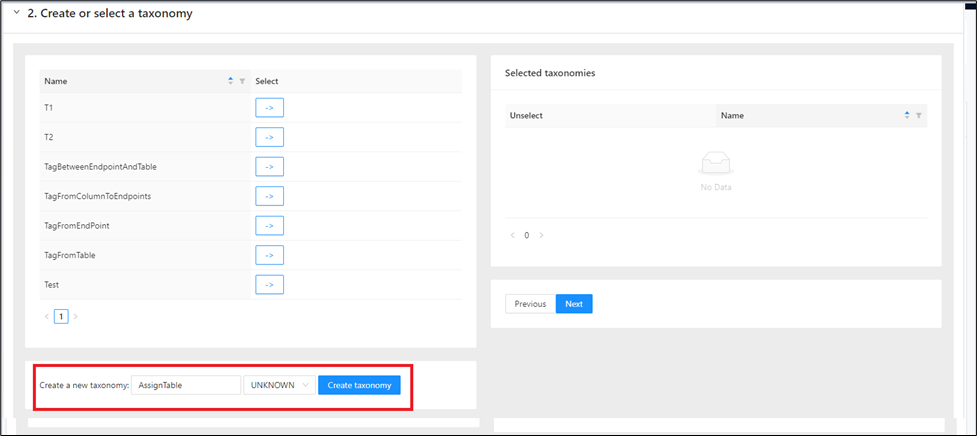
And then click Create taxonomy .
Once the taxonomy is selected (either new or an existing), it will appear on the right-side window.
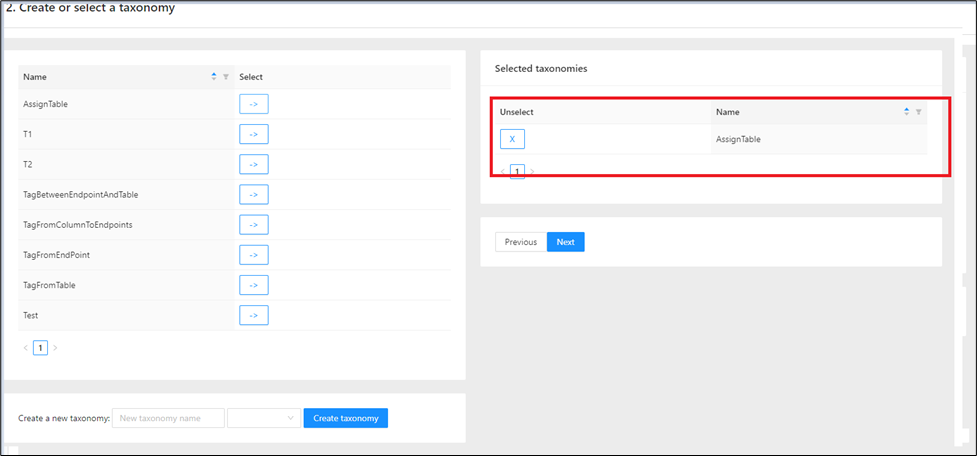
If you wish to deselect any taxonomy listed on the right-hand side, click the next to it. It will move from the right side to the left side, indicating that it is deselected.
Then, click Next .
A message appears indicating the table assignment.
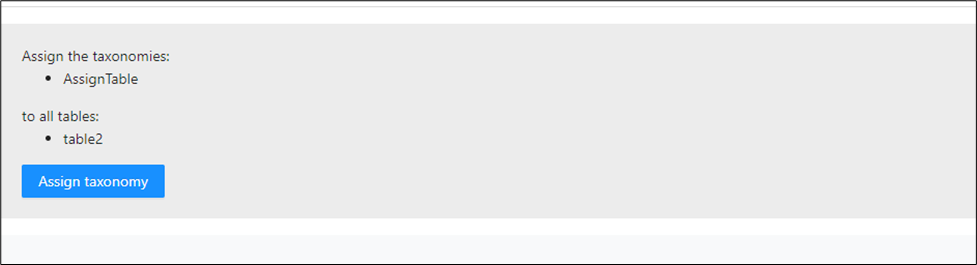
Finally click on Assign taxonomy .