Functional Analysis
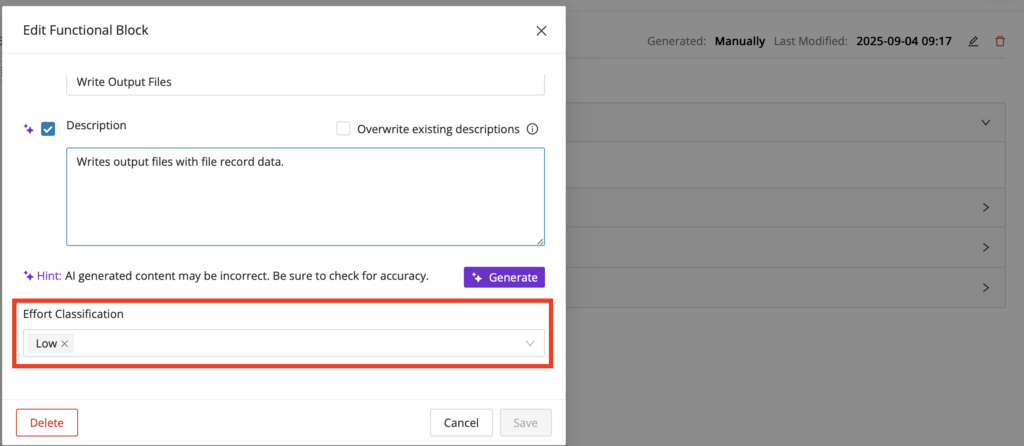
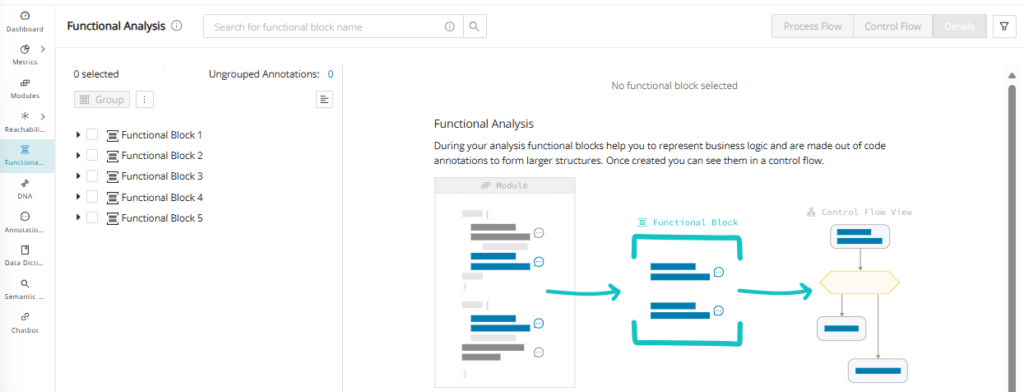
Functional blocks help you to represent business logic and are made of code annotations to form larger functional structures across one or more modules. Review the Modules page for the multiple ways that annotations can be created or generated. Once created, you can see them in a control flow graphical view (technical annotation level) or process flow graphical view (abstracted functional block level).
Role-based access control (RBAC)
This section contains information on role-based access control for editing functional blocks. Access control on functional block screens is based on three user roles:
-
Viewer: Can only view the functional blocks/groups and does not have permission to create, edit, delete, or rename the existing functional blocks/groups.
-
Editor: Can create, edit, modify, and delete the Functional Blocks, but cannot perform any bulk operations. For example, bulk deletion of functional blocks.
-
Manager: Can create, edit, modify, delete, and perform bulk operations.
| Operation | Viewer | Editor | Manager |
|---|---|---|---|
| Filtering on the Functional Analysis landing page | Yes | Yes | Yes |
| Group/ungroup functional blocks | No | Yes | Yes |
| View functional blocks in tree view | Yes | Yes | Yes |
| Expand/collapse functional block in tree view | Yes | Yes | Yes |
| Select and view functional block or annotation details in the tree view | Yes | Yes | Yes |
| Click the modules and navigate to the module detail page | Yes | Yes | Yes |
Functional Blocks creation
Functional Blocks provide great flexibility in how they allow grouping code together. Mining supports several creation paths so you can choose the one that best matches your analysis goal and available metadata. The options below summarize the main ways to create or generate functional blocks.
Manual Functional Block creation
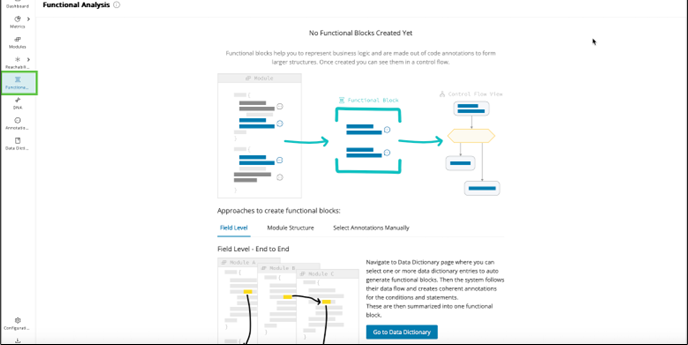
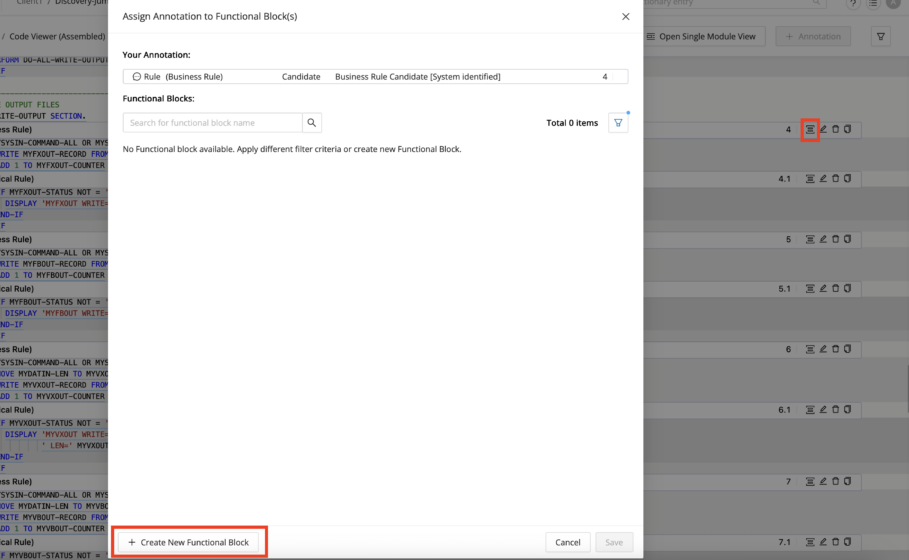
Manual Functional Block Creation starts in the Code Viewer while reviewing the annotations within a module. Once an annotation is created, you can click on its Functional Block icon as the starting point to create and define a Functional Block. For more detail read through the Functional Block tab under Managing Annotations in Code Viewer
Reachability Analysis (E2E flow)
When the Reachability Analysis has been conducted on your project. You can leverage its generated end-to-end (upper bounds to lower bounds) process flow results to generate functional analysis along any or all of its flows as well. This enables you to quickly drill down one level and begin to extract the business logic within the individual modules after decomposing your application at the highest level.
Step 1:
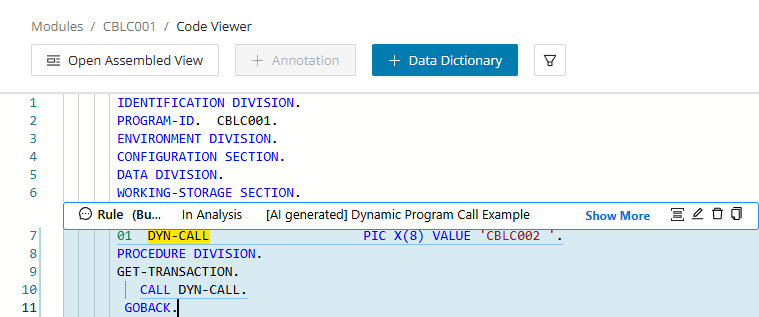
On the Reachability Analysis Block View page, select your reachability block of interest and click Details Table button in the toolbar.
Step 2:
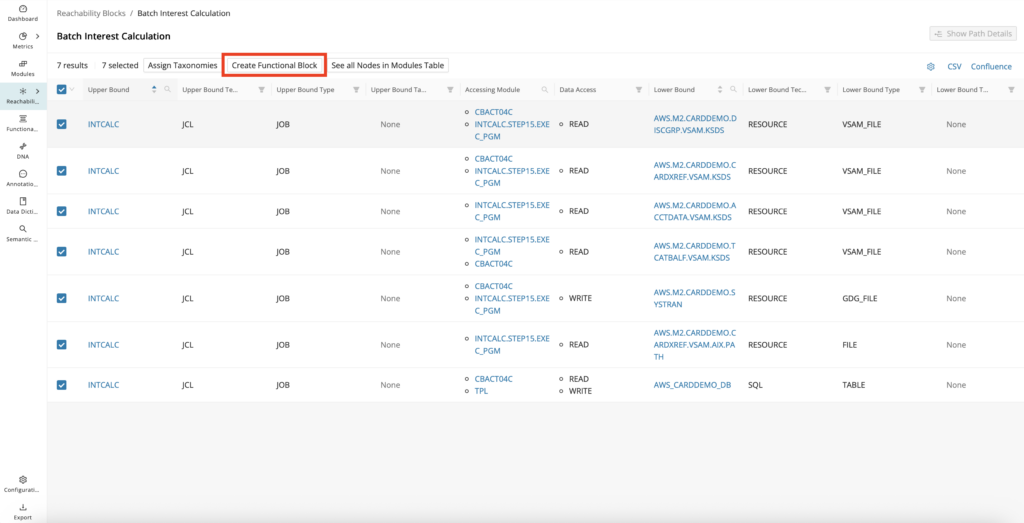
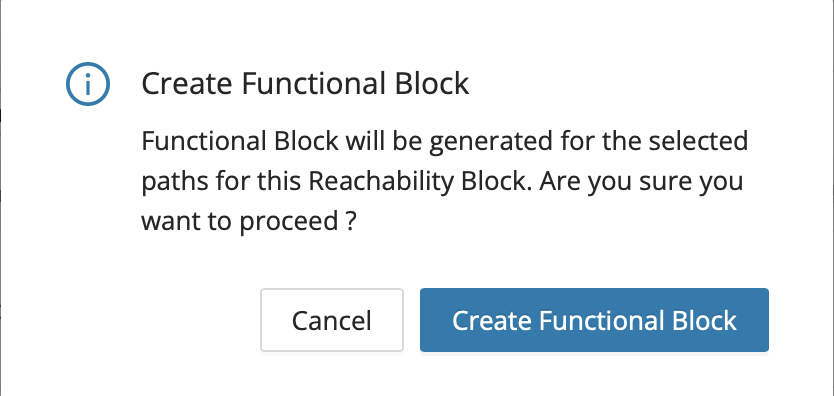
From the Details Table, select each of the E2E flows inside your selected reachability block that you would like to capture functional analysis for, and click Create Functional Block in the toolbar. A confirmation modal will appear next, where you can click Create Functional Block to generate the Functional Blocks.
Step 3:
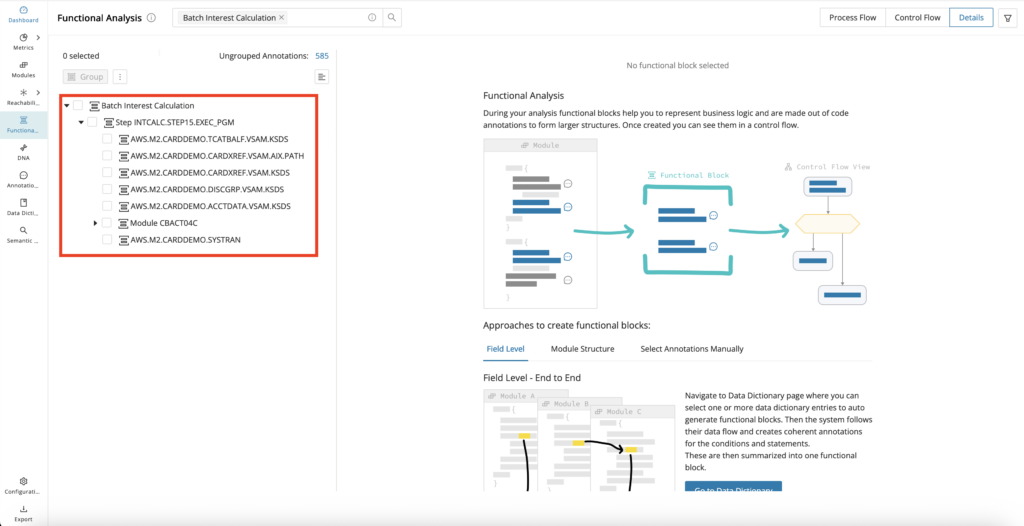
To view the output, click on the Functional Analysis menu option on the far left menu pane. The generated Functional Block(s) will be shown in the tree view of the Functional Analysis page.
Module structure
Functional Blocks will be generated per the skeletal outline of the program, grouping annotations within this structure, or even if they are empty (for example, if no Annotations exist). Functional Blocks generated per the module structure allow a quick functional overview of the entire program from top to bottom, and if present, to see the annotated business logic within that structure.
Info
Enable the feature toggles structuralFunctionalGroups to create Functional Blocks per the Module structure without existing annotations.

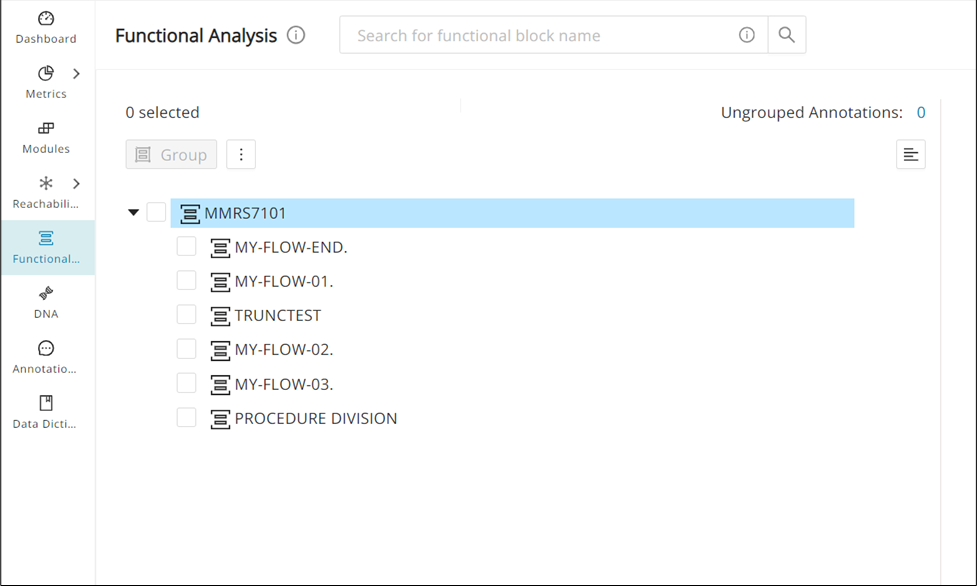
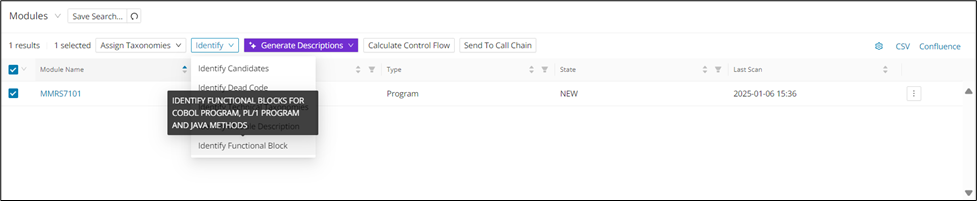
The application generates the functional block when you select a supported module and click Identify Functional Block from the drop-down menu.
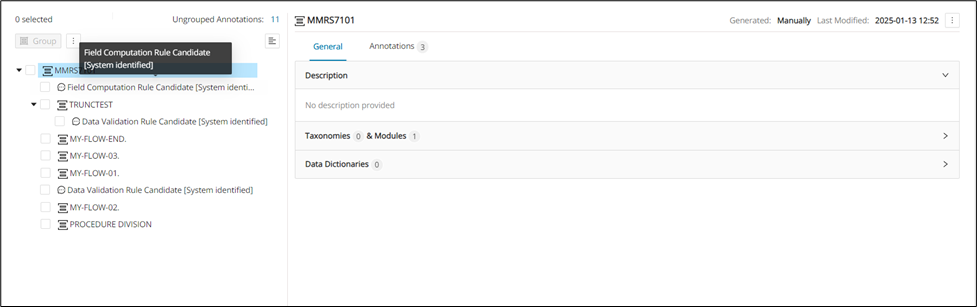
In the figure above, you can see the Functional group containing “Functional units” on the left-hand side. If you click Control Flow at the top right, you will see a filtered control flow graph.
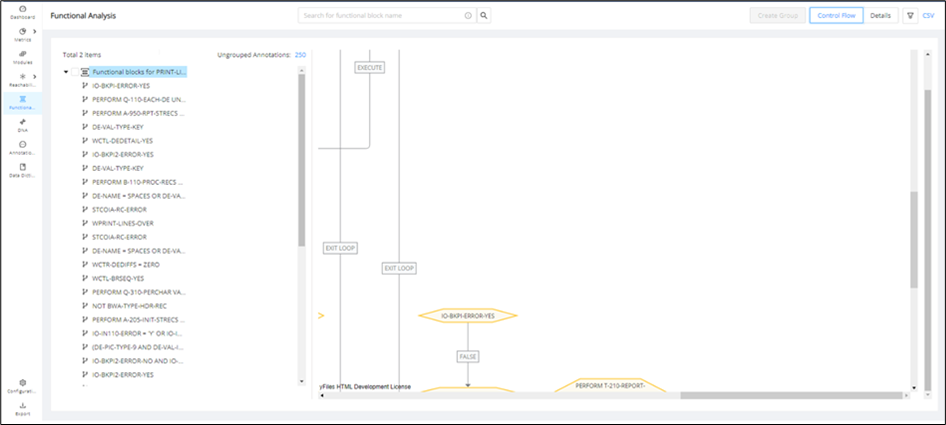
Similarly, if any conditions are present between annotated statements and the entry point for the conditions, functional conditions are created.
Java Functional Blocks
Functional Analysis supports the generation of automated Functional Blocks for Java, where Functional Blocks are created per Java methods along their Call Chain. The detail view, which is displayed next to the blocks, shows the Java methods and classifies the annotation type as FUNCTIONAL, category as none, and state as CANDIDATE. For more info on the details view, refer to the Details View for Functional Analysis
Info
For Java methods, the feature toggle javaCollectMethodCalls must be enabled before Code Discovery; otherwise, it will not generate, and Java methods will show as unsupported.

Field Level Mining
Unlike auto-generated Functional Blocks based on Module Structure, with Field Level Mining generated Functional Blocks contain all the annotated statements along a data flow path across modules stemming from a selected field. It uses Data Lineage to capture this flow and create the Functional Blocks. This allows miners to zoom in on the business logic associated with each selected field to better understand its impact and plan/implement the modernized system.
Field Level Mining can be conducted from the CodeViewer on individual fields if you prefer to see the source code, or from the Data Dictionary in bulk if you know the fields of interest upfront.
Conducting Field-Level Mining from the CodeViewer
Step 1:
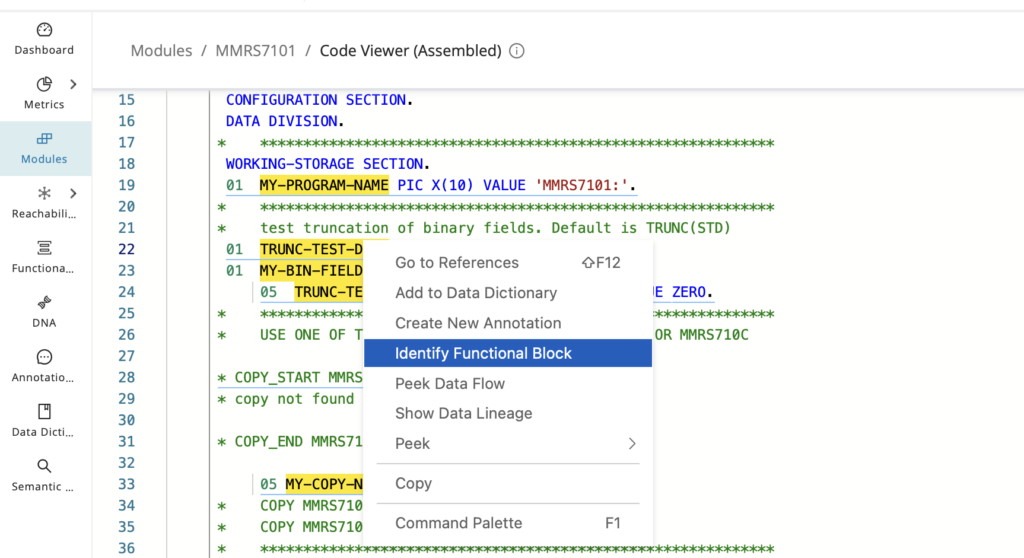
Open the CodeViewer, right-click on the field of interest, and select Identify Functional Block.
Step 2:
To view the Field Level Mining output, click on the Functional Analysis menu option on the far left menu pane. The generated Functional Block(s) will be shown in the tree view of the Functional Analysis page.
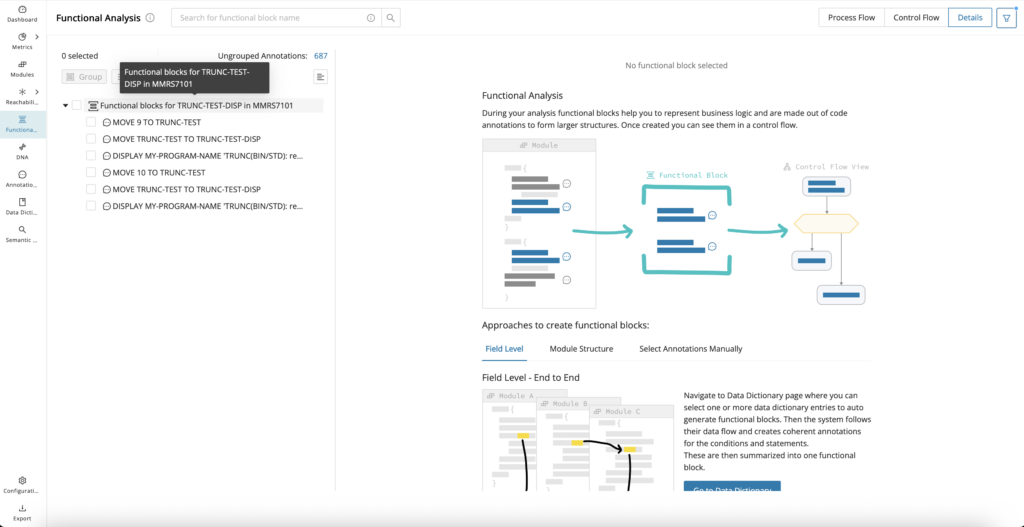
Conducting Field Level Mining from the Data Dictionary
Step 1:
You can search Data Dictionary Entries across your project (Data Dictionary Reporting page) or at a single module level (Module Detail Page - Data Dictionary tab). From either of the Data Dictionary tables, select one or more fields of interest, and select Identify Functional Block.
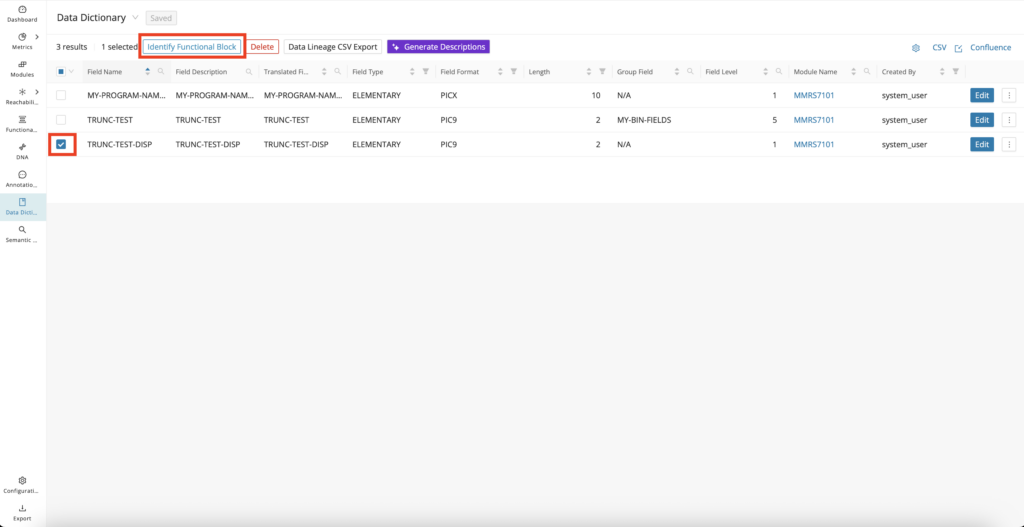
Step 2:
To view the Field Level Mining output, click on the Functional Analysis menu option on the far left menu pane. The generated Functional Block(s) will be shown in the tree view of the Functional Analysis page.
Semantic Functional Block
Uses GenAI capability to group similar code within a module into Functional Blocks, which are also given meaningful names and descriptions.
Info
Enable the feature toggle semanticFunctionalBlockGeneration.
Step 1:
From the Modules Reporting page, select one or more supported modules of interest, click Identify from the toolbar, and select Generate Semantic Functional Block from the drop-down.
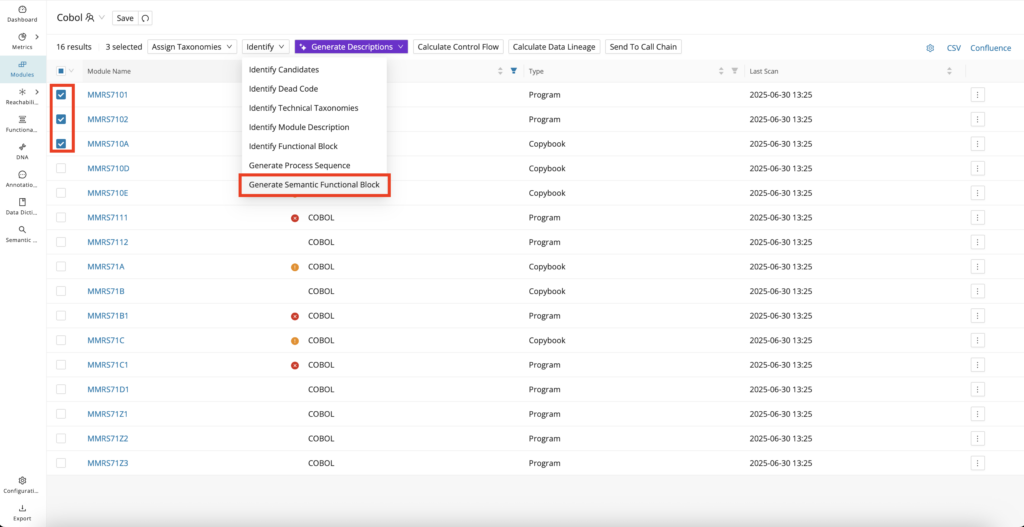
Step 2:
There is an option to configure how many annotations are captured inside the Functional Blocks, along with a similarity threshold if needed. Otherwise, click Submit with the set default values to generate the Semantic Functional Block(s).
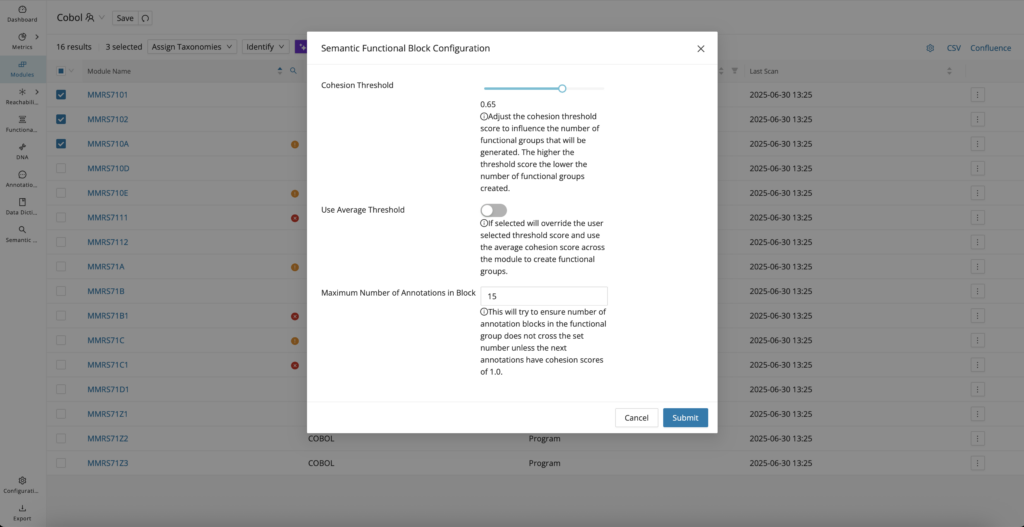
Step 3:
To view the Semantic Functional Block output, click on the Functional Analysis menu option on the far left menu pane. The generated Functional Block(s) will be shown in the tree view of the Functional Analysis page.
Filtering and sorting Annotations by Functional Blocks
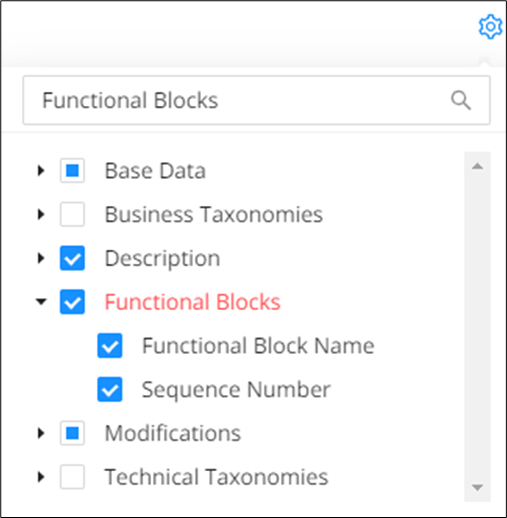
To view functional blocks on the Annotations tables:
Step 1:
Click the settings icon on the top right corner and select Functional Blocks > Functional Block Name.
Step 2:
Click the up and down arrows on the Functional Block Column header to sort the content.
Step 3:
Search for a specific functional block name using the search icon.
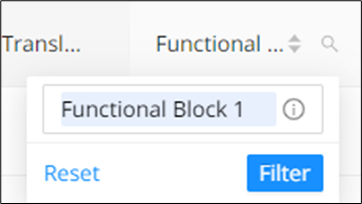
Modules associated with the searched functional block will now be displayed.

Functional Block analysis results
After creating functional blocks, the Functional Analysis is automatically populated with a Tree View to the left and a Details View on the right. From here, you can view and edit the functional block structures and even see these functional blocks in a control flow view or process flow view.
Tree view
The Tree View in the Functional Analysis page allows you to easily organize and rearrange functional blocks and annotations by simply dragging and dropping them across functional blocks.
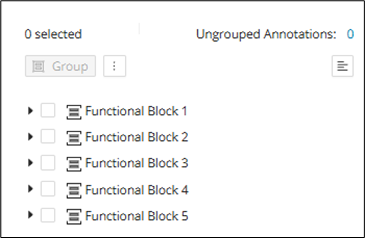
Select the annotation or functional block that needs to be moved and drag and drop it into the desired functional block. If the order must be rearranged, drag the annotation or functional block to the desired spot. Dragging and hovering over a non-empty functional block will auto-expand the block to enable this ordering operation. This auto-expansion applies to non-empty sub-functional blocks as well.
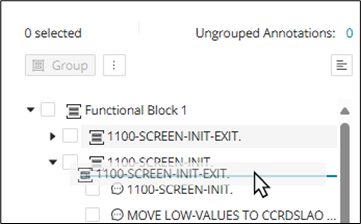
Dragging an annotation or functional block outside of the tree (above the first functional block) will display an error message

Group/Ungroup
Grouping Functional Blocks
You can group functional blocks or annotations from the Functional Analysis page.
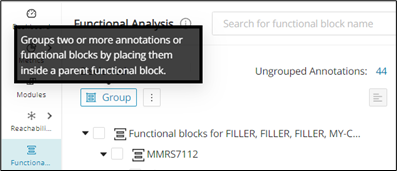
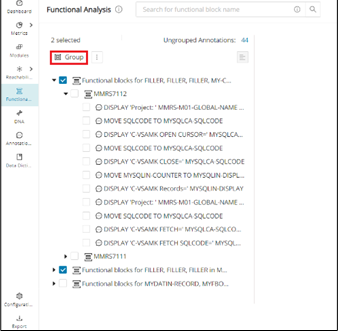
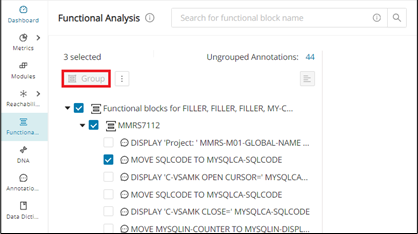
Select 2 or more functional block(s) at the same level and click Group .
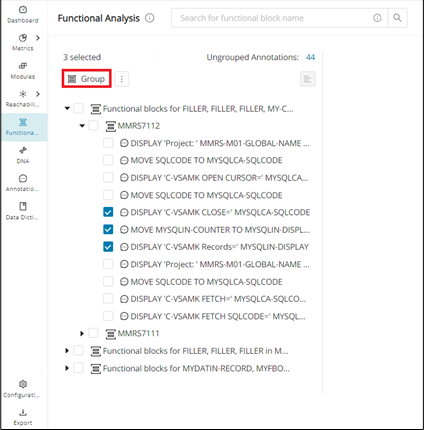
Or select 2 or more annotations at the same level and the same part of the functional block and click Group.
Warning
Group cannot be used when the selected functional blocks and annotations are not appropriately at the same level.
Splitting automatic Functional Blocks
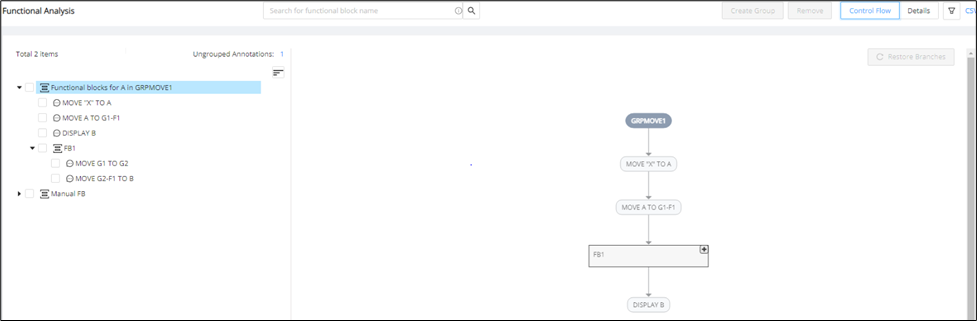
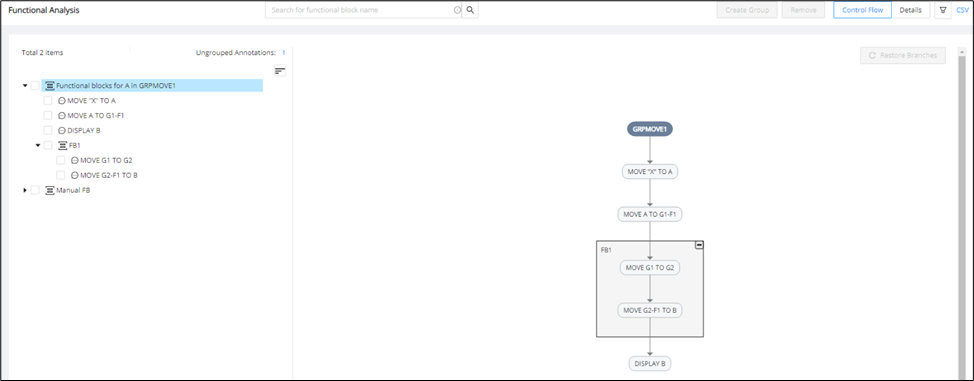
You can modify automatically generated functional blocks to split annotations within a large functional block into a smaller functional block. The CFG of the large functional block will then display the smaller functional block as a collapsible group containing the selected annotations.
Step 1:
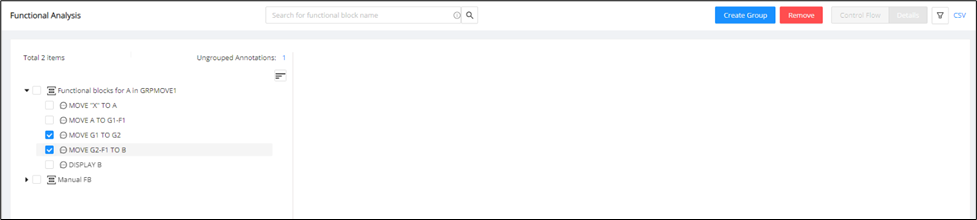
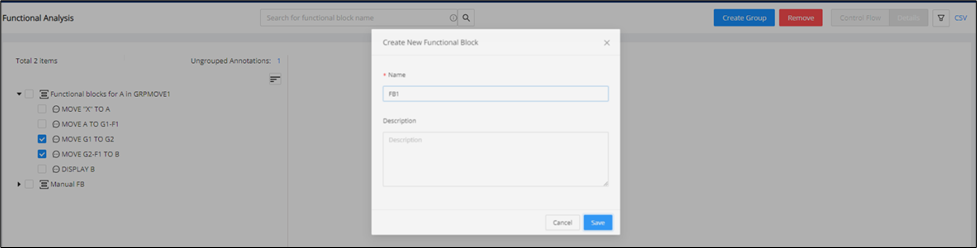
Navigate to the functional analysis page and expand any auto-generated functional block and select the annotations to be put into a smaller functional block, and click Create Group .
Step 2:
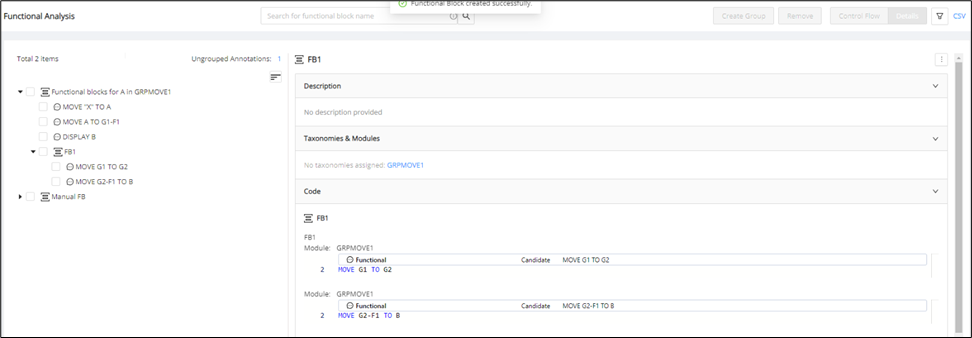
Once the new blocks are created, the selected annotations will split into their own new functional block. The new group will be created as the last child item.
Step 3:
Click the Functional Block and click Control Flow , which will display the smaller functional block as a collapsible group in the CFG.
Ungrouping Functional Blocks
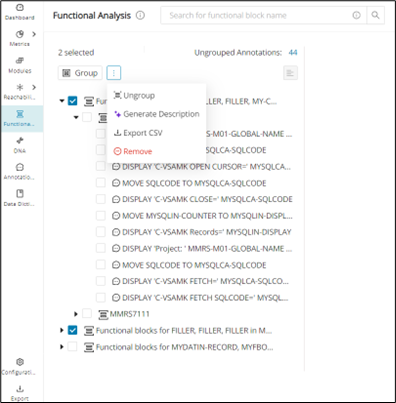
You can ungroup non-empty functional blocks on the functional analysis page. When ungrouping a functional block, the group functional block will be removed, and the assigned annotations will be unassigned. Any child of the formerly grouped functional block will go one level above.
Navigate to the Functional Analysis page and select the non-empty functional block(s). Click the menu icon next to "Group" to display the Ungroup button from a dropdown menu. Click +""Ungroup"++ to Ungroup the selected non-empty functional block(s).
Warning
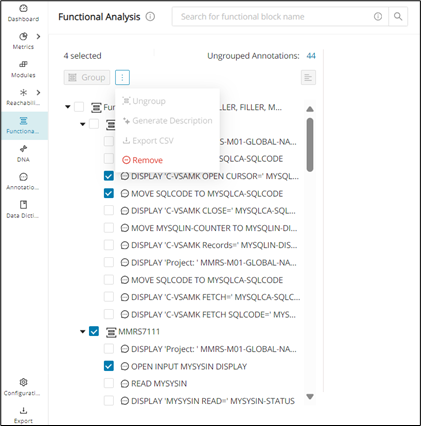
Selecting annotations or a mix of annotations and functional blocks will deactivate the Ungroup button.
Functional Block grouping hierarchy
The grouping of Functional Blocks will maintain its hierarchy in the Functional Analysis page.
Grouping Functional Blocks:
-
When you select two functional blocks (block1 and block2) and then click Create Group in the Functional Analysis page, a new group (group1) will be created with block1 and block2 as its children.
-
The newly created group (group1) will be displayed correctly in the hierarchy.
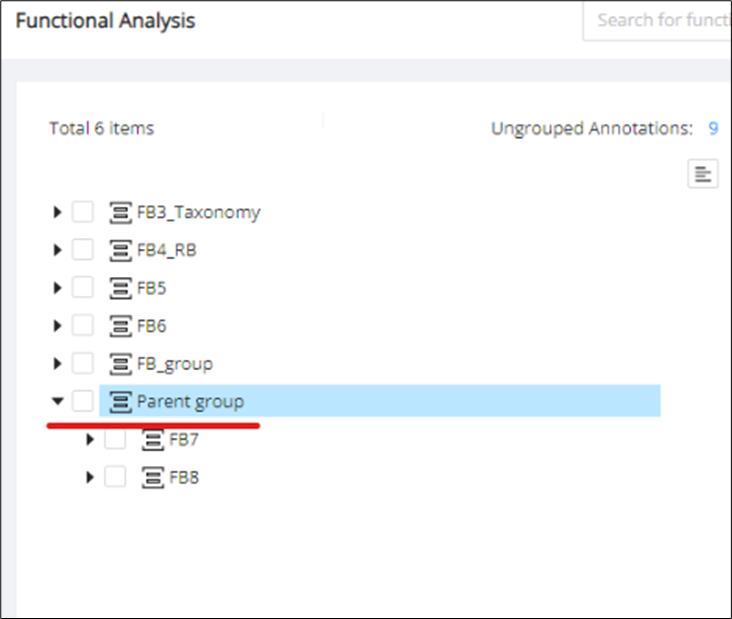
Ungrouping Functional Blocks will function similarly to an undo action. The ungrouping behavior can be revised as follows:
In the functional analysis page, if we have a hierarchy like below.
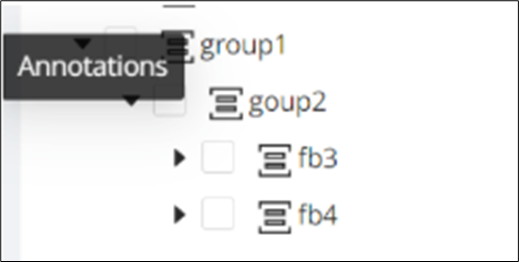
Select group2 on clicking ungroup, the system should delete 'group2'. The child functional blocks of 'group2' (for example, 'fb3' and 'fb4') should then be reassigned to the immediate parent of 'group2', which in this case is 'group1'.
Nested grouping:
-
When you expand group1, select block1 and block2 (children of group1), and then click Create Group again, a new group will be created inside group1.
-
The newly created group will maintain the hierarchy and be displayed as a child of group1.
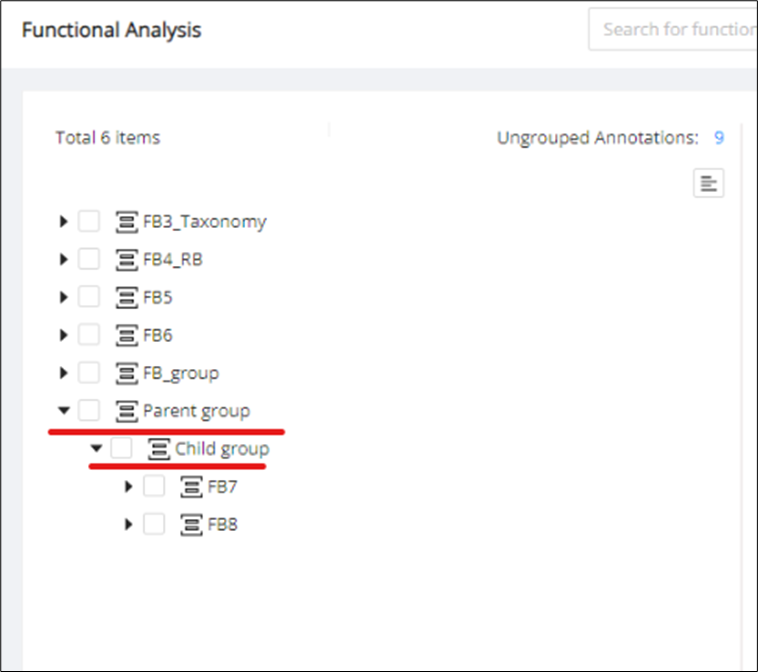
Hierarchy maintenance:
-
The hierarchy of functional blocks will be maintained correctly when creating nested groups.
-
The parent-child relationships will be preserved, and the newly created groups will be displayed within their respective parent groups.
Generate Functional Block name and description
Configuration
The feature toggle generativeAiTranslations must be enabled in the WebUI feature console.
Quickly generate a more meaningful functional block name and/or description by using the "Generate" function, which uses Gen AI to generate content. Information from the related Data Dictionaries will be considered in the AI-generated content, and it is advised to always check for accuracy.
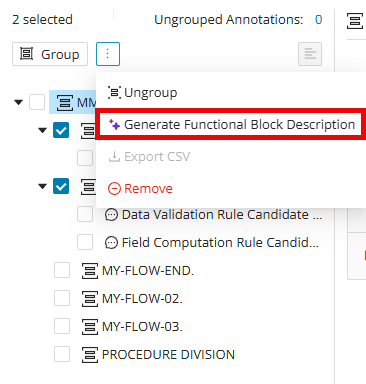
Click the checkbox(es) of the functional block(s) that need a description and/or a more meaningful name. Then, click the menu icon next to the Group button and click Generate Functional Block Description .
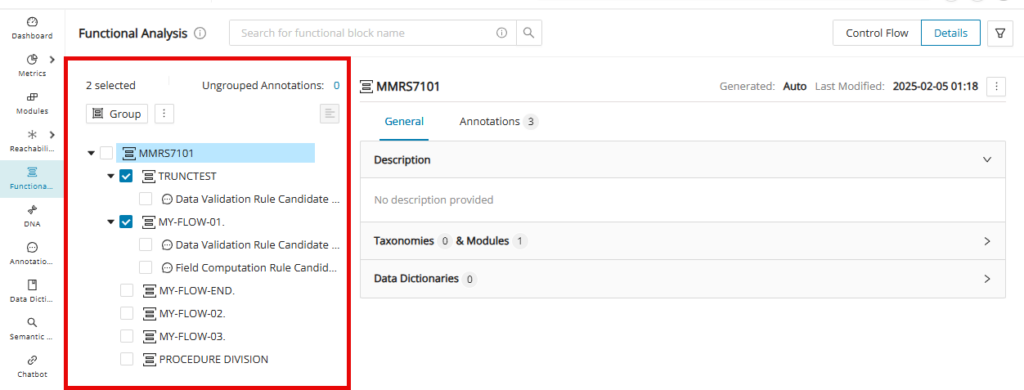
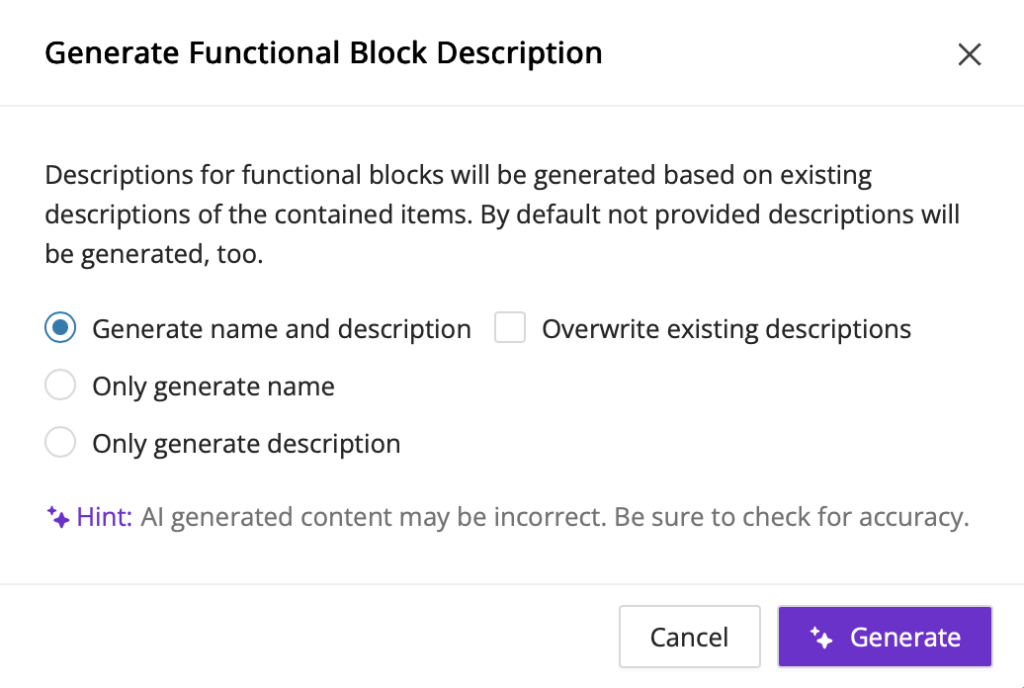
The "Generate Functional Block Description" modal will display, and you can generate the Functional Block names and/or descriptions by clicking Generate . If the selected functional blocks have existing descriptions, they can be overwritten by checking the "Overwrite existing descriptions" option.
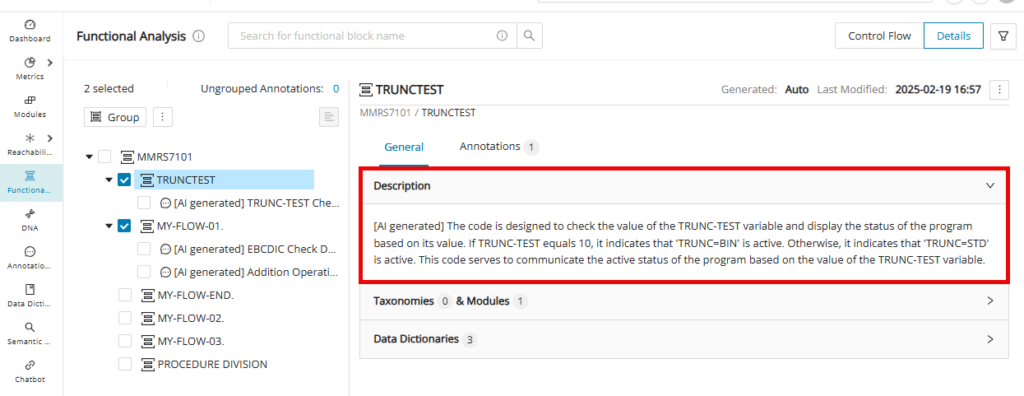
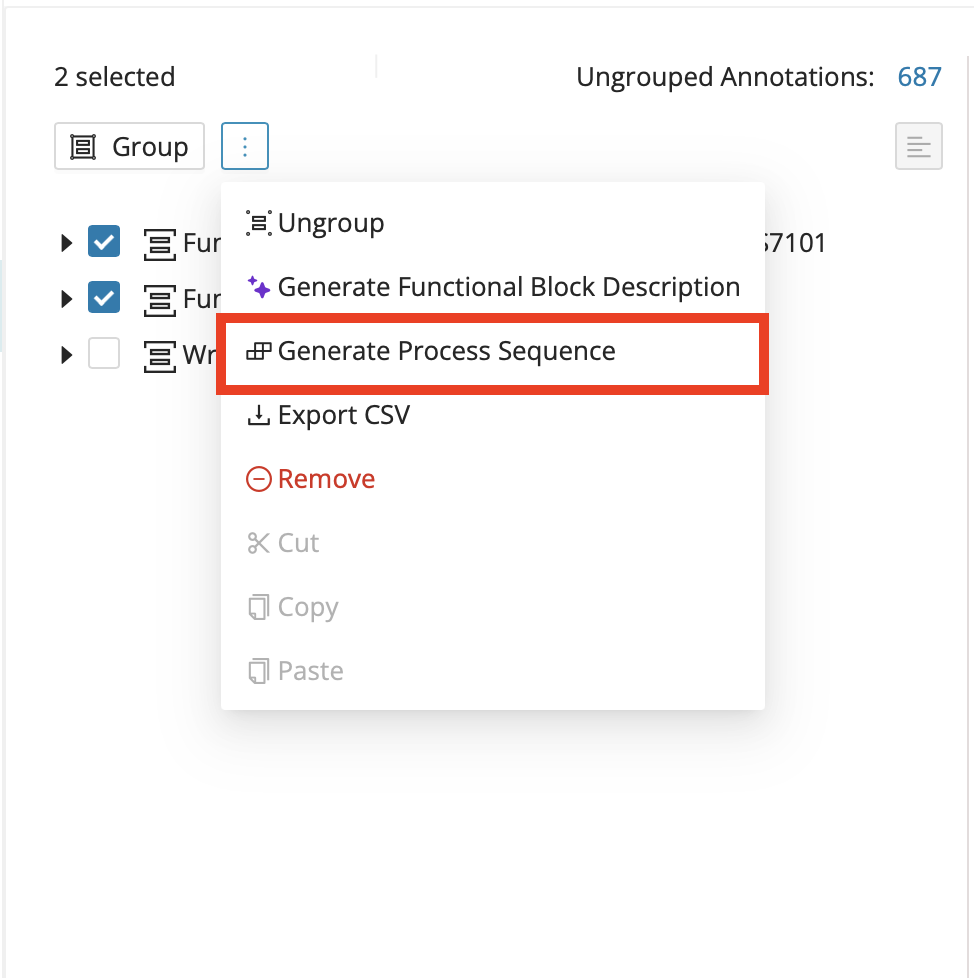
Generate Process Sequence
For the annotations encapsulated within the listed Functional Blocks, you can generate a process sequence (per the execution flow) for them across modules linked to the selected functional blocks in the tree view. This removes the need to manually analyze and sequence annotated rules using custom properties. Alternatively, you can also trigger automated process sequence generation at the module level in batch from the Modules workflow.
Info
Annotations should already exist on the modules associated with the selected functional blocks to allow the system to sequence them per their executable flow.
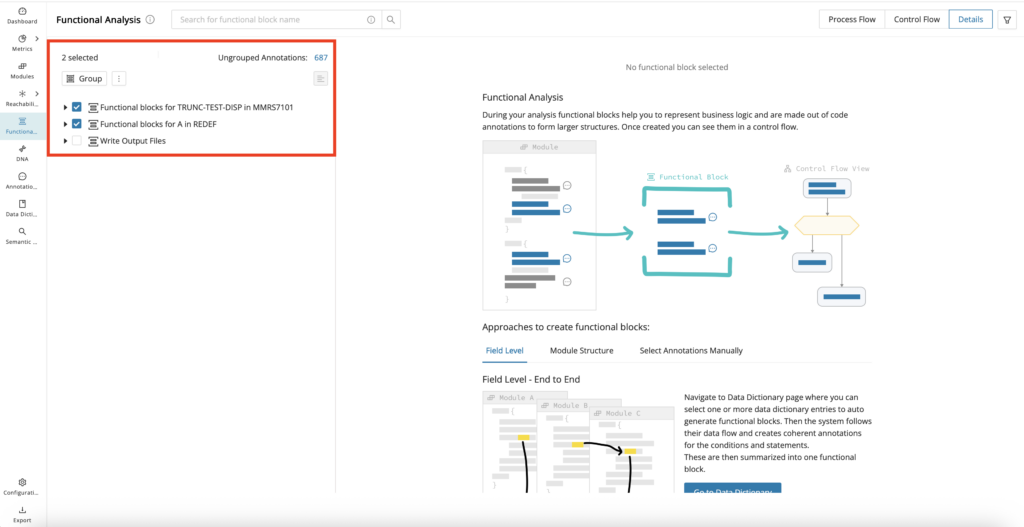
Click the checkbox(es) of the functional block(s) that contain annotations that need automated process sequence generation. Then click the menu icon next to the Group button and click Generate Process Sequence .
Export CSV
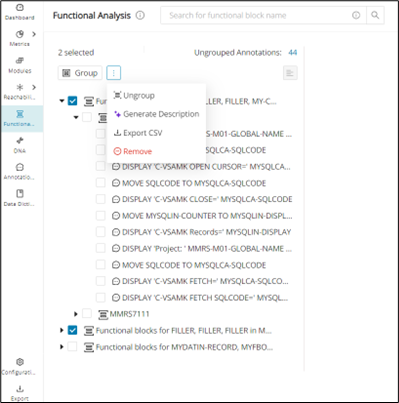
You can export the tree view of functional blocks as a CSV from the Functional Analysis page.
Select the functional block(s) that need to be exported and click the menu icon next to the Group button. Then click Export CSV .
Info
The Export CSV button is still able to be used when selecting nothing to download; contents are downloaded only for the functional blocks that are available based on the filter being applied on the page.
Configuration
Selecting annotations or a mix of annotations and functional blocks will deactivate the Ungroup button.
A CSV file named functional_block_analysis is downloaded. It contains the data of the functional blocks in the sequence specified below:
-
Functional Block Sequence (Level 1)
-
Functional Block Name (Level 1)
-
Functional Block Description (Level 1)
-
Functional Block Sequence (Level 2)
-
Functional Block Name (Level 2)
-
Functional Block Description (Level 2)
-
Functional Block Sequence (Level 3)
-
Functional Block Name (Level 3)
-
Functional Block Description (Level 3)
… -
Module
-
Taxonomy
-
Data Dictionary
-
Annotation ID
-
Annotation Description
-
Annotation Type
-
Annotation Category
-
Annotation State
-
Last Modified By (Annotation)
-
Process Sequences
-
Annotation CFG Translation
-
Annotation Custom property 1
-
Annotation Custom property 2
… -
Functional Block Custom property 1
-
Functional Block Custom property 2
…
Configuration
The feature toggle translateFunctionalBlockCFG must be enabled in the WebUI feature console to see the Annotation CFG Translation column.
Remove
You can remove functional blocks and/or annotations on the functional analysis page. Note that annotations that are unassigned because of the removal will not affect their last modified date, while a functional block with child annotations/functional blocks that are removed will have a modified date.
Step 1:
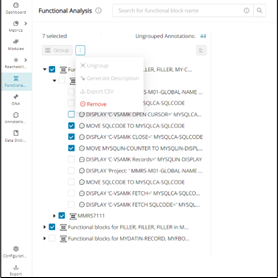
Select one or more functional block(s) and/or annotations and click the menu icon.
Step 2:
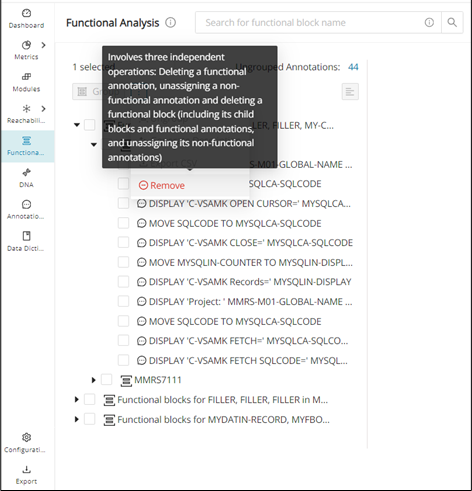
Click Remove from the menu to remove the selected functional block(s)/annotation(s). Hovering on top of Remove reveals a tooltip that describes the Remove operation.
Sort
Sort the Functional Blocks in the "Functional Analysis" page by default order, name, last modified, only annotations, or by source order.
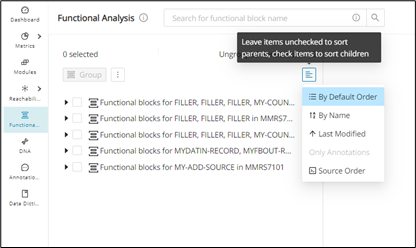
You can sort the children of a functional block in graph SQL queries. Functional blocks can be sorted by annotation offset, module name, and the presence of a functional group type. Additionally, it can sort individual blocks within the functional analysis tree.
The tree view will have an option to sort the children of a particular functional block. To do that, one needs to select the functional block and click the sort icon.
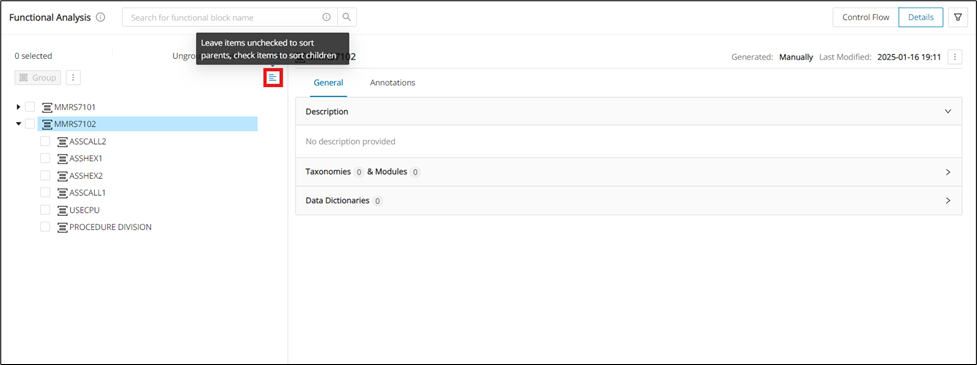
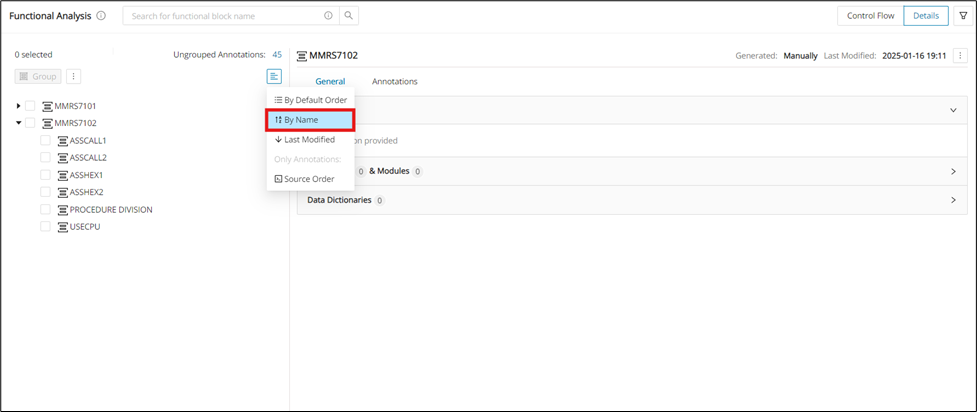
Bulk sorting is not allowed. Sorting will not be done recursively. Only the immediate children will be sorted. The children of any sub-block will not be sorted.
When the top-level sorting is done, it selects the current sorted option in blue.
The tooltip for the sorting button adapts to its state.
Enabled: "Leave items unchecked to sort parents, check items to sort children".
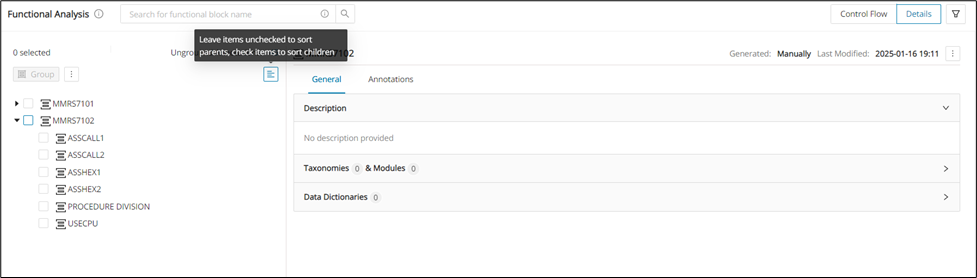
Disabled: "Sorting not applicable to the current selection."
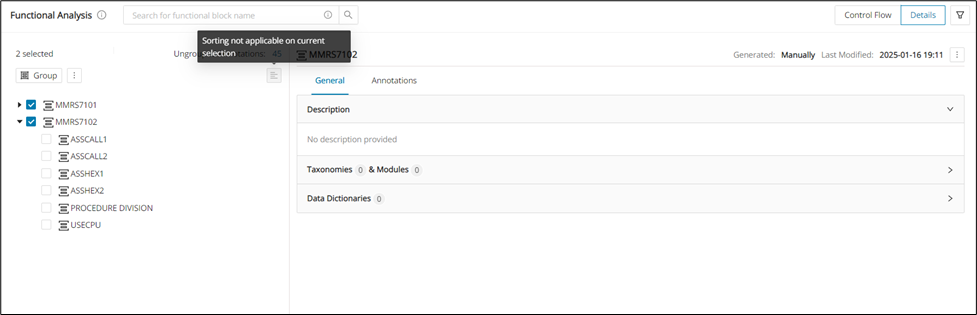
The sorting within a selected functional block could be done either:
-
Default (Also covers re-ordering via manual drag and drop)
-
Alphabetically (ascending/descending)
-
Last Modified
-
Source Order
Sorting by Alphabetically, Last Modified, or Source code should not be persistent.
Details view
The Details View, which is the default view of the Functional Analysis page after creating at least one functional block, summarizes the selected functional block or annotation's description, related taxonomies, modules, data dictionaries, and annotations. You can switch between Process Flow, Control Flow, and Details View from the tabs located at the top right of the Functional Analysis page.

Details View for Functional Block
Editing Functional Blocks
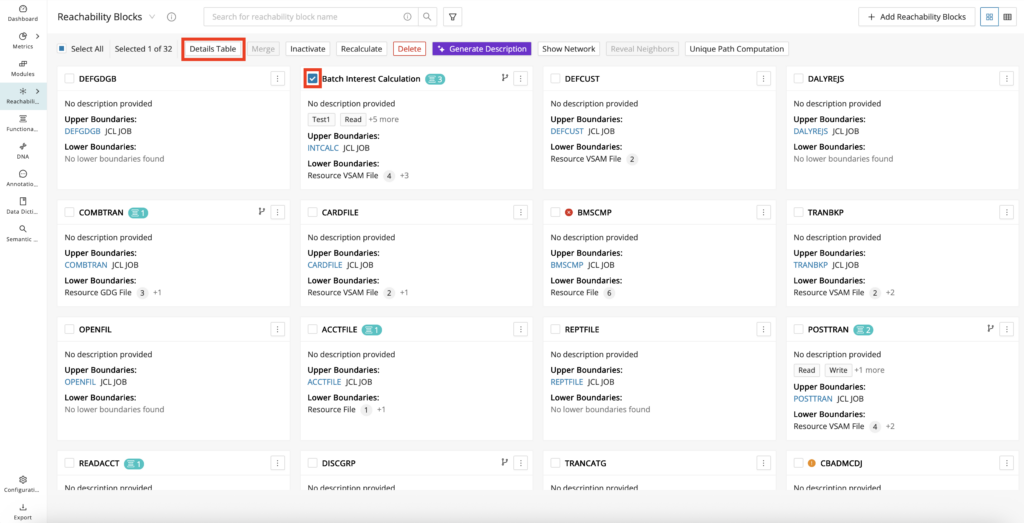
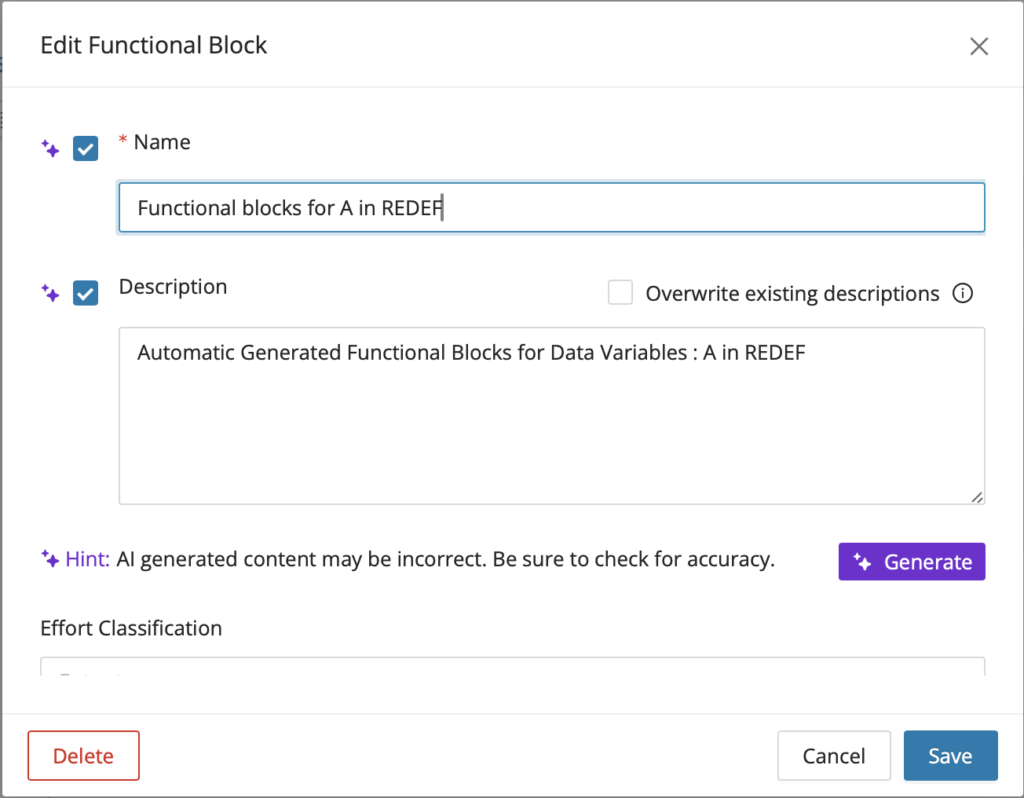
Click the edit icon at the top of the "Details View" and edit the name and description of the selected functional block. The Functional Block name will update, and the description will update accordingly under the "Description" dropdown after saving changes in the Edit Functional Block modal.

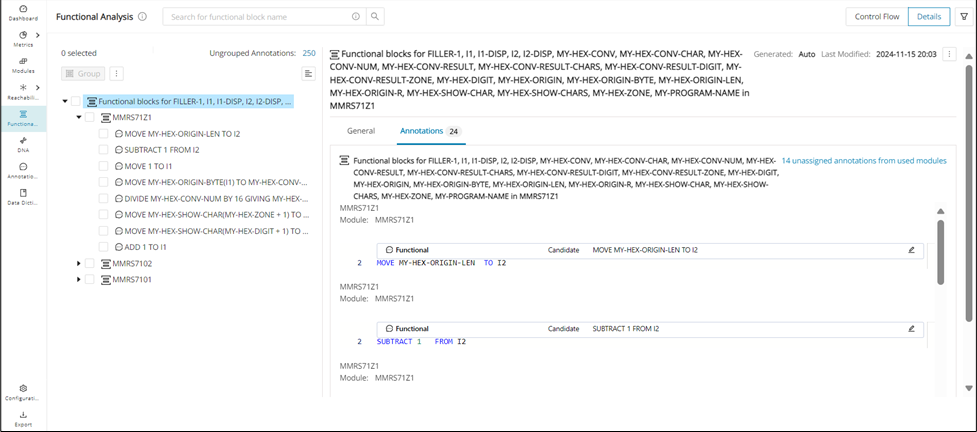
The content in the details view of the functional block is segregated into different tabs.
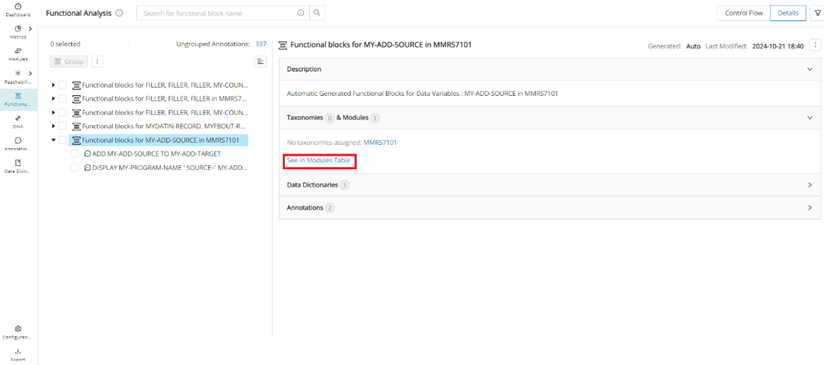
The "Taxonomies & Modules" dropdown details the assigned taxonomies and modules in the functional block. Click See in Modules Table to open a new tab that shows the modules in the functional block within the "Modules" page.
The "Data Dictionaries" dropdown gives a preview of the data dictionary table in the "Details View". Click See in DataDictionary Table to open a new tab to see the Data Dictionary table of the functional block in the "Data Dictionary" page.
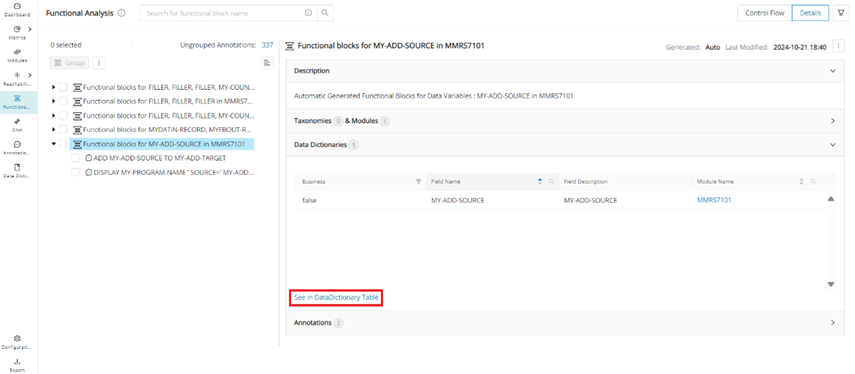
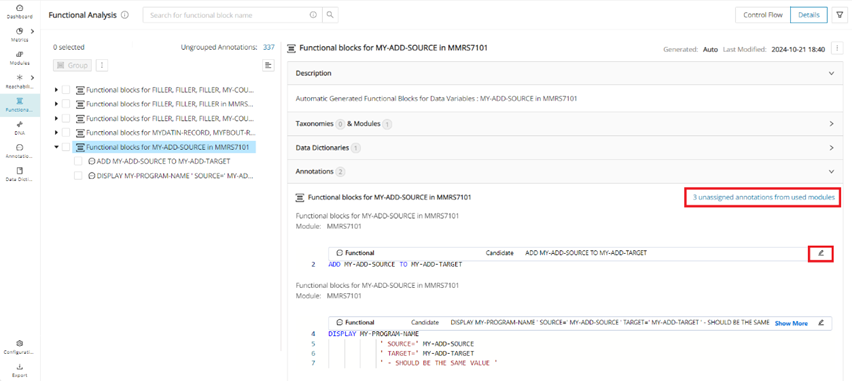
Finally, under the "Annotations" dropdown menu, you can open a saved search with the list of ungrouped annotations in a new tab when you click "unassigned annotations from used modules". You can also directly edit the annotations from the "Details View" by clicking on the edit icon.
Details View for Annotations
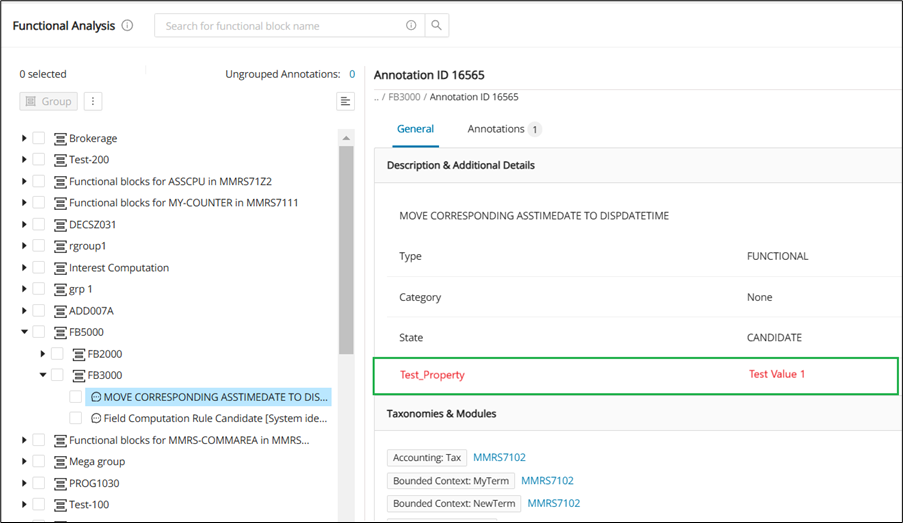
The details view for annotations in the Functional Analysis page also contains "Additional Details", which contain both default and custom properties (if applicable). Please note, custom properties will only show if the selected annotation contains a value for the property. To learn more about custom properties for annotations, please take a look at Annotations Configuration.
Process flow
The Process Flow view in the Functional Analysis page graphically shows a flow sequence of any selected functional block based on the executable process flow of the modules containing the functional Blocks. To access a functional block's process flow, select the desired functional block and then click the Process Flow tab at the top right.

Configuration
Empty functional blocks will have their Process Flow tab disabled.
Recalculate Process Flow
Grouped functional blocks within the selected functional block will show as expandable nodes with their own process flow sequences. Grouping changes in the tree view need to have the process flow restored to its default state by clicking Recalculate .
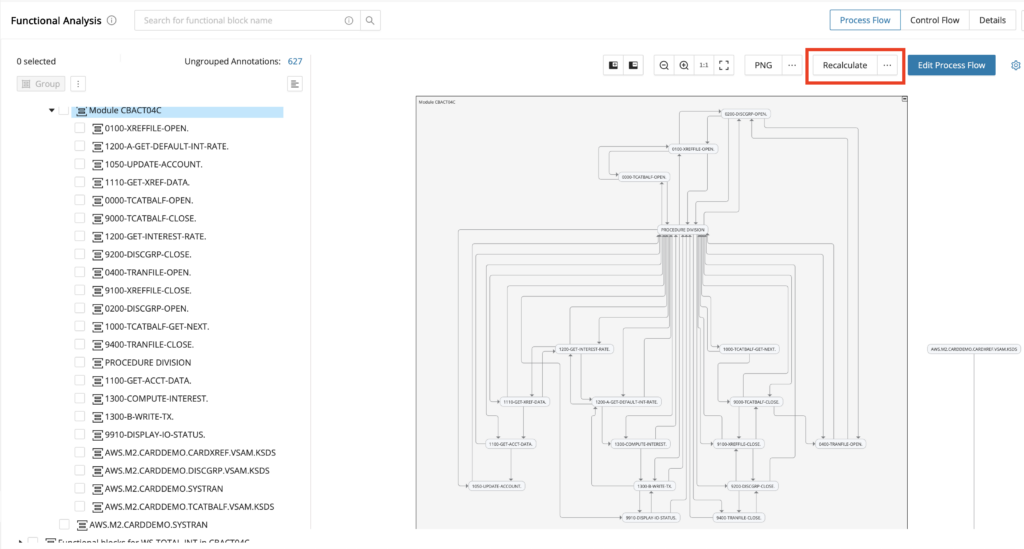
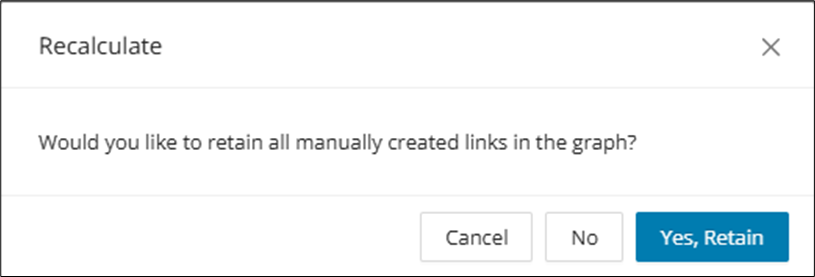
Recalculate gives the option to retain all manually created links in the graph in the following window.
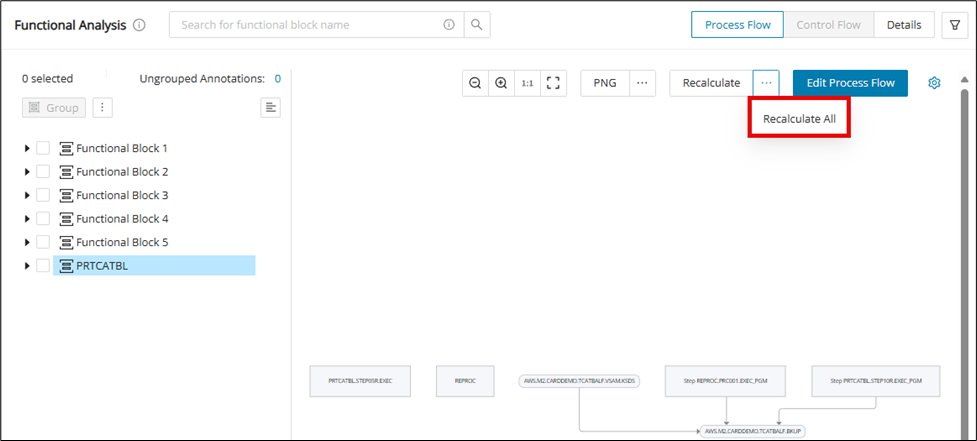
To recalculate the selected functional block as well as its children, click Recalculate All .
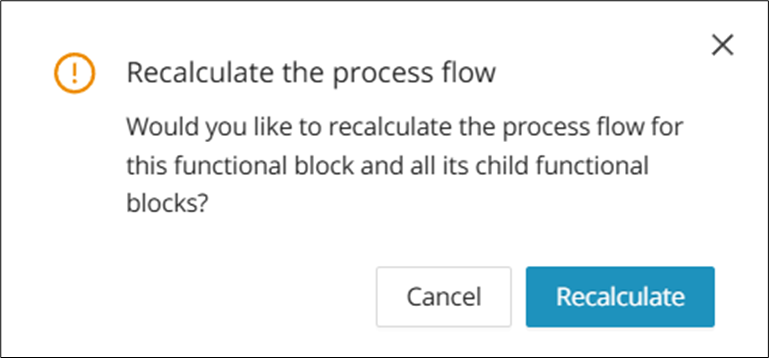
The following alert window will show after clicking Recalculate All . Click Recalculate after verifying.
Edit Process Flow
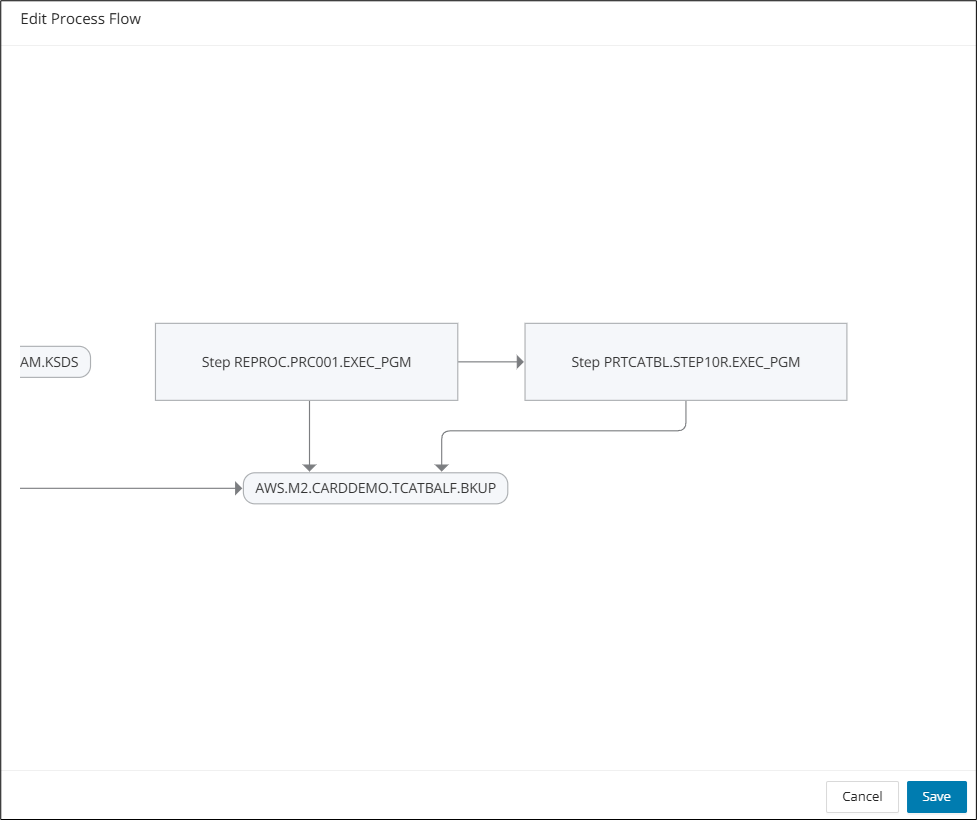
The selected functional block's process flow will display as a flow sequence. The process flow is view-only by default. To edit the process flow, click Edit Process Flow to open the edit window.
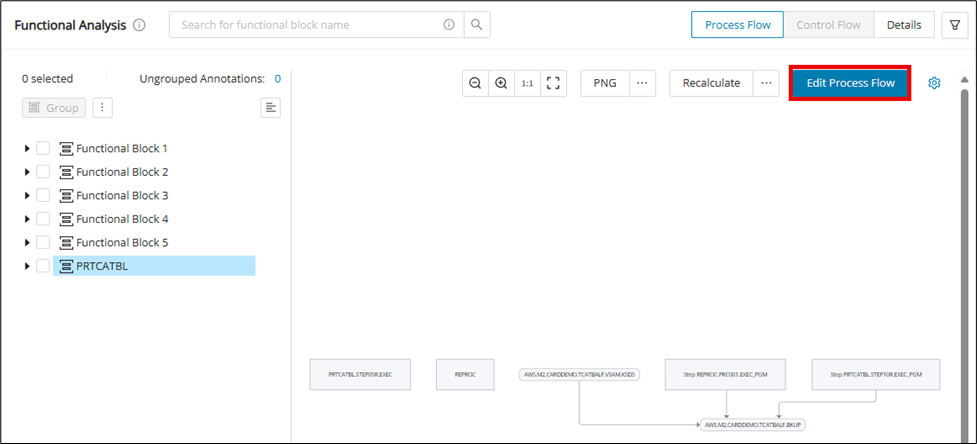
While editing the graph, it is also possible to change the shapes of the nodes to visually signal certain core operations happening along the process flow, including decisions and database Input/Output. Simply click on a node and hover over the edit node shape icon and pick the desired shape for the node.
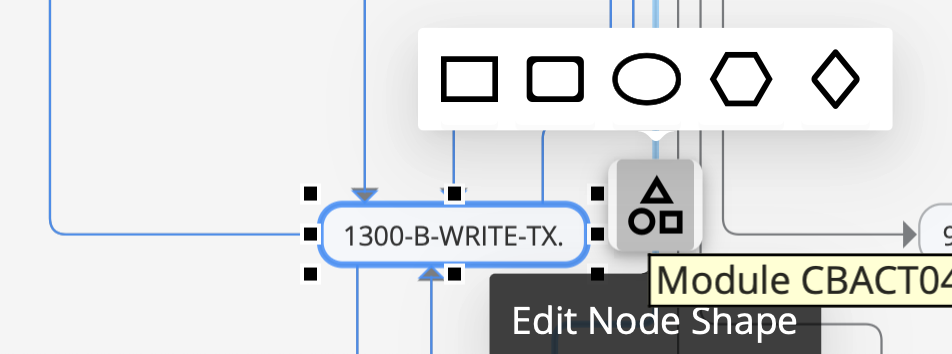
Click Save after making the necessary process flow changes.
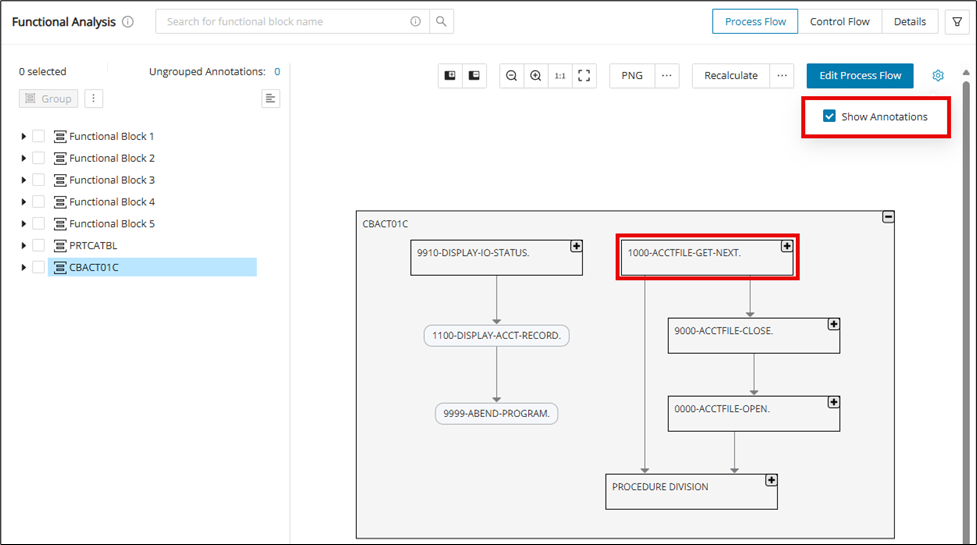
Show Annotations in Process Flow
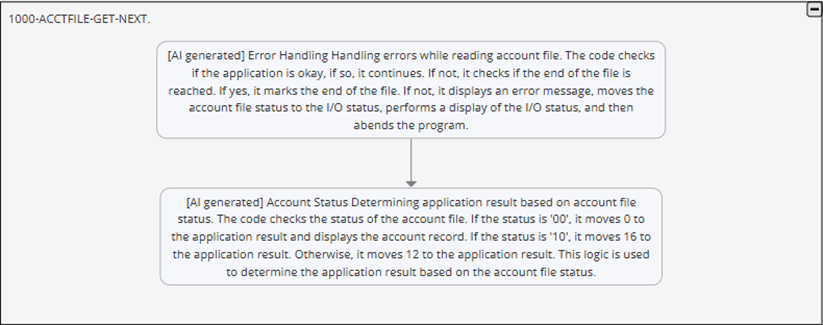
To show/hide the annotations within the Process Flow, click the settings icon in the upper right corner to reveal the dropdown for "Show Annotations". When "Show Annotations" is enabled, all expanded functional block nodes display their contained annotation nodes within. Annotations are connected based on their configuration in the tree view.
Expanded nodes containing annotations are shown below:
Control Flow
When the CFG node is clicked, the code viewer section, along with the relevant portion of the Code Viewer code, will be highlighted.
The side panel Code Viewer will have the double arrow buttons to expand and collapse the Code Viewer.
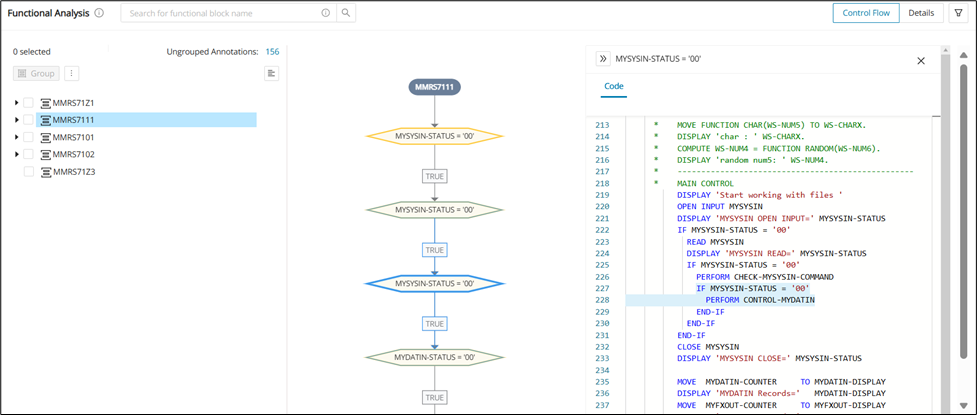
Configuration
Empty functional blocks will have their Control Flow tab disabled.
Search Control Flow Graph for structural and manual Functional Block
| Use Case | Control Flow Graph Visibility |
|---|---|
| Functional blocks created from annotation manual assignment that have all annotations part of the same module. | Visible |
| Functional blocks generated via Reachability Analysis. | Visible |
| Functional blocks generated via the Module Structure approach. | Visible |
| Functional blocks generated via the Semantic Functional Block approach. | Visible |
| Functional blocks generated via the Field Level Mining approach (CodeViewer or Data Dictionary). | Visible |
| Functional blocks generated via the Field Level Mining approach (CodeViewer or Data Dictionary), and if a new annotation from the same module gets added to the block | Visible |
| Functional blocks generated via the Field Level Mining approach (CodeViewer or Data Dictionary), and if a new annotation from a different module gets added to the block | Visible |
| Functional blocks generated via the Field Level Mining approach (CodeViewer or Data Dictionary), and if a new annotation from a different module gets added to the block | Visible |
The disabled Control Flow will have a tool tip mentioning that the button has been disabled, as the graph cannot be generated.
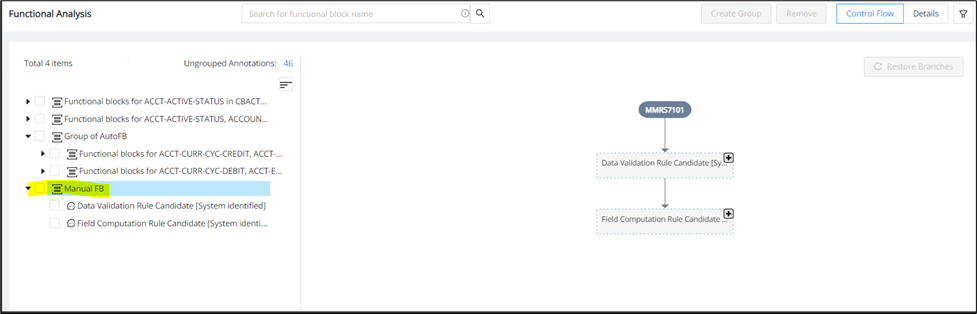
Control Flow for manual Functional Block
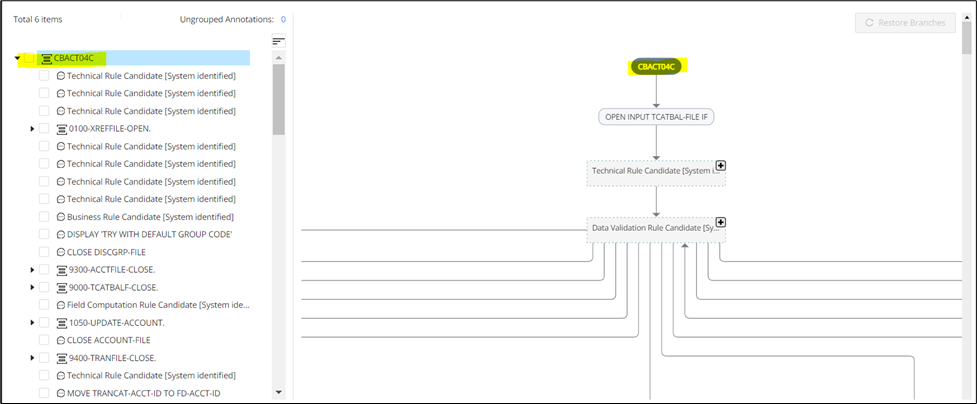
Control Flow for structural Functional Block
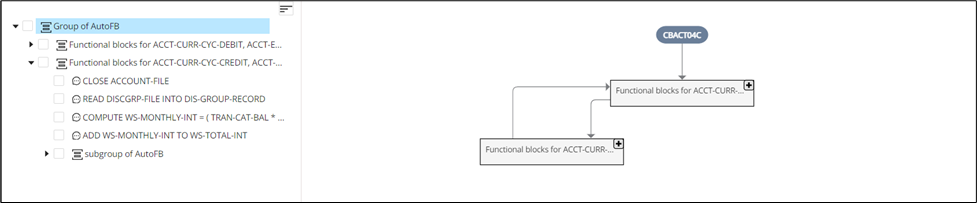
The collapsible on the graph will be shown for the Functional Group's direct children of the selected group. Inside this collapsible, you will see all children with no more collapsibles inside (you can see the collapsible only at one level).
Filter
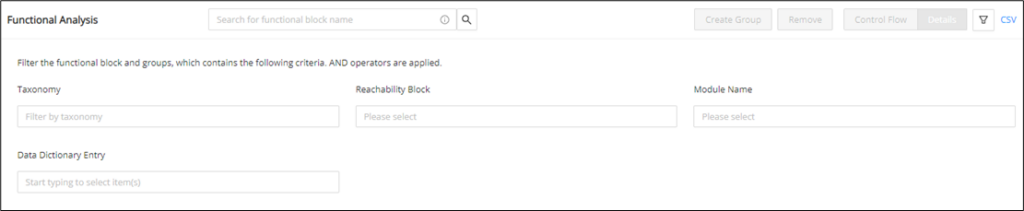
With this function, users can apply any filter or combination of filters to get the functional block(s) associated with the criteria.
The Functional Analysis window displays filters for:
-
Taxonomy
-
Reachability Block
-
Module Name
-
Data Dictionary Entry
Multiple options can be selected from the four filter drop-down lists.
To apply the filter function:
Step 1:
Click the filter icon.
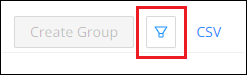
The Functional Analysis window opens, displaying all filter options.
Step 2:
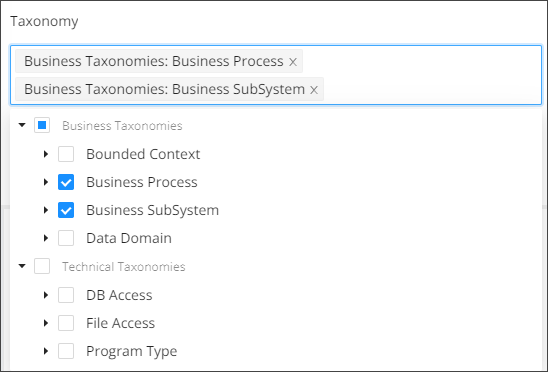
Select the appropriate option(s) from the Taxonomy drop-down list.
Step 3:
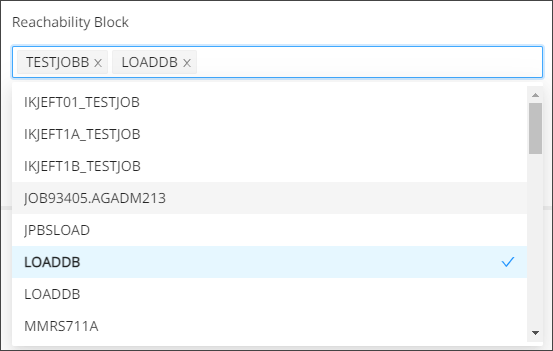
Enter the name of the reachability block(s) and select the desired option from the drop-down list of the Reachability Block.
Step 4:
Enter the name of the module and select it from the drop-down list of the Module Name filter.
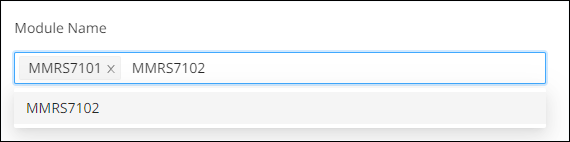
Step 5:
Enter the name of the data dictionary and select the desired option from the drop-down list of Data Dictionary Entry. The functional blocks with the mentioned data dictionary will be filtered.
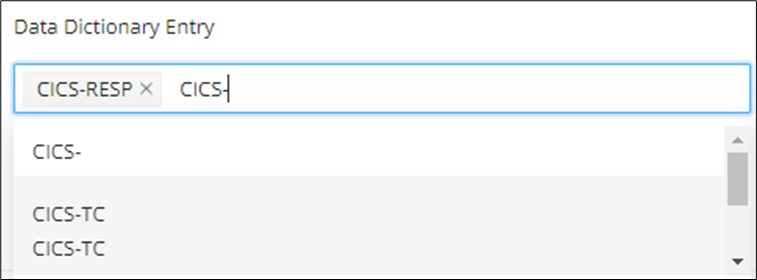
Step 6:
To clear the selection, click Reset

Navigation from Reachability Blocks
This functionality allows the user to view all of the functional blocks associated with the respective reachability block.
To view the referenced functional blocks:
Step 1:
Click the green badge icon shown below on the reachability block.
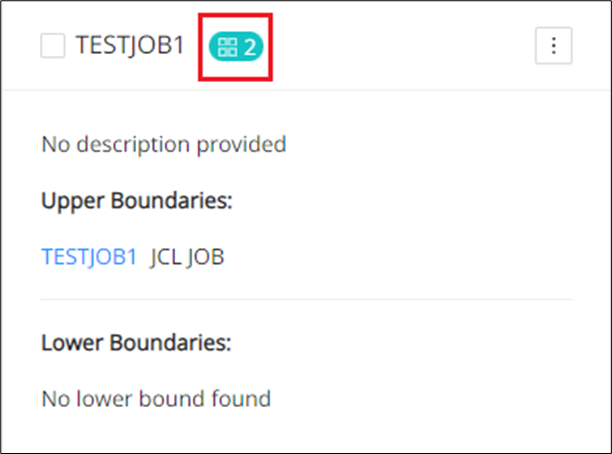
Step 2:
The user will be redirected to the Functional Analysis page that displays the functional blocks associated with the reachability block.
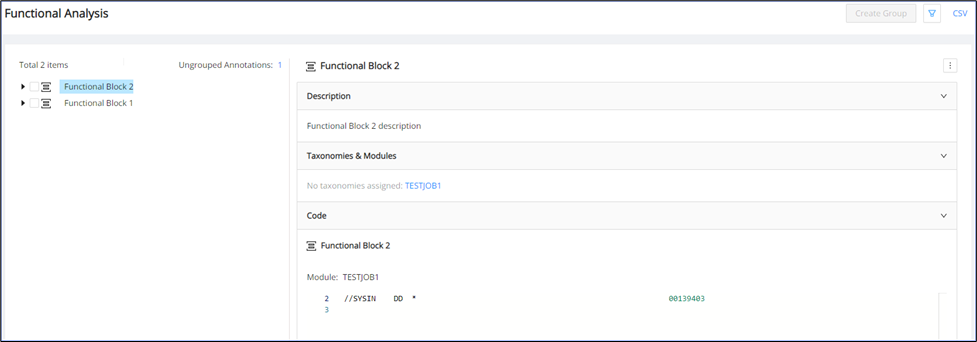
Step 3:
The Reachability Block filter will be populated with the block name.

Search Functional Blocks inside tree view on Functional Analysis page
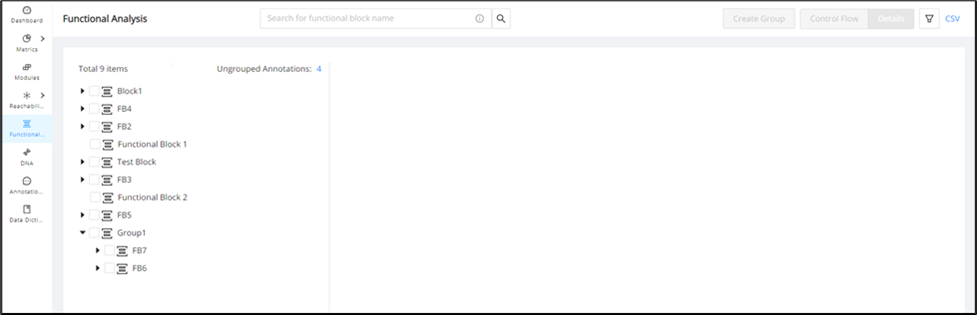
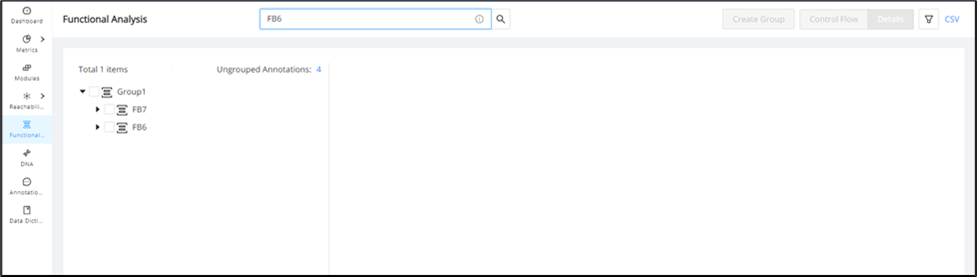
Functional blocks within the tree structure can be searched on the Functional Analysis page. The user can search functional blocks by full name and with wildcards. Hover over the tooltip icon for the Wildcard Syntax.
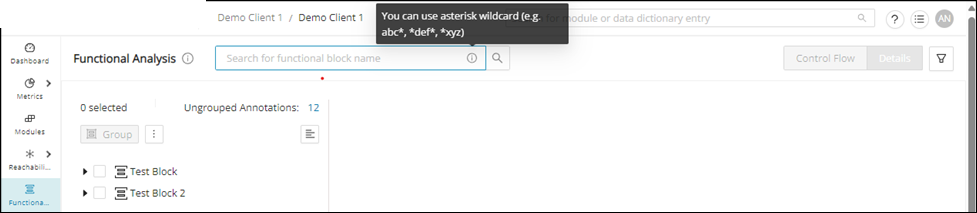
Blocks available inside a functional group can also be searched with full name and wildcards.
Custom properties for Functional Blocks
Further customize the output of your Functional Analysis by using Custom Properties. Similar to the use of custom properties across Mining, you can create custom String Input, String Repeater, URL, and Select Tag fields and edit them for each Functional Block to provide additional context, for example, (industry or client-specific meaning surrounding the source code).
Step 1:
Configure your custom property(s) scoped to Functional Blocks from the Configuration page.
Step 2:
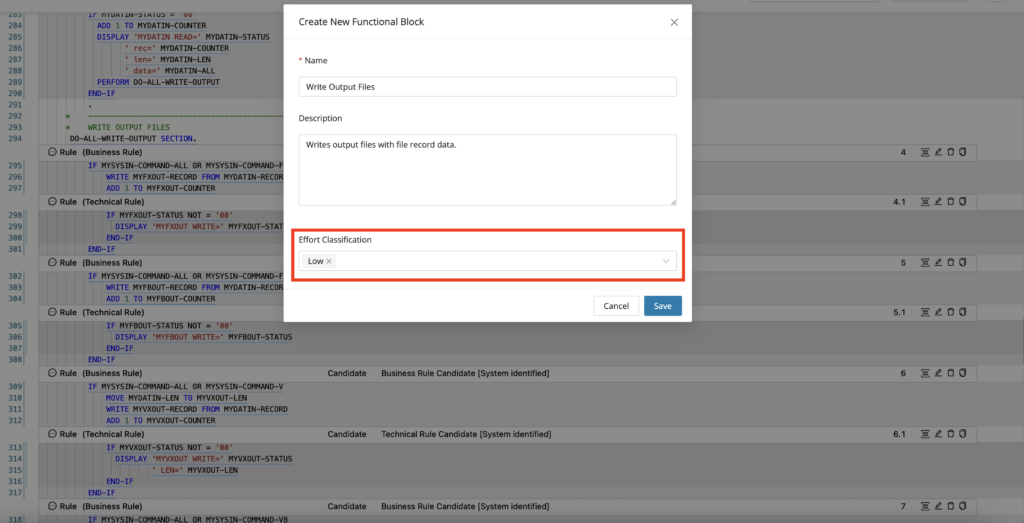
Populate the custom property when creating a new Functional Block manually or when editing an existing Functional Block.
Adding Custom Properties during Functional Block creation:
Adding or editing Custom Properties during Functional Block editing: