Tools
The Tools menu provides supporting utilities for maintaining and correcting project data in Decompose. These pages help you validate imported queries, repair schema artifacts, and manage other project-level configuration details. Use them when your workflow requires inspection or cleanup rather than primary decomposition analysis.
SQL Validator
The SQL Validator validates SQL queries for a selected bounded context against modernized databases to display missing columns. It also displays the columns that are part of another context.
To access the SQL Validator, select Tools > SQL Validator in the left navigation panel. Import the schema, bounded contexts, modules, and queries for your project before using this tool.
Selecting a bounded context
Select the desired bounded context from the drop-down list in the upper right corner. After you select a context, the validator populates the query table with all modules assigned to that bounded context. You can switch the bounded context at any time using this drop-down.
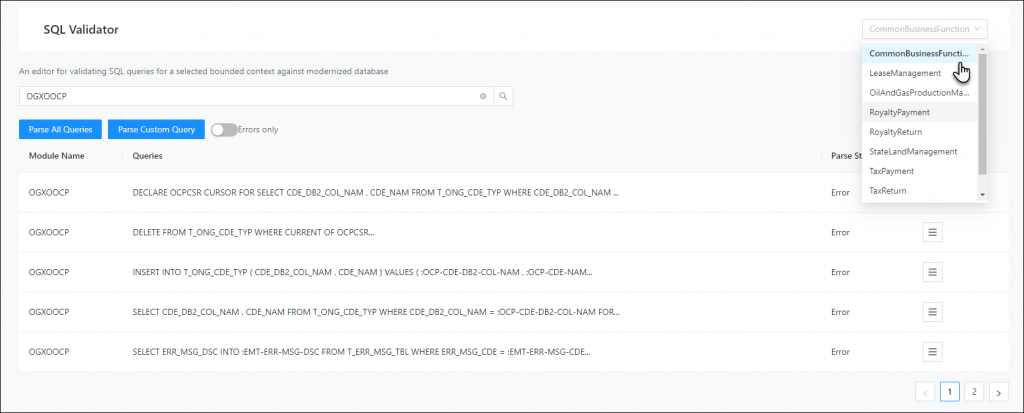
Query table
The main view displays a table of all modules and their queries for the selected bounded context.
| Column | Description |
|---|---|
| Module Names | The name of the module associated with the query. Click the module name to highlight the row. |
| Queries | The SQL query text, truncated if the query is long. |
| Parse Status | The parse result for the query (for example, Success). |
| Missing Columns | The number of columns referenced in the query that are missing from the modernized database. |
| Parse Details | Click the icon to open the parse details view for that query. |
Validating all queries
Click Validate All Queries to parse and validate all queries in the table and update the parse status for each row.
Viewing parse details
Click the icon in the Parse Details column for a query to open the parse details view. This view displays the parsed query with syntax highlighting and line numbers, along with the validation result (for example, Successfully parsed the query against Modernised Database). If the query has missing columns or columns belonging to different contexts, this information is displayed below the query.
Parsing a custom query
Click Parse And Validate Custom Query to open the custom query editor. Enter any SQL query in the code editor and click Parse and Validate Query to validate it against the modernized database. The editor displays the validation result below the query.
Query Editor
The Query Editor is a tool for viewing, modifying, and validating ingested queries. It displays all queries associated with each module and their originating database. Use the Query Editor as a repair tool to update or fix queries that are incorrect or slightly outdated.
To access the Query Editor, select Tools > Query Editor in the left navigation panel.
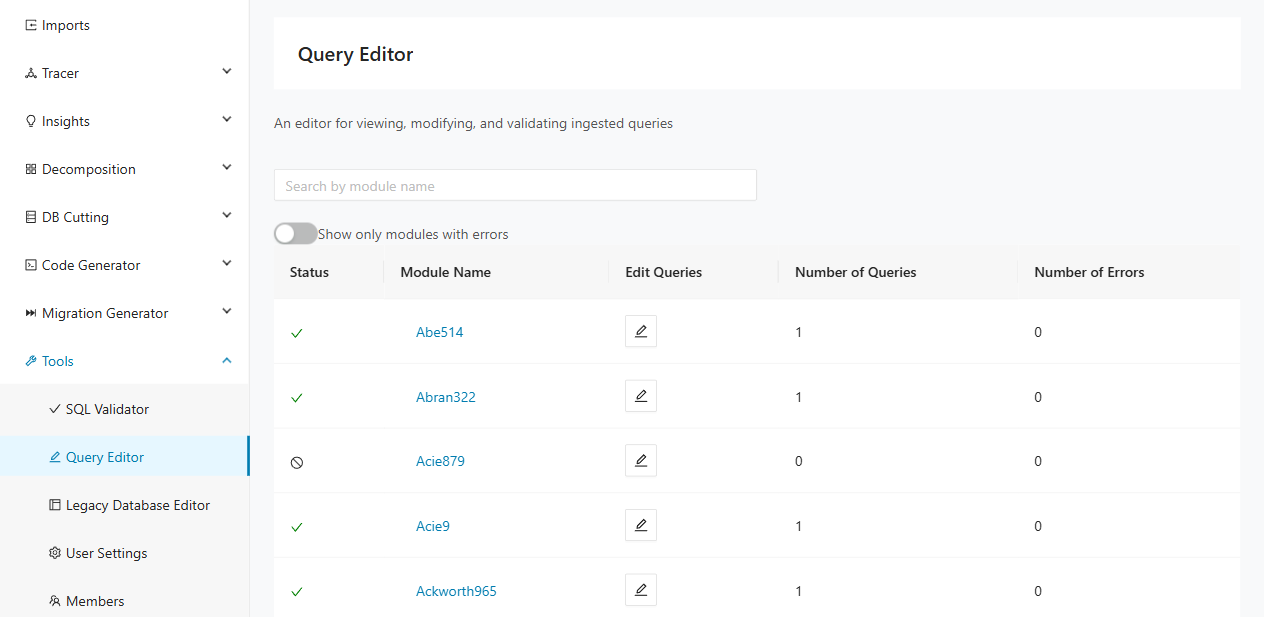
Module listing
The main view presents a table of all modules in the current project. Each row displays the module status, name, and query statistics.
| Column | Description |
|---|---|
| Status | A green checkmark indicates all queries parsed successfully. A red X indicates one or more queries have errors. A gray stop icon indicates the module has no queries. |
| Module Name | The name of the module. Click the name to highlight the row. |
| Edit Queries | Click the pencil icon to open the query editor for that module. |
| Number of Queries | The total number of queries associated with the module. |
| Number of Errors | The number of queries that failed to parse. |
Use the Search by module name text field to filter modules by name. Enable the Show only modules with errors toggle to display only modules that contain query parse errors.
The following screenshot shows the module listing with the error filter enabled, displaying only modules with parsing errors.
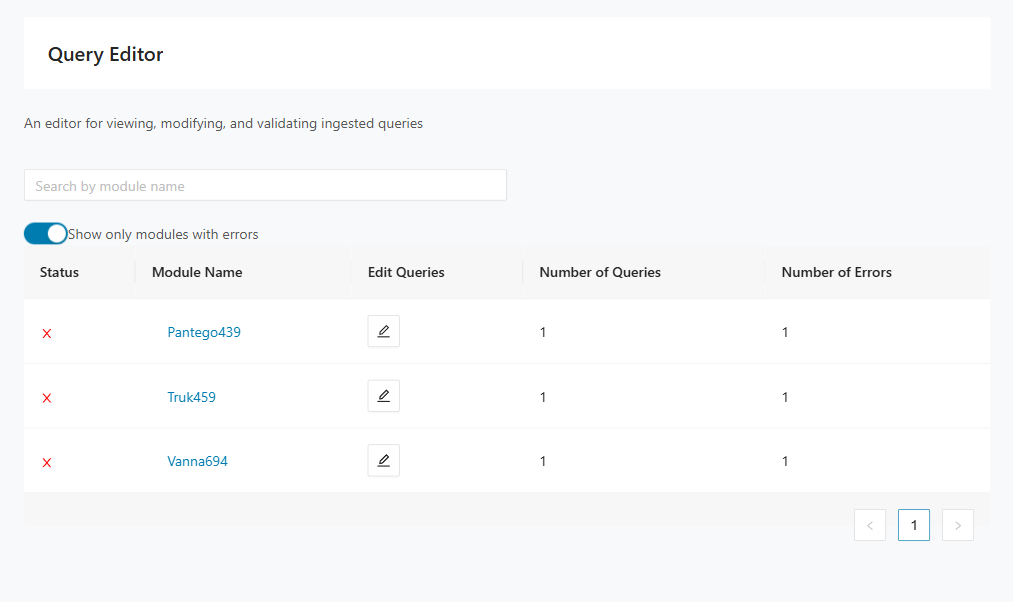
Editing queries for a module
Click the pencil icon in the Edit Queries column to open the query editor for a specific module. The heading updates to show the module name.
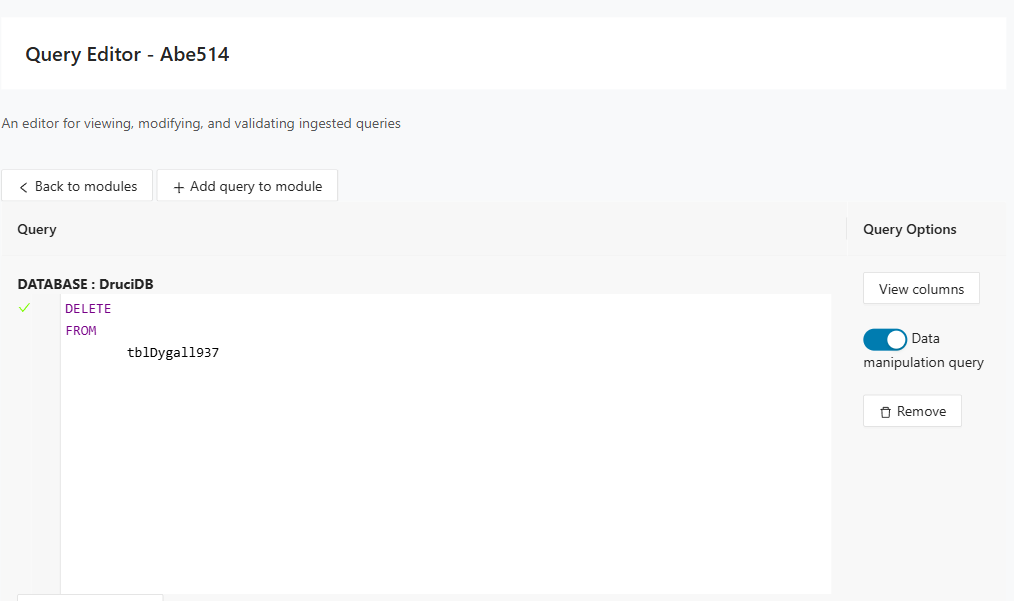
The query detail view contains the following elements:
- Back to modules — Click Back to modules to return to the module listing.
- Add query to module — Click Add query to module to create a new query for the module.
- Query table — Lists each query with two columns: Query and Query Options.
Each query row displays:
| Element | Description |
|---|---|
| Database label | The name of the database the query targets (for example, DATABASE : LegacyDB). |
| Query editor | An inline code editor with syntax highlighting and line numbers. SQL keywords are color-coded. You can edit the query text directly within this editor. |
| Submit for parsing | Click Submit for parsing to revalidate the query after making changes. |
| View columns | Click View columns to open the Add Table/Column dialog showing columns associated with the query. |
| Data manipulation query | A toggle that marks whether the query is a data manipulation query. |
| Remove | Click Remove to delete the query from the module. |
Queries with errors
When a query fails to parse, the editor displays a QUERY ERROR section below the query text. This section shows the full error message including the exception details and the location of the parsing failure.
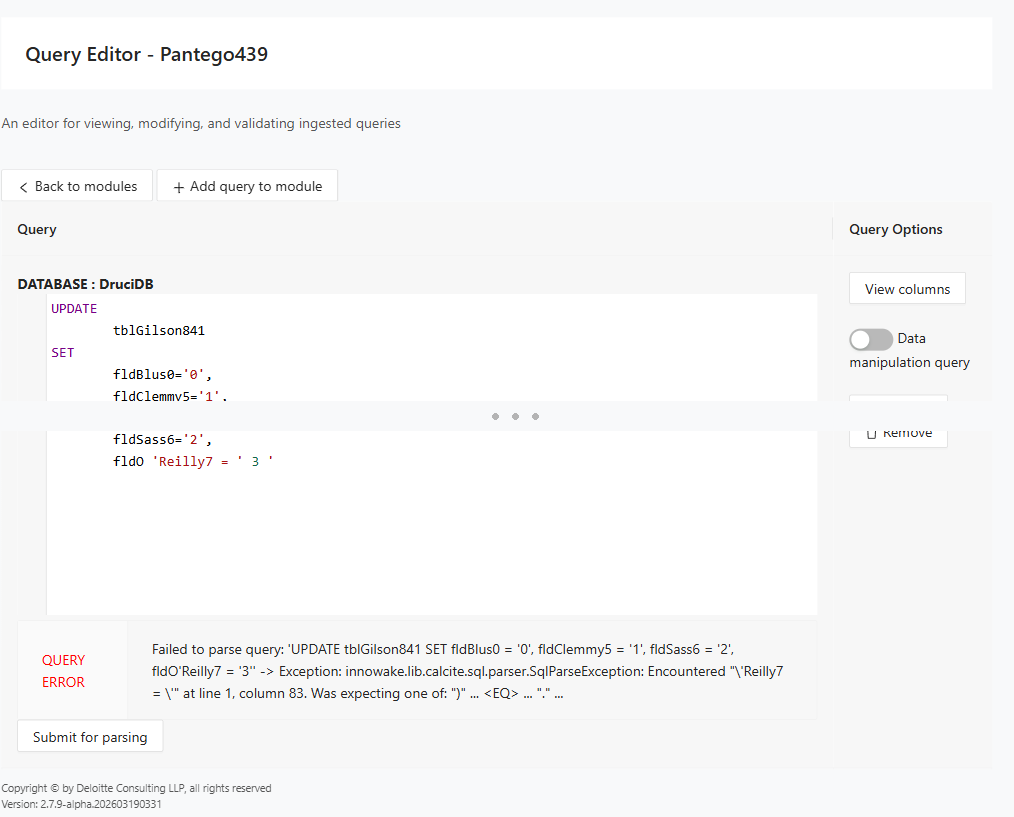
To fix a query error, edit the query text in the inline editor and click Submit for parsing to revalidate.
Viewing and managing columns
Click View columns on any query to open the Add Table/Column dialog. This dialog has two tabs: Current Columns and Add New Columns.
Current Columns
The Current Columns tab displays columns currently associated with the query.
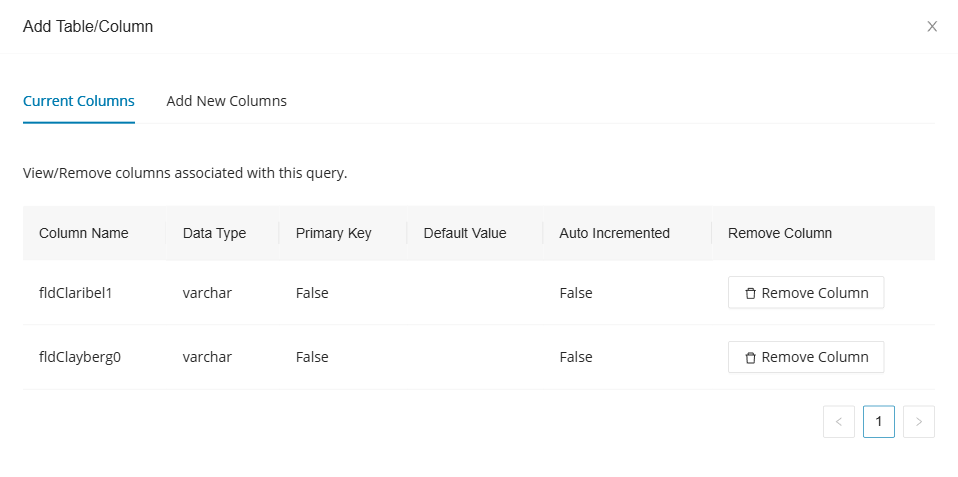
| Column | Description |
|---|---|
| Column Name | The name of the column. |
| Data Type | The data type of the column (for example, varchar). |
| Primary Key | Whether the column is a primary key. |
| Default Value | The default value assigned to the column, if any. |
| Auto Incremented | Whether the column auto-increments. |
| Remove Column | Click Remove Column to disassociate the column from the query. |
Pagination controls appear at the bottom of the table when there are multiple pages of columns.
Add New Columns
The Add New Columns tab allows you to associate new columns with the query.
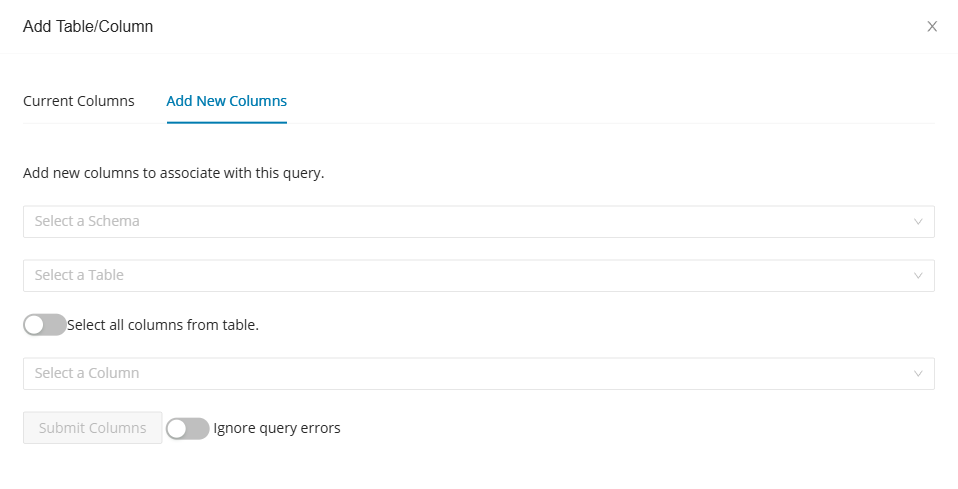
- Select a schema from the Select a Schema drop-down.
- Select a table from the Select a Table drop-down.
- Optionally, enable the Select all columns from table toggle to select every column in the chosen table.
- If not selecting all columns, choose a specific column from the Select a Column drop-down.
- Optionally, enable the Ignore query errors toggle to submit columns even if the query has parse errors.
- Click Submit Columns to associate the selected columns with the query.
Adding a new query
Click Add query to module to open the Create Query for Module dialog.
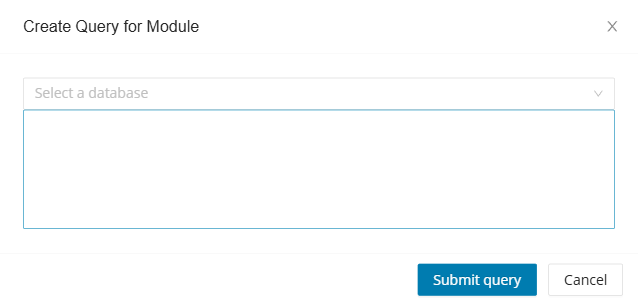
- Select the target database from the Select a database drop-down.
- Enter the SQL query text in the text area.
- Click Submit query to add the query to the module, or click Cancel to discard.
Legacy Database Editor
The Legacy Database Editor allows you to view and modify the imported database schema for your project. Use it as a repair tool to correct tables, columns, views, and other schema objects that are incorrect or outdated.
To access the Legacy Database Editor, select Tools > Legacy Database Editor in the left navigation panel.
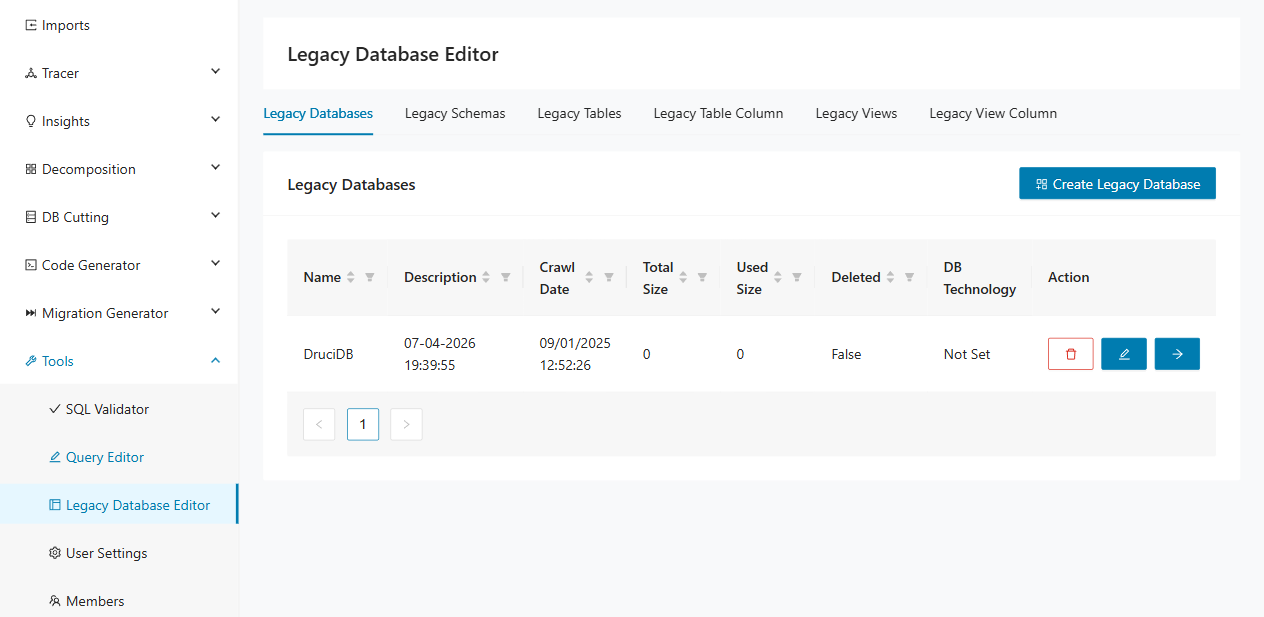
The editor organizes the schema into six tabs that follow the database hierarchy: databases, schemas, tables, table columns, views, and view columns. Each tab provides a table listing with sorting, filtering, pagination, and action buttons for creating, editing, and deleting entries. To navigate deeper into the hierarchy, click the arrow action button on a row. The next level opens, filtered to that parent object.
Legacy Databases
The Legacy Databases tab lists all databases in the current project.
| Column | Description |
|---|---|
| Name | The name of the database. |
| Description | A description or timestamp associated with the database. |
| Crawl Date | The date and time the database was last crawled. |
| Total Size | The total size of the database. |
| Used Size | The used size of the database. |
| Deleted | Whether the database is marked as deleted. |
| DB Technology | The database technology (for example, Postgres, MySQL, SQL Server, Oracle, or DB2). |
| Action | Provides options to delete, edit, or navigate into the database schemas. |
Each row in the Action column provides three buttons:
- Delete ( trash icon) — Remove the database entry.
- Edit ( pencil icon) — Open the Edit Legacy Database dialog to modify the database properties.
- Navigate (arrow icon) — Open the Legacy Schemas tab filtered to the selected database.
Creating a new legacy database
Click Create Legacy Database to open the New Legacy Database dialog.
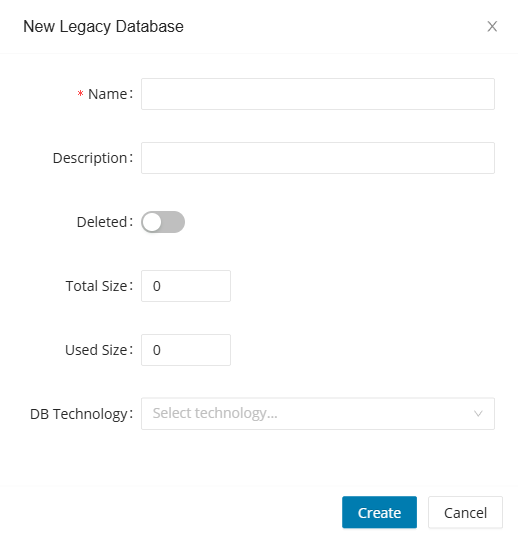
The dialog contains the following fields:
| Field | Description |
|---|---|
| Name | Required. The name of the database. |
| Description | An optional description for the database. |
| Deleted | A toggle to mark the database as deleted. |
| Total Size | The total size of the database (numeric input). |
| Used Size | The used size of the database (numeric input). |
| DB Technology | Select the database technology from the drop-down. Options include Postgres, MySQL, SQL Server, Oracle, and DB2. |
Click Create to add the database, or click Cancel to discard.
Editing a legacy database
Click the pencil icon in the Action column to open the Edit Legacy Database dialog. This dialog contains the same fields as the creation dialog, pre-populated with the existing values. Click Update to save changes.
Legacy Schemas
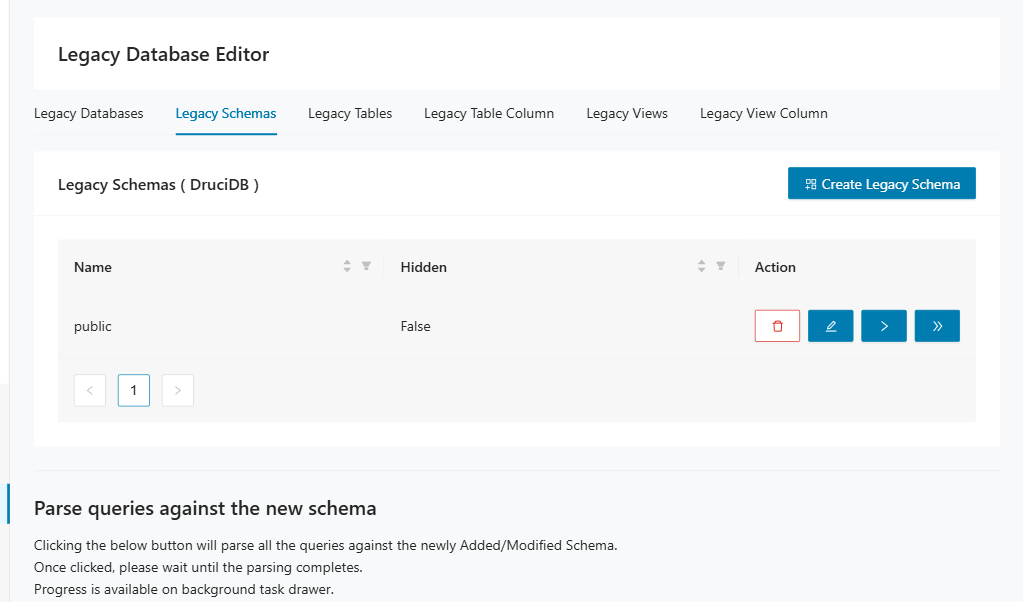
The Legacy Schemas tab displays the schemas belonging to a selected database. The heading shows the parent database name (for example, Legacy Schemas ( LegacyDB )).
| Column | Description |
|---|---|
| Name | The name of the schema. |
| Hidden | Whether the schema is hidden from the decomposition views. |
| Action | Provides options to delete, edit, navigate to tables, or navigate to views. |
Each row in the Action column provides four buttons:
- Delete ( trash icon) — Remove the schema.
- Edit ( pencil icon) — Open the edit dialog to modify the schema.
- Navigate to tables (arrow icon) — Open the Legacy Tables tab filtered to the selected schema.
- Navigate to views (double arrow icon) — Open the Legacy Views tab filtered to the selected schema.
Click Create Legacy Schema to add a new schema to the database.
Below the schema table, the Parse queries against the new schema section reparses all queries against schema modifications. Click Parse to start the process. Progress is available in the background task drawer.
Legacy Tables
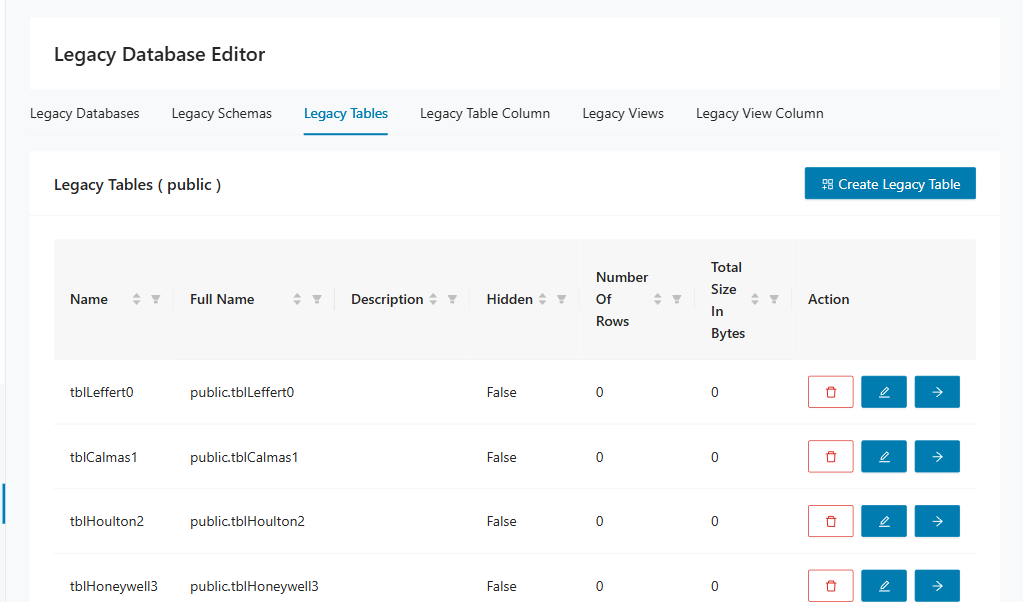
The Legacy Tables tab lists all tables within a selected schema. The heading shows the parent schema name (for example, Legacy Tables ( public )).
| Column | Description |
|---|---|
| Name | The name of the table. |
| Full Name | The fully qualified name including the schema (for example, public.customers). |
| Description | An optional description of the table. |
| Hidden | Whether the table is hidden from the decomposition views. |
| Number Of Rows | The number of rows in the table. |
| Total Size In Bytes | The total size of the table in bytes. |
| Action | Provides options to delete, edit, or navigate to the table columns. |
Click Create Legacy Table to add a new table to the schema.
Legacy Table Column
The Legacy Table Column tab displays all columns for a selected table. The heading shows the parent table name (for example, Legacy Table Columns ( customers )).
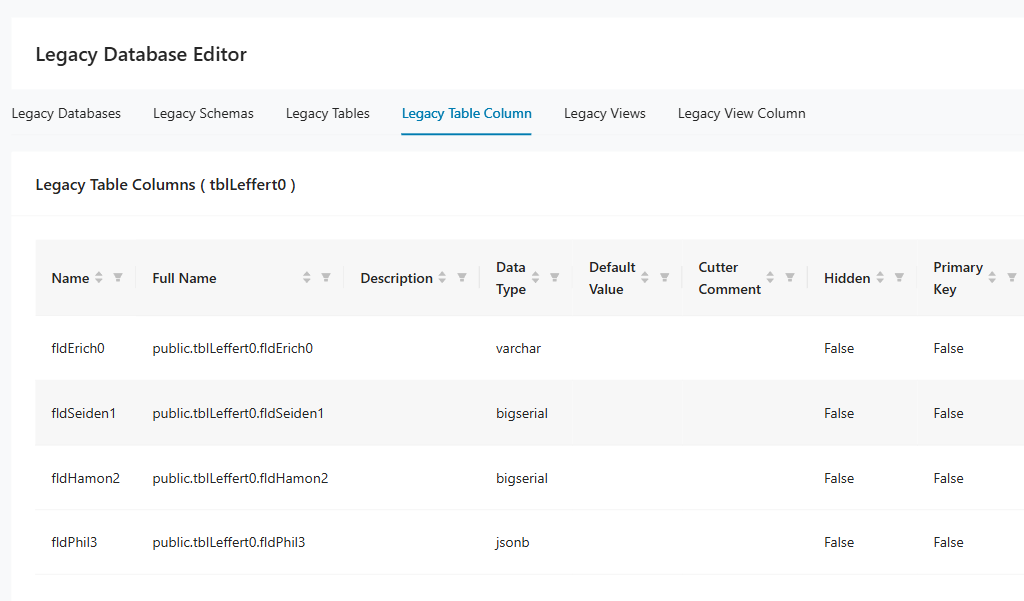
| Column | Description |
|---|---|
| Name | The name of the column. |
| Full Name | The fully qualified name including the schema and table (for example, public.customers.email). |
| Description | An optional description of the column. |
| Data Type | The data type of the column (for example, varchar, bigserial, jsonb). |
| Default Value | The default value assigned to the column, if any. |
| Cutter Comment | A comment field used by the decomposition engine. |
| Hidden | Whether the column is hidden from the decomposition views. |
| Primary Key | Whether the column is a primary key. |
| Auto Incremented | Whether the column auto-increments. |
| Action | Provides options to delete or edit the column. |
Click Create Legacy Table Column to add a new column to the table.
Legacy Views
The Legacy Views tab lists all views within a selected schema. The heading shows the parent schema name (for example, Legacy Views ( public )).
| Column | Description |
|---|---|
| Name | The name of the view. |
| Hidden | Whether the view is hidden from the decomposition views. |
| Action | Provides options to delete, edit, or navigate to the view columns. |
Click Create Legacy View to add a new view to the schema.
Legacy View Column
The Legacy View Column tab displays all columns for a selected view. The heading shows the parent view name, or prompts you to select a view if none is selected.
| Column | Description |
|---|---|
| Name | The name of the view column. |
| Hidden | Whether the column is hidden. |
| Column Name | The name of the underlying column. |
| Action | Provides options to delete or edit the view column. |
Click Create Legacy View Column to add a new column to the view. This button is disabled until you select a view.
User Settings
User Settings allows you to configure graph display preferences for the various graph views in Decompose. These settings control layout algorithms, subgraph expansion behavior, caching, and filtering options for the Legacy Database, Query Paths, and Migration Report graphs.
To access the User Settings, select Tools > User Settings in the left navigation panel.
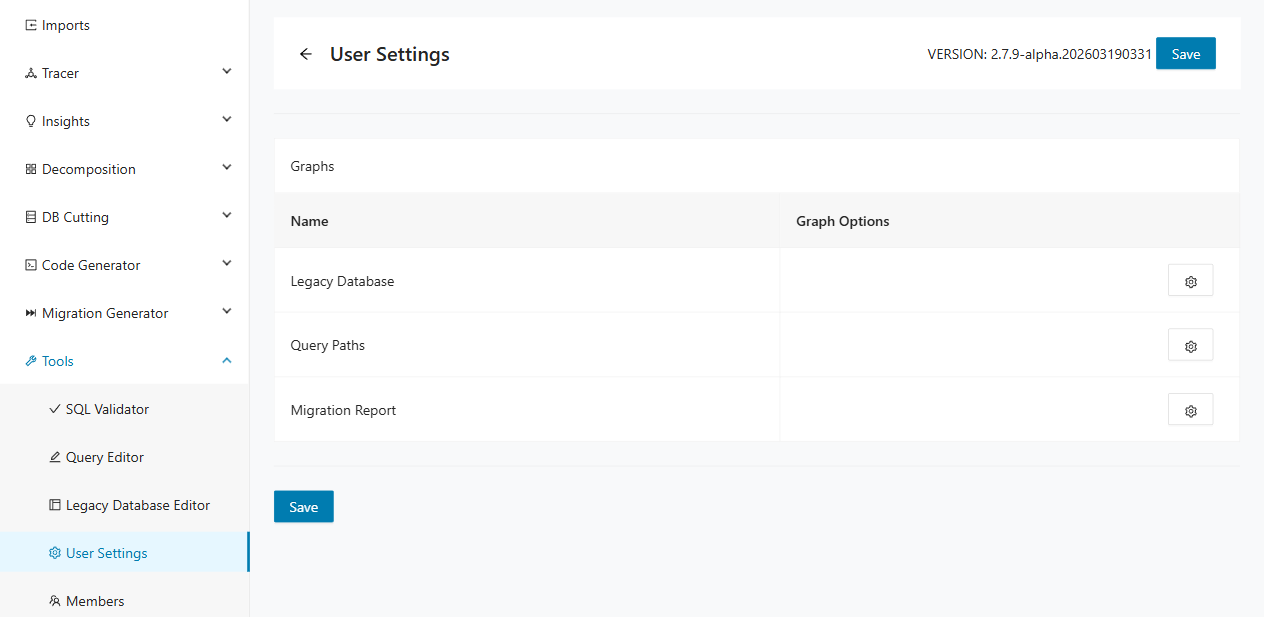
The page displays a Graphs section containing a table with two columns:
| Column | Description |
|---|---|
| Name | The name of the graph view. |
| Graph Options | Click the settings icon to open the Graph Options dialog for that graph. |
The three configurable graphs are:
- Legacy Database — controls the database schema graph in the decomposition views;
- Query Paths — controls the graph that visualizes module and query relationships;
- Migration Report — controls the graph displayed in migration reports.
Click Save at the top or bottom of the page to persist any changes you make to the graph options.
Graph Options
Click the settings icon in the Graph Options column for any graph to open its Graph Options dialog. Each dialog contains settings organized into sections: Display Style, Subgraph Expansion, Caching, and Filtering. The available settings vary by graph view.
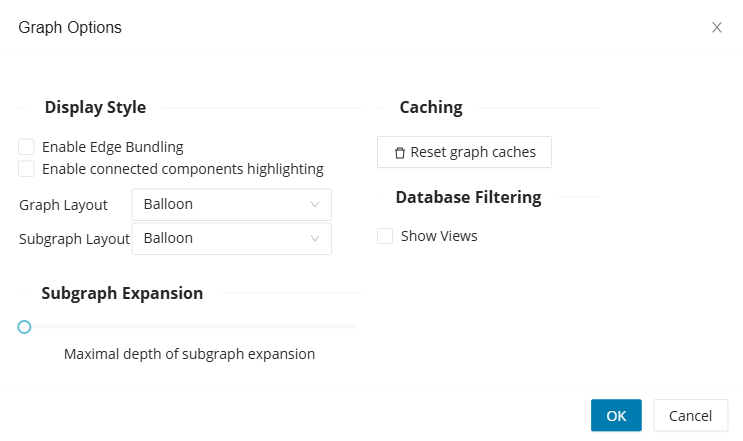
The following table lists all configurable settings across the three graph views.
| Section | Setting | Description | Graph View |
|---|---|---|---|
| Display Style | Enable Edge Bundling | Groups graph edges together to reduce visual clutter. | All |
| Enable connected components highlighting | Highlights connected components in the graph with distinct colors. | All | |
| Graph Layout | Sets the layout algorithm for the main graph. Options: Balloon, Hierarchical, Organic, Radial. | All | |
| Subgraph Layout | Sets the layout algorithm for subgraphs. Options: Balloon, Hierarchical, Organic, Radial. | All | |
| Subgraph Expansion | Maximal depth of subgraph expansion | Controls how many levels deep subgraphs are expanded automatically. | Legacy Database |
| Fully expand bounded contexts in subgraph | Automatically expands all bounded contexts when viewing a subgraph. | Query Paths, Migration Report | |
| Fully expand modules in subgraph | Automatically expands all modules when viewing a subgraph. | Query Paths, Migration Report | |
| Maximal depth of module hierarchy | Controls how many levels deep the module hierarchy is expanded. | Query Paths, Migration Report | |
| Caching | Reset graph caches | Clears all cached graph data. Use this after making schema or decomposition changes that are not yet reflected in the graph. | All |
| Filtering | Show Views | Includes database views in the graph when enabled. | Legacy Database |
| Has Query | Filters the graph to show only modules that have at least one query. | Query Paths | |
| Has ReadQuery | Filters the graph to show only modules that have at least one read query. | Query Paths | |
| Has WriteQuery | Filters the graph to show only modules that have at least one write query. | Query Paths |
Click OK to apply the settings, or click Cancel to discard changes.
Members
The Members subpage is a user management area that allows you to manage user access to clients and projects. You can create new users, assign user roles, and grant access to specific clients and their associated projects. To navigate to the Members subpage, select Tools > Members.
The page lists each client as a collapsible accordion panel. Expand a client to manage its members. Each panel contains two sub-tabs: Managers and Project Members.
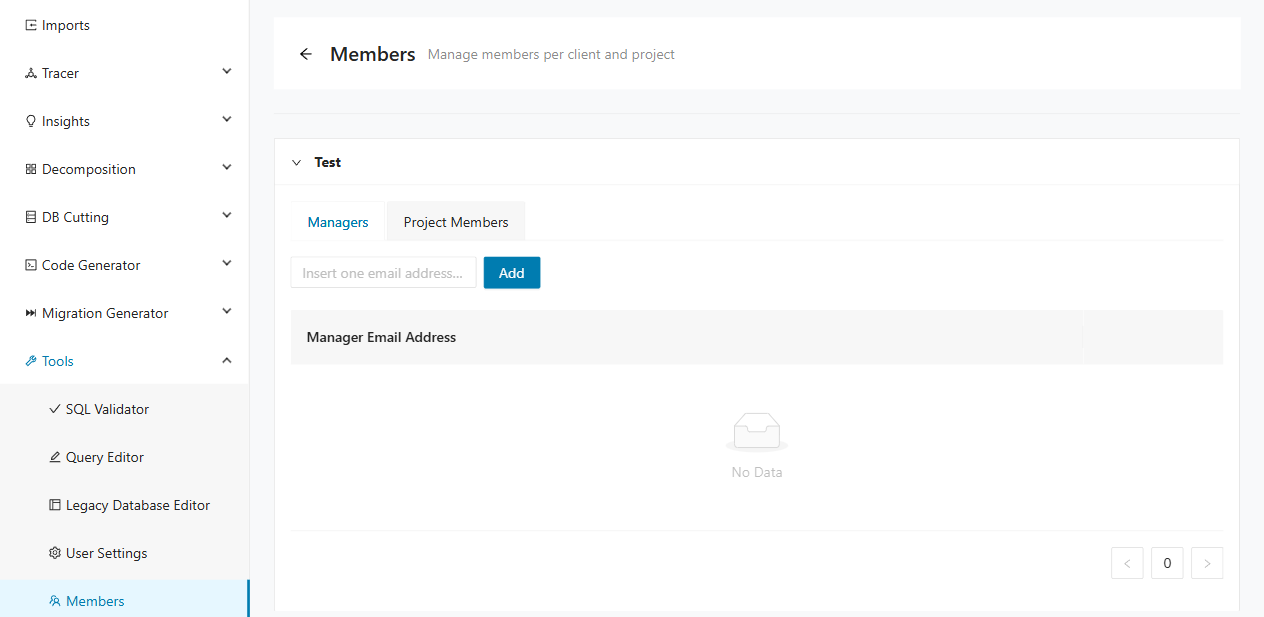
| Sub-tab | Description |
|---|---|
| Managers | Users with the Manager role are added on this tab. Managers have elevated access to the client and its associated projects. |
| Project Members | Users with Editor or Viewer roles are added on this tab. Users are assigned to specific projects with a role that defines their access rights. |
Creating a new manager role
Each user is identified by a unique email address. To assign the Manager role to a user:
- Expand the target client panel.
- Select the Managers tab.
- Enter the user's email address in the input field.
- Click Add .
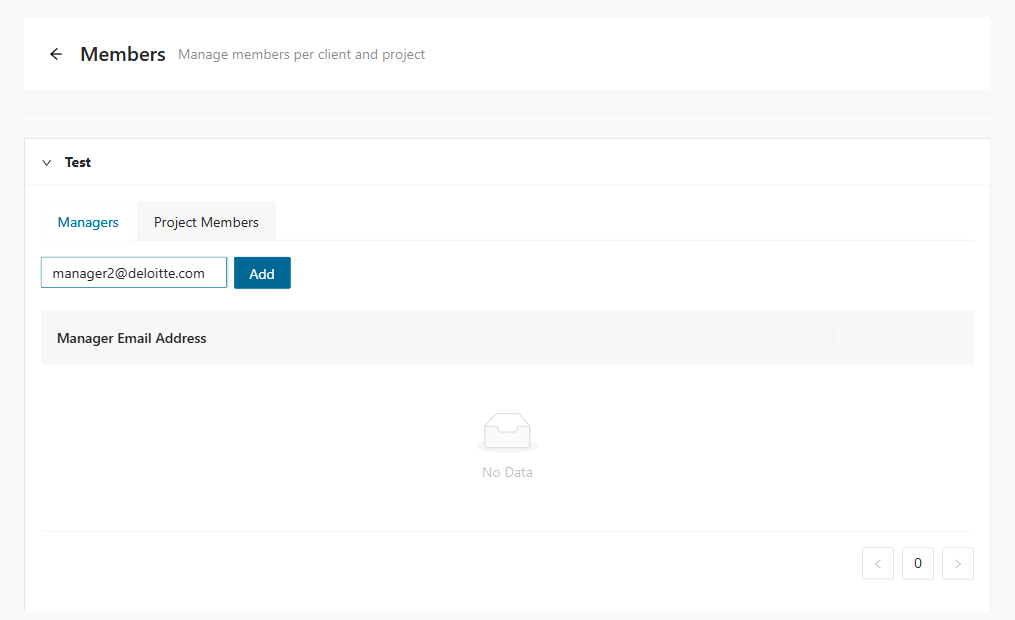
The system adds the manager under the respective client, granting access to that client and its associated projects. The Manager Email Address table lists all current managers. Each row includes a delete icon to remove a manager.
Creating a new project member
To create a new project member:
- Expand the target client panel.
- Select the Project Members tab.
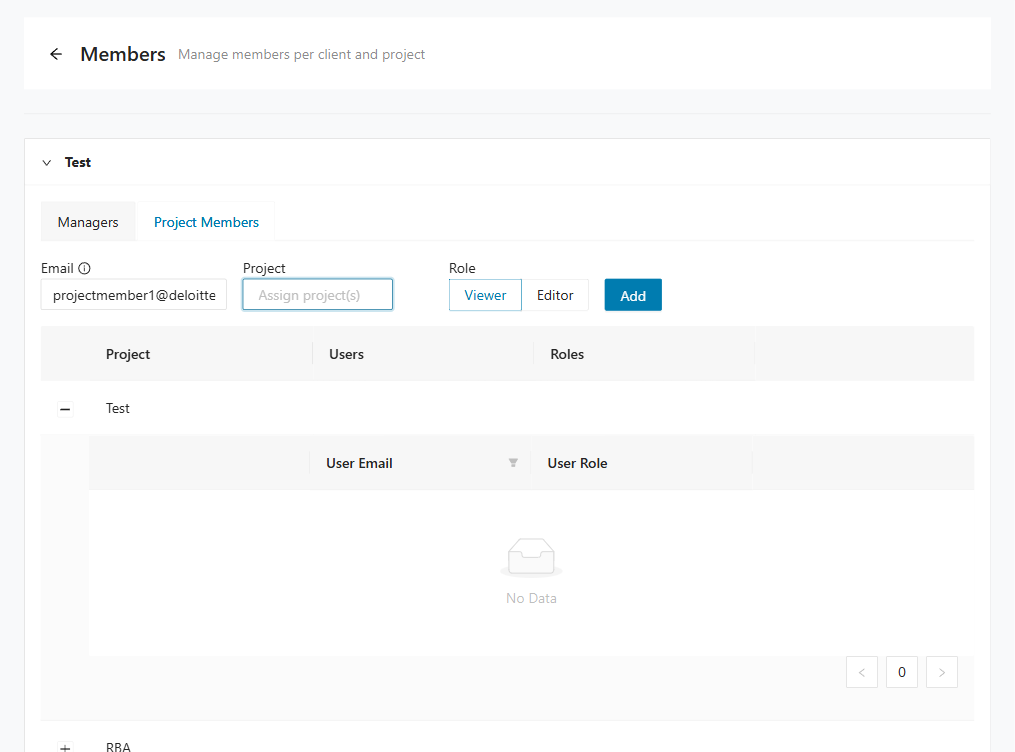
- Enter the user's email address in the Email field.
- Open the Project drop-down and select one or more projects to assign the user to.
- Under Role, select either Viewer or Editor.
- Click Add .
The following screenshot shows the Project Members tab with the add-member form and the projects table.
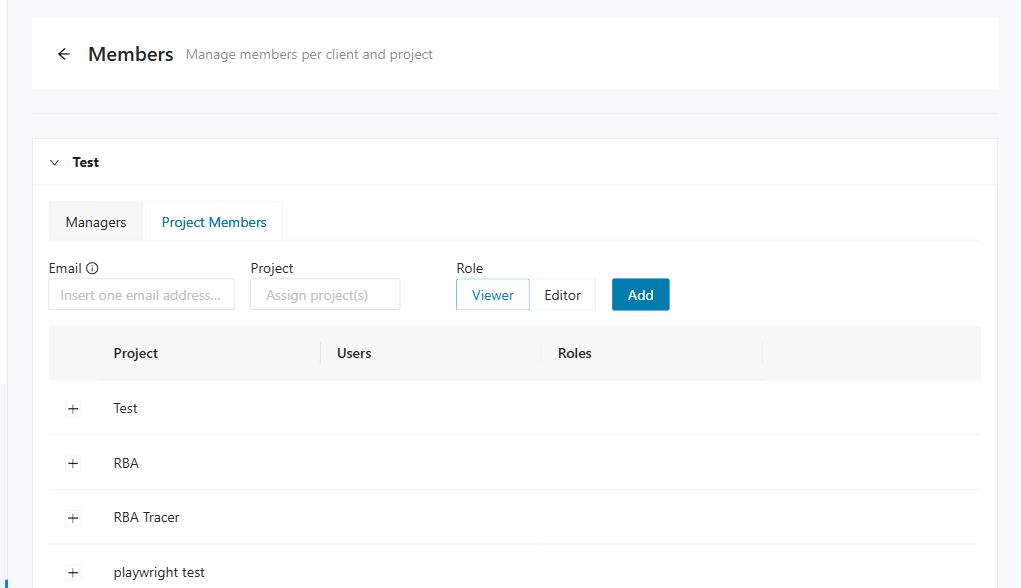
The projects table lists all projects belonging to the client. Expand a project row to view the User Email and User Role columns for members assigned to that project.
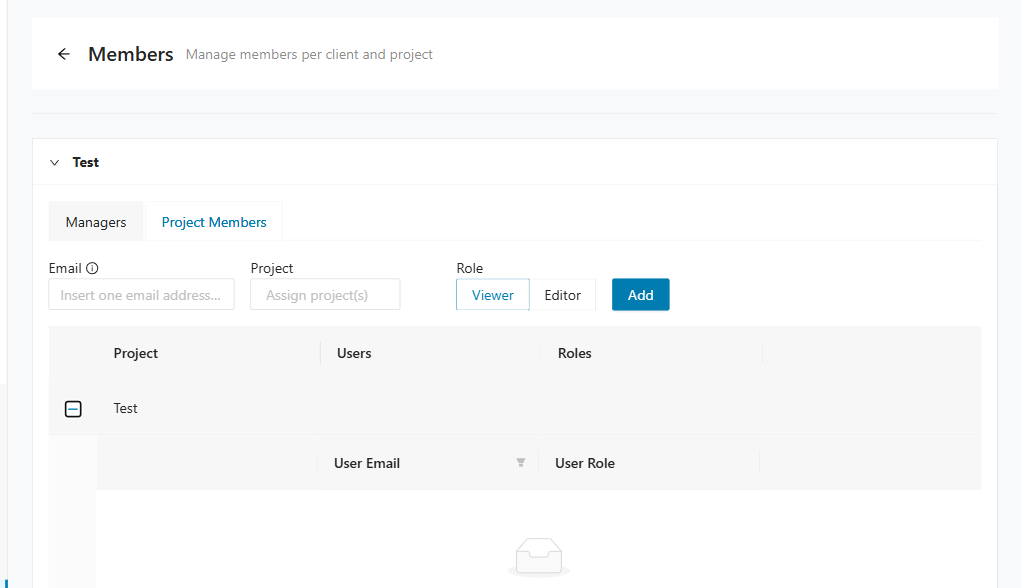
Changing user roles or deleting users
You can change user roles — for example, from Editor to Viewer — which automatically adjusts the permissions. You can also delete users.
To change a user's role, expand the project row to reveal the member list, then select a new role from the User Role drop-down for that user. To delete a user, click the delete icon in the corresponding row.
Permissions overview table
Decompose uses four user roles to control access to clients, projects, and administrative functions. The table below summarizes the permissions linked to each role.
| Area | Action | Admin | Manager | Editor | Viewer |
|---|---|---|---|---|---|
| Access to Members subpage | ✅ | ✅ | ❌ | ❌ | |
| Projects | Access to all projects | ✅ | ❌ | ❌ | ❌ |
| Access to projects to which access was granted | ✅ | ✅ | ✅ | ✅(read-only) | |
| Create new projects | ✅ | ✅ | ❌ | ❌ | |
| Duplicate or delete projects | ✅ | ✅ | ❌ | ❌ | |
| Edit or modify projects | ✅ | ✅ | ✅ | ❌ | |
| View or export reports | ✅ | ✅ | ✅ | ✅ | |
| Import or upload files and data | ✅ | ✅ | ✅ | ❌ | |
| Clients | Access to all clients | ✅ | ❌ | ❌ | ❌ |
| Access to clients to which access was granted | ✅ | ✅ | ✅ | ✅(read-only) | |
| Create or delete clients | ✅ | ❌ | ❌ | ❌ | |
| User Management | Manage users and organize access to all clients and projects | ✅ | ❌ | ❌ | ❌ |
| Manage users and organize access to specific clients and projects | ✅ | ✅ | ❌ | ❌ | |
| Create or delete Manager roles | ✅ | ❌ | ❌ | ❌ | |
| Create or delete project members, assign them to user roles and to client-related projects | ✅ | ❌ | ❌ | ❌ | |
| Edit user role of existing project members | ✅ | ✅ | ❌ | ❌ | |
| Add or remove Viewers or Editors to or from clients or projects | ✅ | ✅ | ❌ | ❌ |
Role descriptions:
- Viewer — Read-only access to assigned clients and projects. A Viewer can view and export reports but cannot upload, import, or modify data.
- Editor — Access to assigned clients and projects with the ability to edit projects and import data. An Editor cannot create, duplicate, or delete projects, nor access the Members subpage.
- Manager — Access to the Members subpage and all Editor permissions. A Manager can also create, duplicate, or delete projects and manage user access. Managers can only access explicitly assigned clients and projects.
- Admin — Full access to Decompose. An Admin can manage all clients, projects, users, and roles across the platform.