Reachability Analysis
To help understand and structure the technical dependencies of a system, Code Discovery & Mining offers analysis via Reachability blocks. Reachability blocks represent a dependency graph from one upper bound (like a job or stored procedure) to its lower bounds (like a table or file) via the modules in between the bounds. Reachability blocks can be easily created automatically based on desired criteria and analyzed from the overview of the Reachability page.

Reachability analysis form groups of modules by following the call chains between defined upper bound and lower bound modules.
Access control on Reachability Block view:
-
Viewer: Cannot modify anything on a reachability screen, that is, can only view the reachability blocks. Does not have permission to edit or rename the reachability blocks.
-
Editor: Can modify and edit the reachability block and screens, but cannot perform any bulk operations, that is, bulk delete reachability blocks or perform reachability analysis.
-
Manager: Has full access, including bulk operations like re-running reachability analysis or bulk deleting blocks.
| Operation | Viewer | Editor | Manager |
|---|---|---|---|
| Create Reachability blocks and perform analysis | No | No | Yes |
| CSV export of the Reachability Block details table | Yes | Yes | Yes |
| Filter Reachability Block based on Taxonomy | Yes | Yes | Yes |
| View details of a Reachability Block | Yes | Yes | Yes |
| Customize the column of the Reachability Block details table | Yes | Yes | Yes |
| Switch the upper/lower bound of the Reachability Block details table | Yes | Yes | Yes |
| See all nodes in the modules table of the Reachability Block details table | Yes | Yes | Yes |
| Edit the name and description of a reachability block | Yes | Yes | Yes |
| Show/Hide inactive reachability blocks from the overview screen | No | Yes | Yes |
| Merge/Unmerge Single Reachability Block | Yes | Yes | Yes |
| Activate/Inactivate Reachability Block from inside the RB details screen | No | Yes | Yes |
| Merge/Unmerge Single Reachability Block | No | Yes | Yes |
| Bulk Inactivate Reachability Blocks | No | No | Yes |
| Single Recalculation | No | Yes | Yes |
| Bulk Recalculation | No | No | Yes |
| Access Successor/Predecessor graphs | Yes | Yes | Yes |
| Configure Technology & Type for RB | No | No | Yes |
Create Reachability Blocks
To begin reachability analysis, navigate to the Reachability page to create reachability blocks. If there are no reachability blocks created yet, the Reachability page introduces reachability blocks as below. The creation flow lets you define the boundary criteria that determine which end-to-end paths are grouped together.
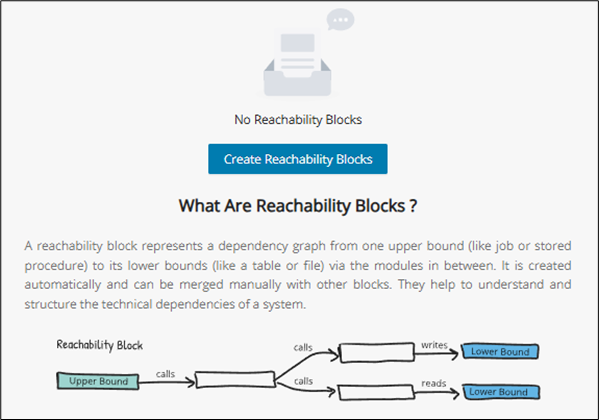
When you are ready, click Create Reachability Blocks to begin reachability analysis. The following pop-up window gives the option to perform reachability from the following criteria:
-
Upper or Lower Boundary (select from the radio buttons on the top left)
-
Technology & Type (configure this by clicking the settings icon, more info under Technology & Type Configuration)
-
Taxonomy
-AND/OR logic for multiple taxonomies
-Tooltip: If no taxonomy is selected, then all upper/lower bound types will be selected for analysis
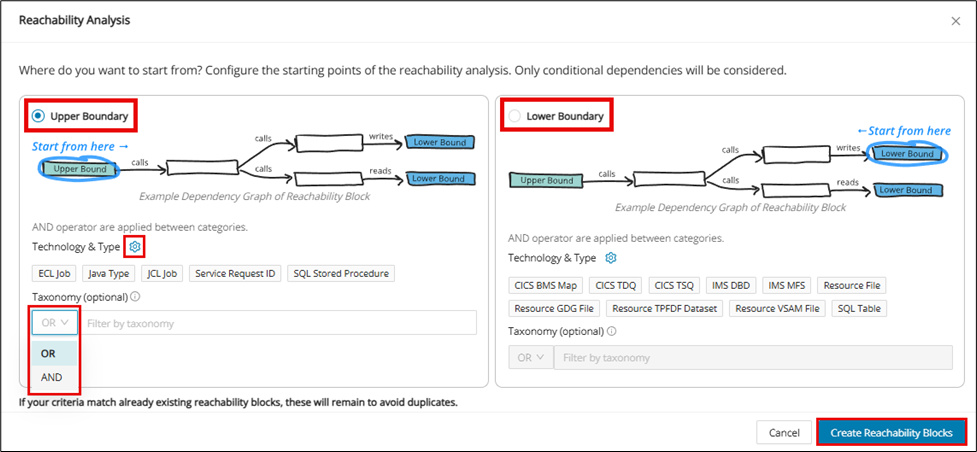
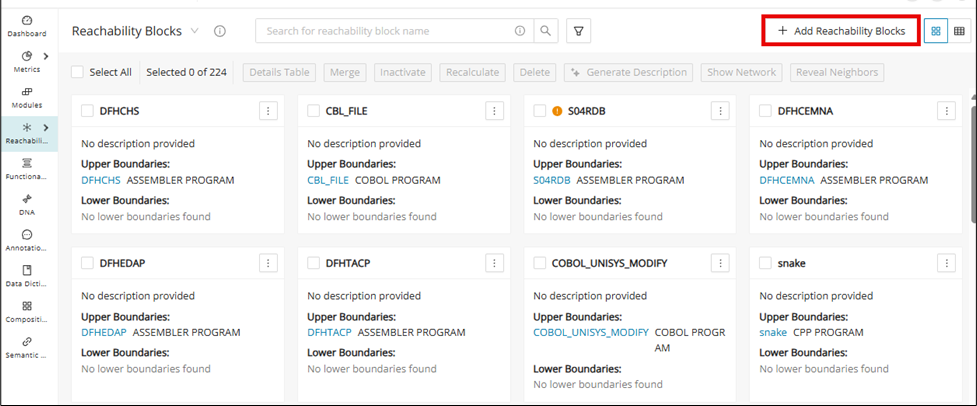
After filling in the desired criteria, click Create Reachability Blocks to complete the reachability analysis. After the reachability analysis is complete, the Block View will automatically populate itself with reachability blocks. To create more reachability blocks, click + Add Reachability Blocks in the top right corner.
Technology & type configuration
Info
Only users with the following roles can edit the Reachability configuration: Admin, Client-Admin, and Managers. Viewers and Editors are restricted from performing these configurations.
When creating Reachability Blocks, you can edit the default Technology and Types that come with their creation. To do this, either:
- Navigate to the Configuration page and click the Reachability tab or
- Navigate to the Reachability page and click Add Reachability Blocks and then click Edit
You will then see the default Technology & Type that are associated with the Upper and Lower Boundaries.
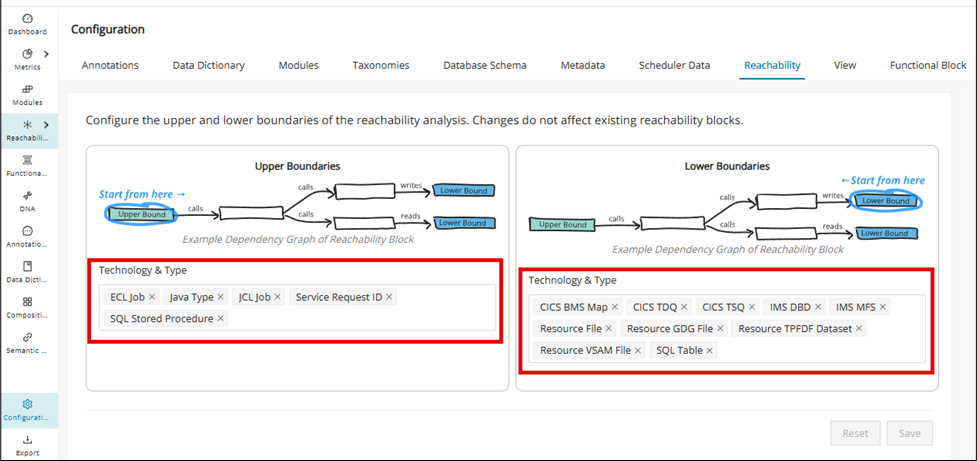
Either add or remove Technology & Type and then click Save to save the settings for future-created Reachability Blocks. All changes that are made can be reverted by clicking Reset while making changes.
UI validations
Warning
The Technology & Type of the Upper and Lower Boundaries must contain at least one item; otherwise, an error message will be displayed.
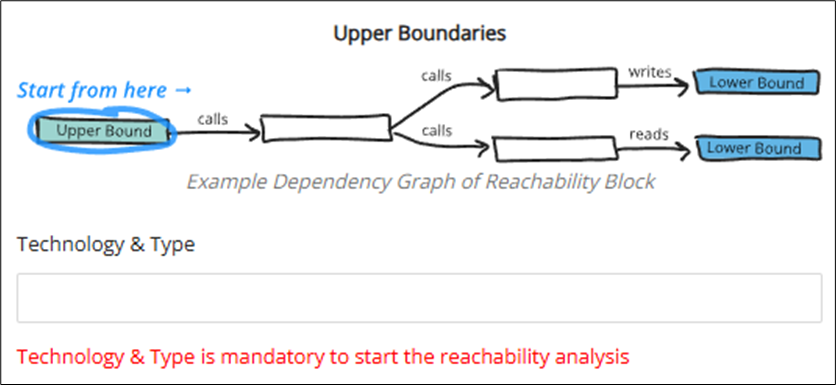
Warning
The Technology and Type in Upper and Lower Bound cannot be the same; otherwise, end-to-end flows cannot be determined, and the following error message will be displayed.

Reachability Analysis results
With reachability blocks now created and visible on the Reachability Blocks page, you are ready to conduct Reachability Analysis. This section provides an overview of the available features designed to help you understand the technical dependencies of your system. From here, you’ll learn how to leverage these tools to gain deeper insights into application structure and behavior.
Block view
After the reachability analysis, the Block View displays all reachability blocks in a grid. A reachability block represents a dependency graph from one upper bound (like a job or stored procedure) to its lower bounds (like a table or file) via the modules in between. This is created automatically and can be merged manually with other blocks. They help to understand and structure the technical dependencies of a system.
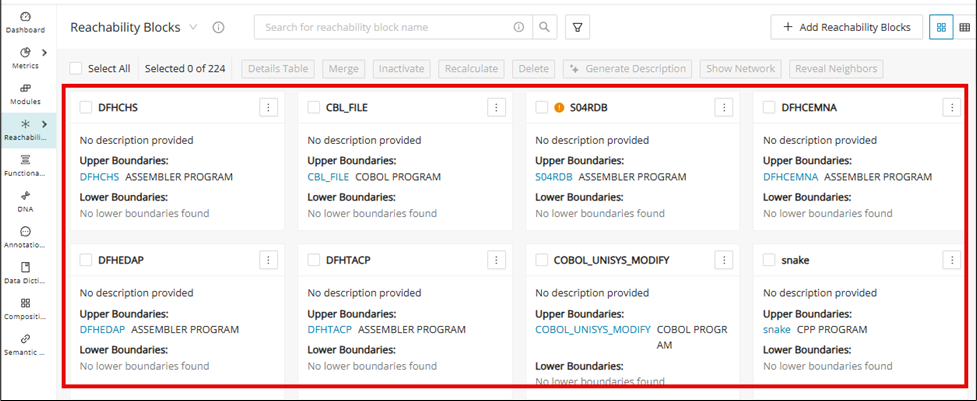
Toolbar
| Button | Description |
|---|---|
| Details Table | Opens Details Table for selected reachability block(s) |
| Merge | Merges selecting reachability blocks |
| Inactivate | Inactivates selected reachability block(s) |
| Recalculate | Opens a visual network view of the selected block(s), connections, and dependencies |
| Delete | Removes the selected reachability block(s) from the project. |
| Generate Description | Automatically creates a summary or explanation for the selected block(s) |
| Show Network | Opens a visual network view of the selected block(s), connections, and dependencies |
| Reveal Neighbors | Displays modules directly connected to the selected reachability block(s) |
Table view

The default view for the reachability blocks page is Block View. To instead view all of the reachability blocks in tabular form, toggle from the Block View to the Table View in the page header.
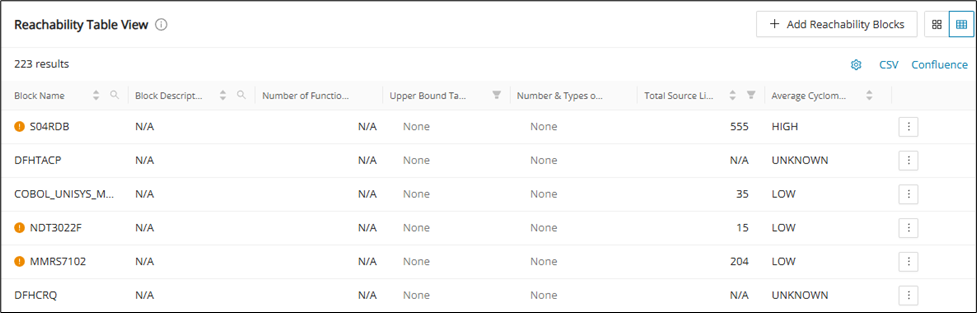
Reachability Block details
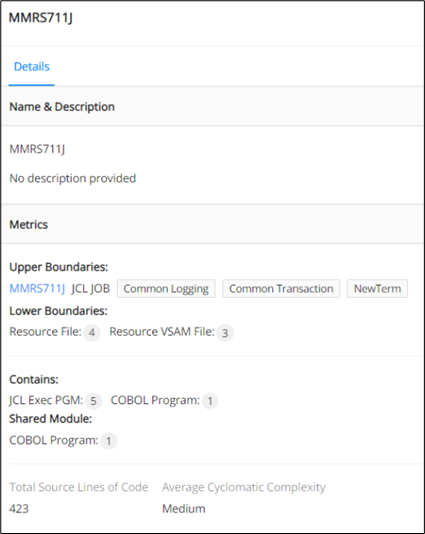
Within the Block View, the summarized details are shown in each reachability block. To find more detailed information within a reachability block, click any reachability block.
-
Name & description
-
Metrics
-Displays the upper and lower boundaries and their technology, types, count, and other details.
-Shows the relationships with other modules and what is contained within the reachability block. -
Total source lines of code:
-Represents the total lines of code for all modules within a reachability block, including upper and lower bounds and everything in between.
-For merged reachability blocks, the total lines of code updates automatically when blocks are added or removed.
-The total lines of code for a merged reachability block are the sum of all its blocks. -
Average cyclomatic complexity:
-Displays the average cyclomatic complexity for all modules within a reachability block, including upper and lower bounds and everything in between.
-For merged reachability blocks, the average cyclomatic complexity updates automatically when blocks are merged, unmerged, added, or removed.
-The average cyclomatic complexity for a merged reachability block is the average of the complexities of all its blocks.
Removed Reachability Blocks
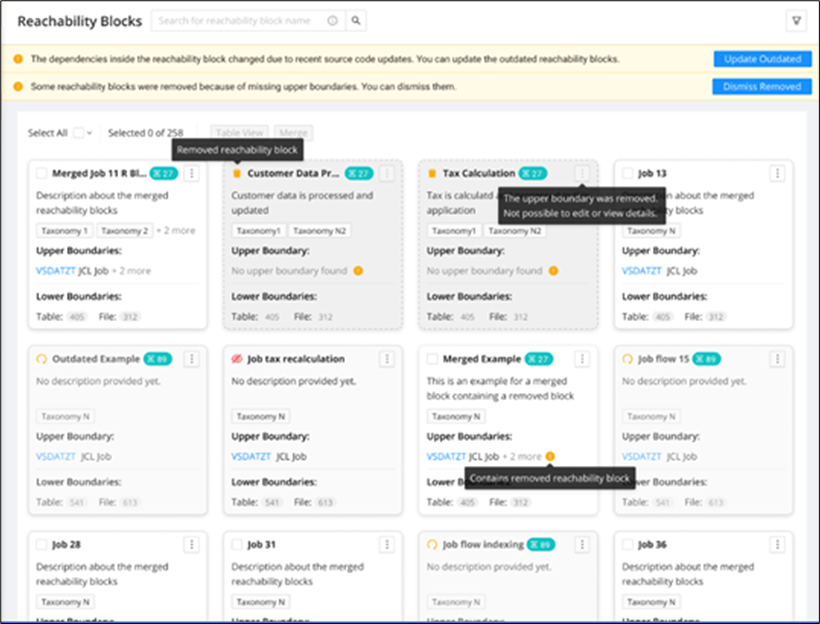
When upper bounds can't be found or deleted, then the whole reachability block with those upper bounds will cease to exist. This feature allows you to have a chance to review removed blocks with the possibility of restoring them by providing a notification before total removal.
Single Reachability Block containing deleted upper bound module:
-
Visual indication:
-Deleted reachability blocks will be marked with a delete icon -
Menu and tooltip:
-Menu items for deleted blocks will be disabled.
-Hovering over these items will show a tooltip: “The Upper boundary was removed. Not possible to edit or view details.” -
Notification and dismissal:
-A message at the top of the screen will state: "Some reachability blocks were removed because of missing upper boundaries. You can dismiss them."
-Click Dismiss Removed to remove these blocks from view. -
Pagination:
-The notification banner will appear on all pages until dismissed.
-Dismissing the message removes all deleted blocks from all pages. -
Checkbox visibility:
-Rows with removed upper-bound modules will not have checkboxes.
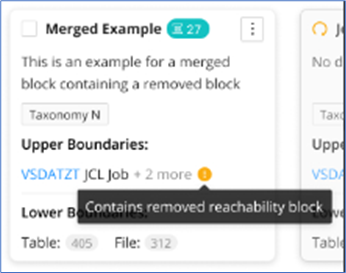
Merged RB containing a deleted Reachability Block:
-
Indicator for deleted Modules:
-If any upper-bound module in a merged reachability block is deleted, an indicator will be shown on the overview screen instead of marking the entire block as removed. -
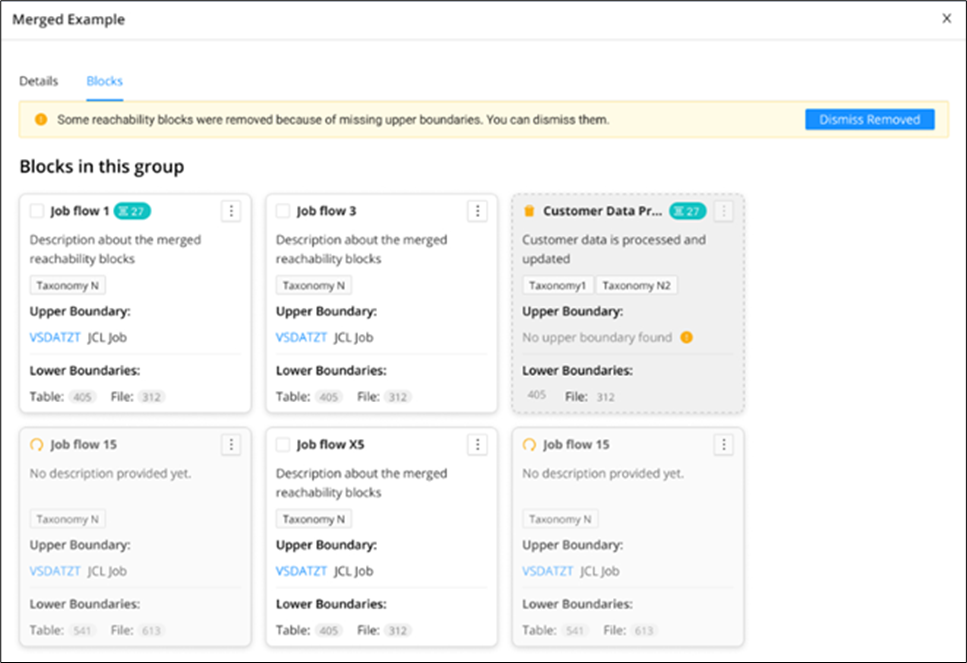
Details view:
-In the blocks tab of the Details view, deleted reachability blocks will be displayed.
-Click Dismiss Removed to remove these deleted blocks from the screen.
-
Checkbox availability:
-If a merged reachability block has at least one active upper bound module, the checkbox will be enabled, allowing it to be available for merging. -
Merging with removed Modules:
-When merging a merged reachability block containing removed upper bound modules with another block, the same indicators and messages will appear in the newly formed merged block.
-
Display of fully removed blocks:
-If all upper-bound modules in a merged reachability block are removed, the entire block will be shown as removed. -
Details table:
-The Details Table will only display details of available upper-bound modules, not the deleted ones.
-A banner will indicate: "Some reachability block details were not populated in this table because of missing upper boundary(s) due to source code updates or may have been deleted manually." -
Dismiss removed functionality:
-If a merged block contains two blocks and one is removed, clicking Dismiss Removed in the Details view will remove the deleted block.
-If only one block remains, the merged block will revert to an unmerged state, adopting the name of the remaining block.
Deleted Reachability Blocks Details Graph:
-
Deleted Reachability Blocks:
-No Details Graph will be available for deleted reachability blocks.
-Menu items for deleted blocks will be greyed out and disabled. -
Merged Reachability Blocks:
-For merged blocks containing deleted reachability blocks, the Details Graph will exclude modules from the deleted blocks.
-The graph will display links and paths only between the modules of the existing blocks within the merged block.
Auto detect outdated Reachability Blocks
This feature indicates when an existing reachability block is outdated. If the source code is modified, then the whole reachability block will be marked as outdated. In that case, we will provide a notification to the user indicating that the block has been outdated and needs recalculation.
Single and merged outdated blocks
The outdated blocks in the cards in the overview screen will be indicated with an outdated icon in place of a checkbox, and a tool tip message, as shown below
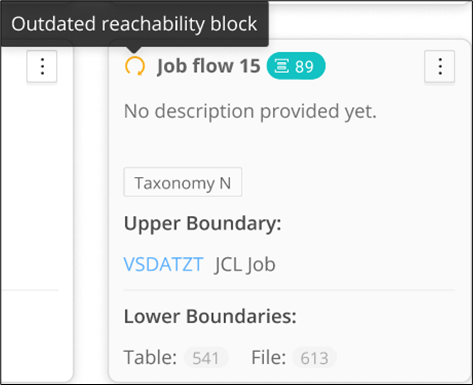
You will be notified when a re-calculation/re-run of the reachability analysis is needed, with an alert on top of the screen whenever there is at least 1 outdated reachability block.

This banner will be visible on all of the pages in case of paginated data, until updated. Click Update Outdated to retrigger the reachability analysis. The page loader will be displayed in case it takes time to run the reachability analysis after clicking Update Outdated.
In the case of a Merged RB, if any one of the included blocks is outdated, the merged block will be shown as outdated. If a block is inactive, there will be no check for whether the block is outdated.
This will also work with pagination. For example, if there is 1 outdated block in the 2nd or 3rd page and you are on the 1st page, the outdated banner, along with the Update Outdated button will still be displayed on every page.
The banner will appear in the following:
-
The Reachability Block card view
-
The Reachability Block details if the block is merged and contains outdated blocks
-
The Reachability Block Table details whether the block is merged and contains outdated blocks. Show in all pages, in case of paginated data
-
The Reachability Block Table details if the block is single, but it contains outdated modules
-
The Reachability Block Details Graph, that the block is single and contains outdated modules.
-
The Reachability Block Details Graph, that the block is merged and contains outdated blocks.
The Update Outdated button will only be visible to users with the key cloak roles: Editor, Manager, and Admin.
Viewers can only view the banner and cannot see the Update Outdated button.
Edit name & description
Generate a single Reachability Block description using Gen AI
Configuration
To use this feature
1. Enable the generativeAiTranslations feature toggle.
2. Module description should be available for the modules available in the reachability blocks.
Step 1:
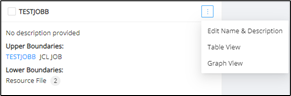
Navigate to the Reachability Blocks overview screen, click the menu icon of a Reachability Block, and then click Edit Name and Description .
Step 2:
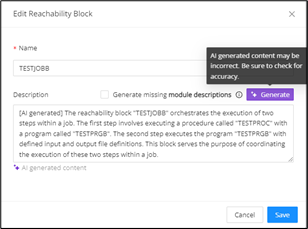
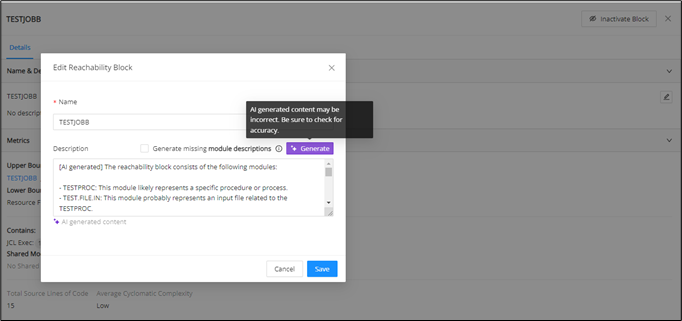
Click Generate to generate the reachability block description.
Step 3:
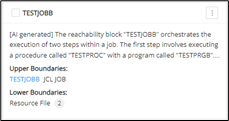
Click Save to save the description, and it can be seen on the RB overview and the view details screen.
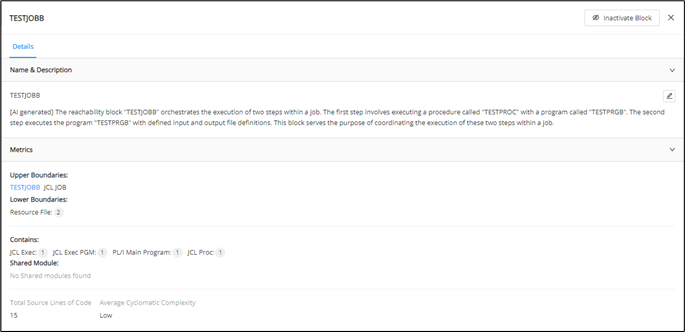
Reachability block descriptions can be generated from the View Details screen as well.
Step 1:
Click any reachability block on the reachability blocks overview screen.
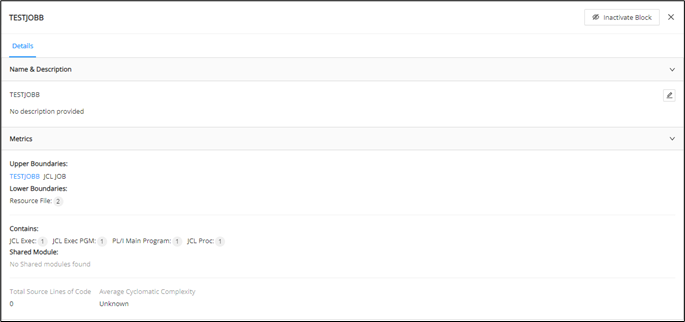
Step 2:
Click the edit icon to edit the name and description
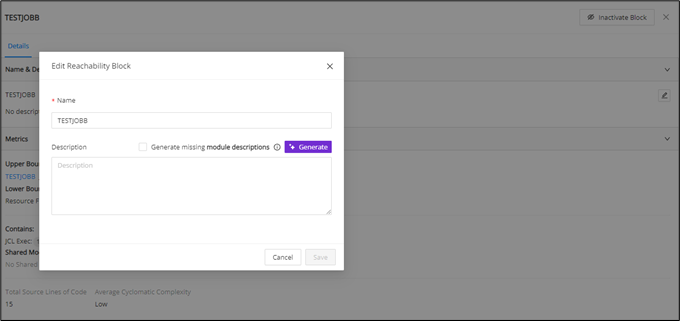
Step 3:
Click Generate to generate the description.
Details graph
Details Graph for an individual Reachability Block
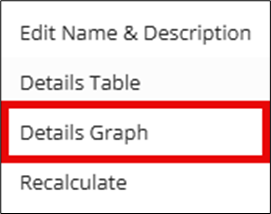
Navigate to the Reachability Blocks window and click the menu icon of the respective reachability block.
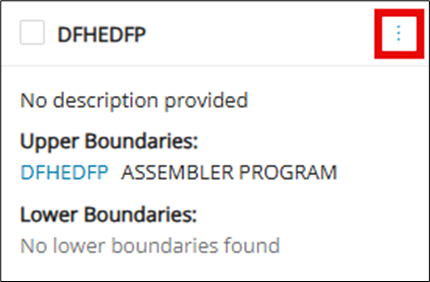
Click Details Graph from the menu.
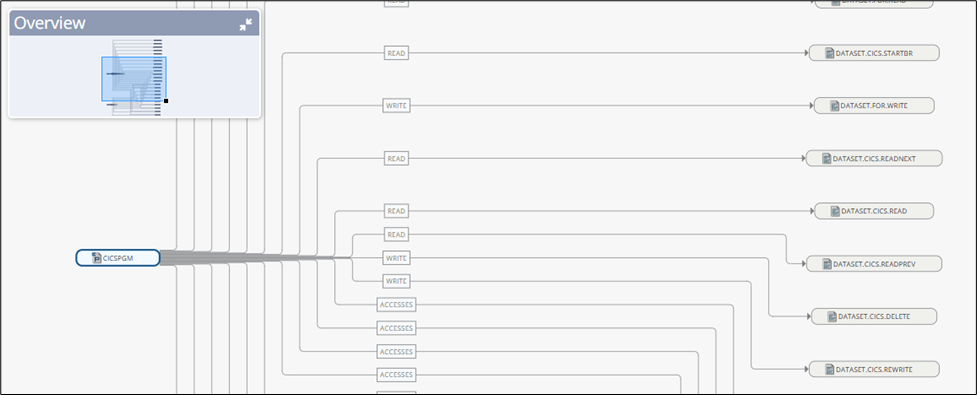
The Details Graph of the modules present in the selected reachability block is displayed as shown in the following figure. The upper bound module is displayed on the left and points to the lower bound modules on the right.
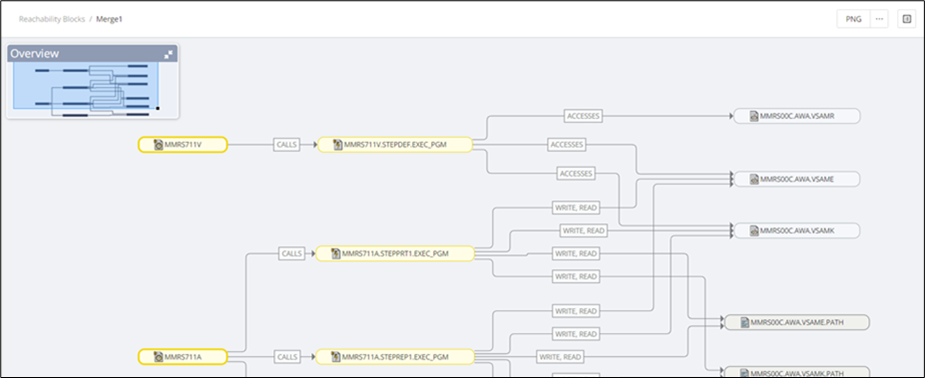
Details Graph for a merged Reachability Block
For a merged reachability block, click the menu icon. Then click Details Graph from the menu.
The Details Graph for a merged reachability block is displayed as in the following figure.
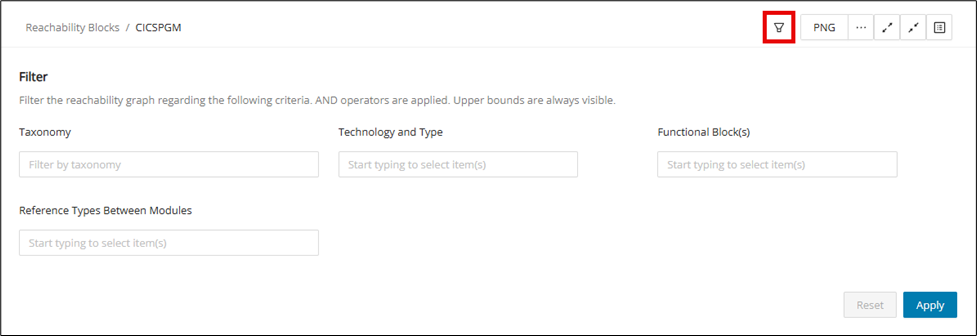
Filter for Details Graph for individual Reachability Blocks
Filter individual reachability block graph modules using "Taxonomy", "Technology & Type", "FB", and "Reference Types" between modules.
Details table
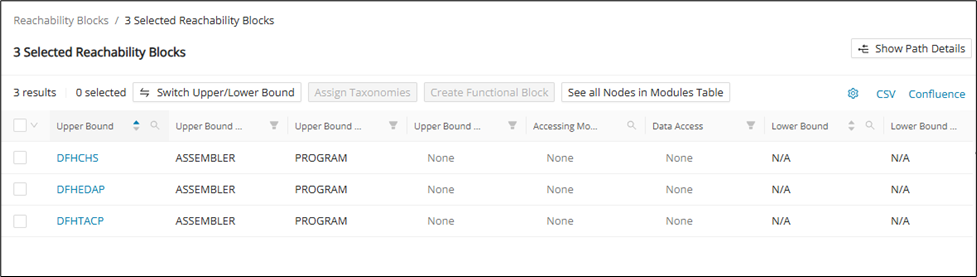
The Details Table provides a comprehensive view of how reachability blocks interact within your system, displaying detailed relationships between upper-bound and lower-bound modules. Each row captures information such as the access modules, access methods, name and technology of the upper/lower bounds. You can customize the table to your liking and adjust the level of detail by grouping data in various ways. This section will guide you through the table’s features, helping you analyze module interactions and access patterns with precision.
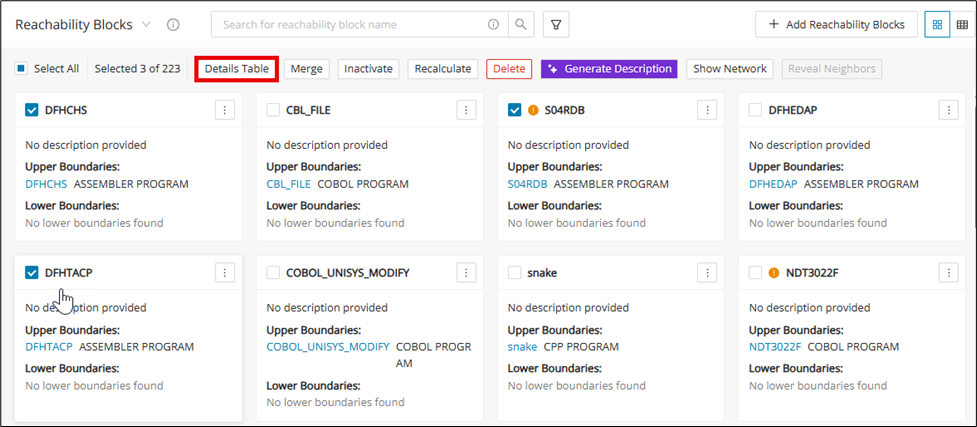
Open the Details Table from the Block View toolbar
To open the Details Table, select the module(s) to include in the Details Table and click Details Table .
Open the Details Table from an individual block
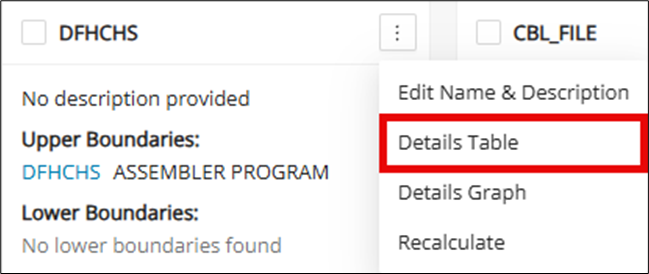
You can also open the Details Table directly from an individual Reachability Block. Simply click the menu icon of the block and click Details Table from the drop-down menu.
Toolbar
| Button | Description |
|---|---|
| Switch Upper/Lower Bound | See all Nodes in the Modules Table |
| Assign Taxonomies | Assign Taxonomies for Upper or Lower Bound(s) |
| Create Functional Block | Ability to create a functional block by selecting one or more reachability blocks |
| Splits multiple Accessing Modules and adds intermediate modules and path taxonomies | Opens a new tab to the Modules page with a table of all of the nodes in the Details Table |
| Show Path Details | Splits multiple Accessing Modules and adds intermediate modules and path taxonomies |
Switch upper/lower bound
Info
Switch Upper/Lower Bound only appears when multiple blocks are in the Details Table.
Assign Taxonomies
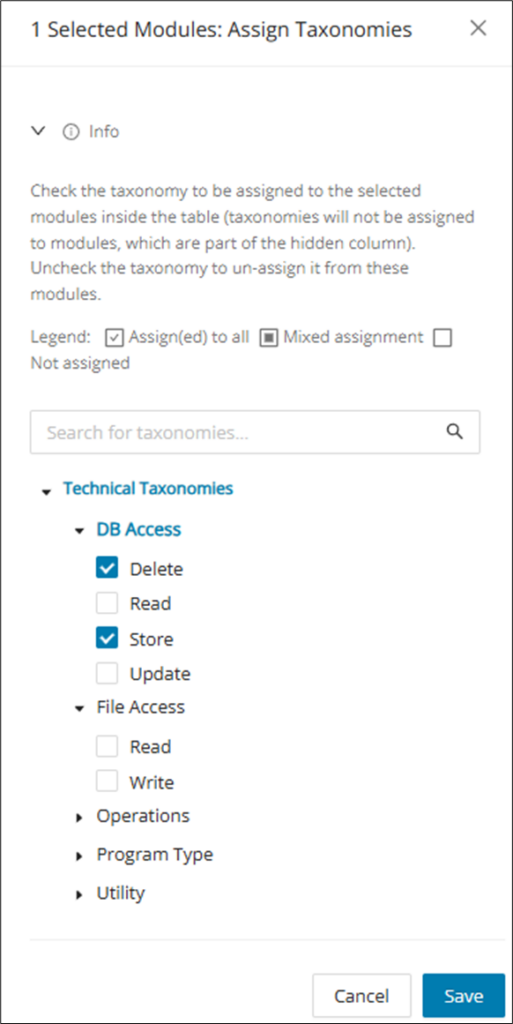
Select upper/lower bound(s) and click Assign Taxonomies .

Select the Taxonomies to assign and click Save .
Technical taxonomies in RB Details Table and CSV
The technical taxonomies below are supported and need to have the related utility added.
| Utility | Taxonomy type | Taxonomy |
|---|---|---|
| ADUUMAIN | Operations | Unloads Table |
| ADUUMAIN | DB Access | Read |
| AMUUMAIN | Operations | Loads Table |
| AMUUMAIN | DB Access | Store |
| JZOSPROC | Operations | Runs a JAVA Program |
| NDMBATCH | Operations | Network Data Mover |
| INFOPAC | Operations | Generates Report |
Show/hide path details
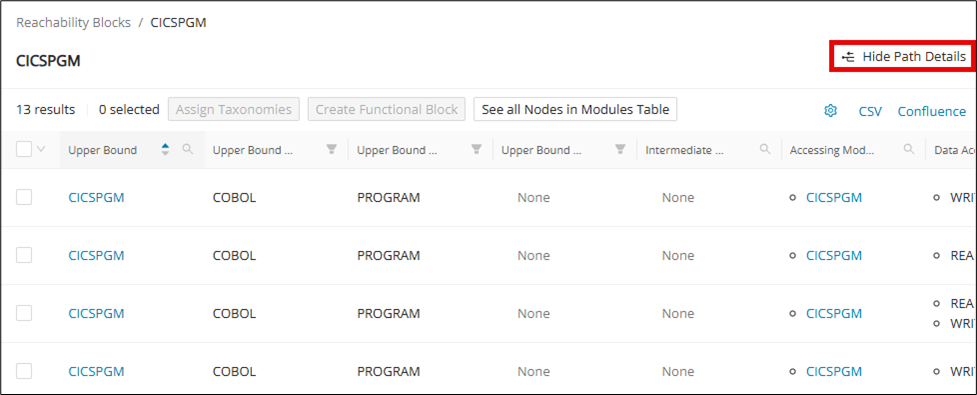
Click Show Path Details to add intermediate modules. Intermediate modules are the modules that can be reached by going from the upper bound toward the lower bound (excluding the upper bound, the lower bound, and the accessing modules' names, as these are already displayed separately).
Upon clicking Show Path Details , the data in the Accessing Module column will be split into two different rows (if there are two or more access modules for the same lower bound).
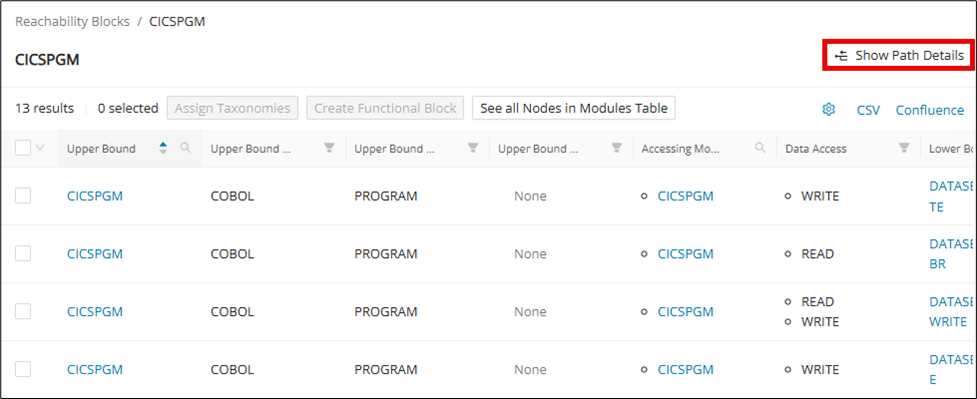
If you click Hide Path Details , the Intermediate Modules column is removed from the user interface, and the Accessing Module column is displayed again.
Merge
Reachability blocks can be merged to form a Merged Block. From the Block View, select two or more reachability blocks to enable the Merge button.
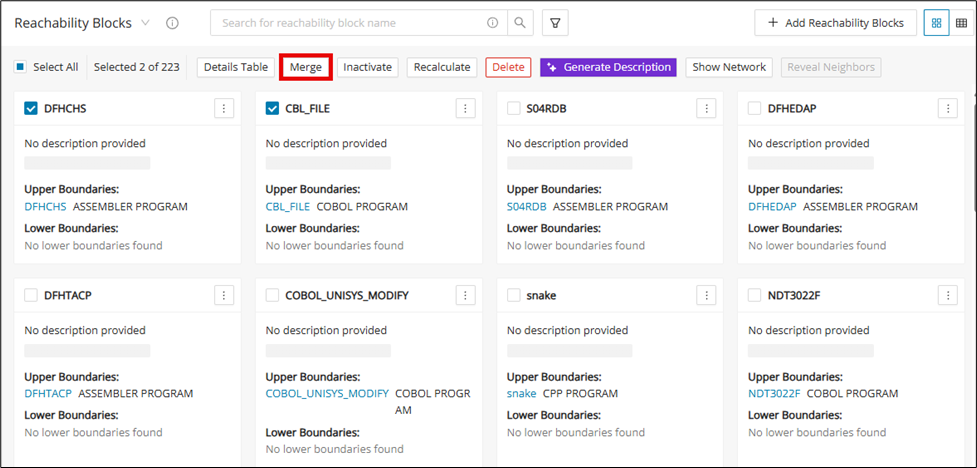
Click Merge and enter the name and description of the Merged Block. Then click Merge .
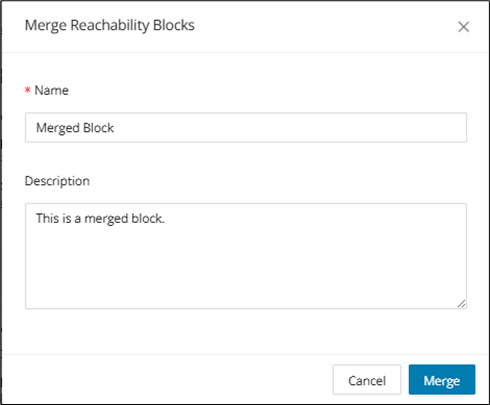
The new Merged Block is created and ready to be used for reachability analysis.
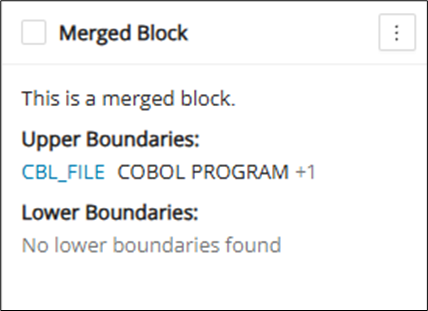
Add/remove Reachability Block(s) to a merged block
To add or remove blocks to a Merged Block, click the Merged Block to bring up its Details view. In the Details view, switch to the Blocks tab.
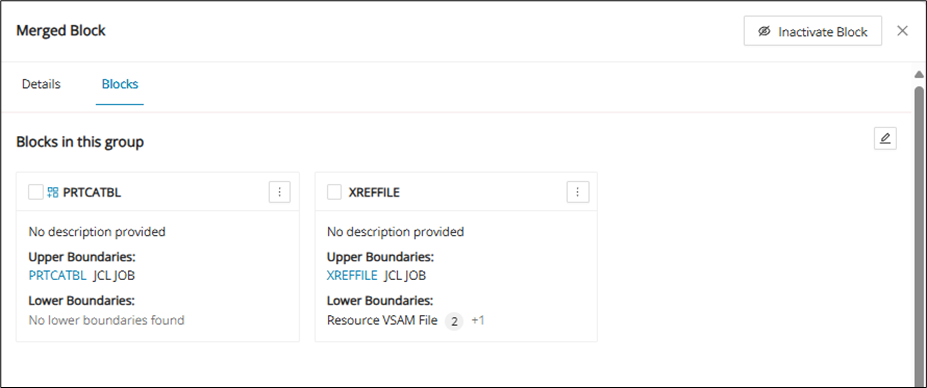
Click the edit icon for a drop-down that gives the option to either add or remove.
Add Reachability Block to merged block
Adding reachability blocks to a Merged Block shows the other reachability blocks that are not in the Merged Block. Select the desired reachability block(s) to merge into the Merged Block and click Save Updates .
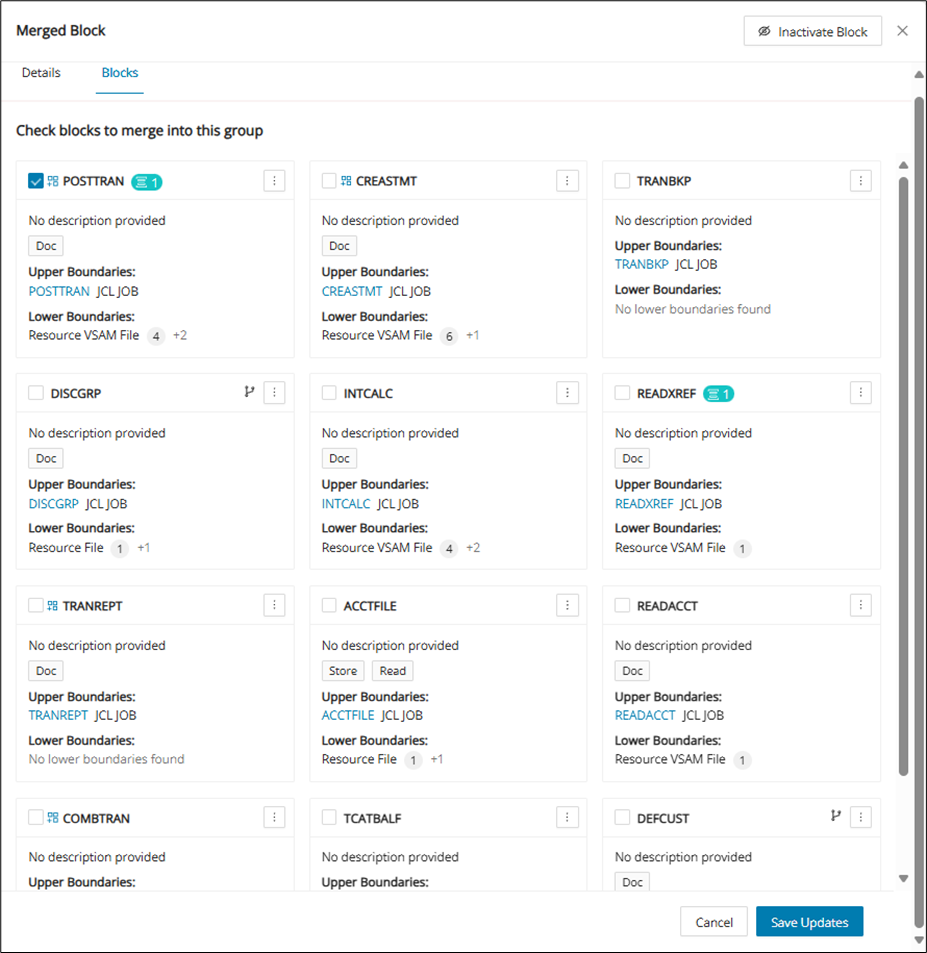
Remove Reachability Block from merged block
Removing reachability blocks from a Merged Block shows the reachability blocks that are within the Merged Block. Select the desired reachability block(s) to unmerge from the Merged Block and click Save Updates .
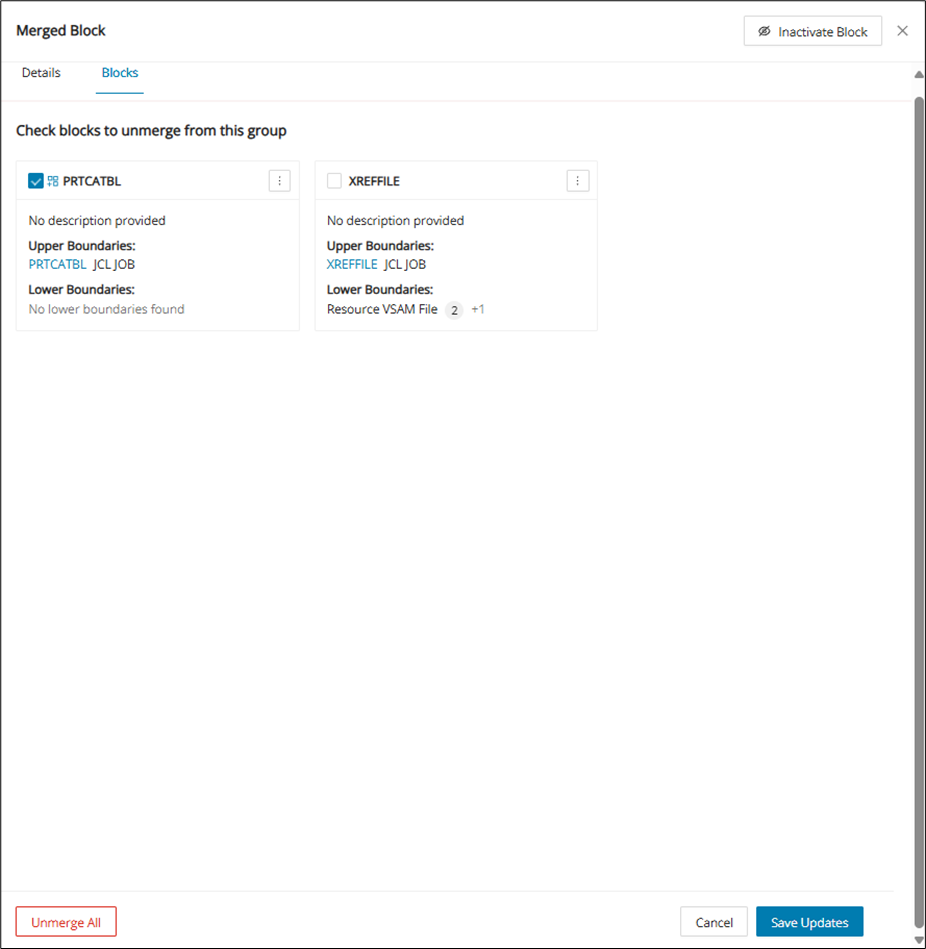
Unmerge all
To simply unmerge all reachability blocks within a Merged Block, click Unmerge All at the bottom of the Block tab in the Merged Block's Details view.
Inactivate
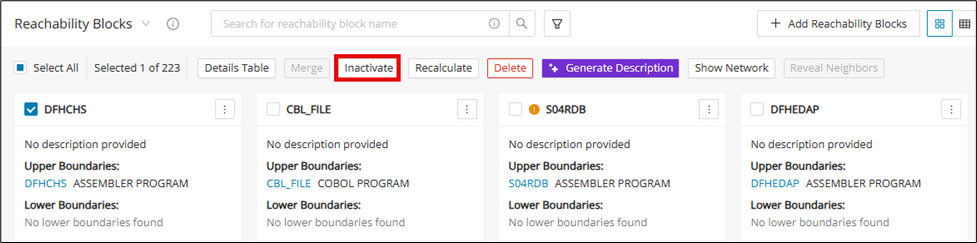
Reachability blocks can be inactivated to be hidden from all views unless explicitly activated. To inactivate a block from the Block View, select the reachability block(s) to inactivate and click Inactivate .
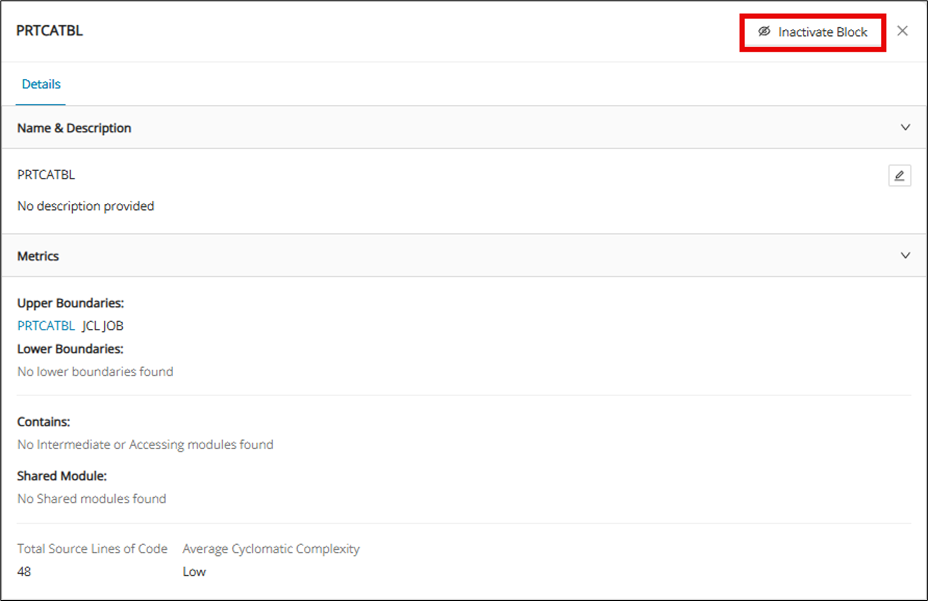
An individual reachability block can also be inactivated from its Details view. Open the Details view and click Inactivate .
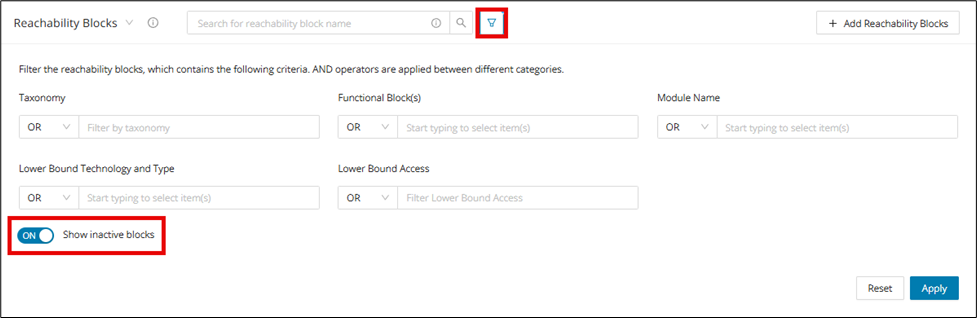
To show inactive blocks, click the filter and toggle on "Show inactive blocks".
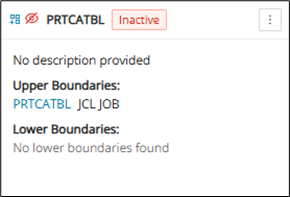
Inactive blocks are marked as "Inactive" at the top of the block.
Re-activate block
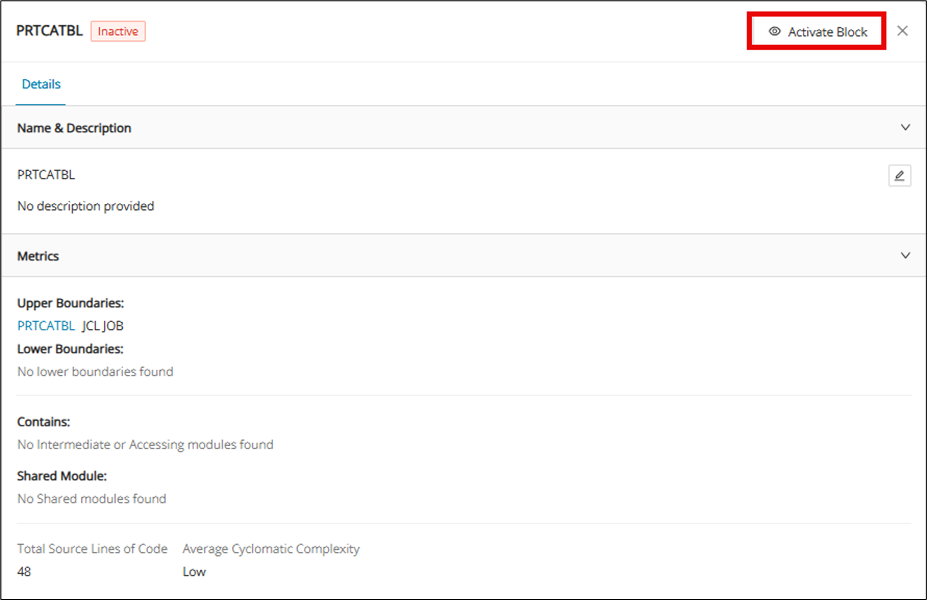
To re-activate a reachability block, make sure the "Show inactive blocks" toggle is on inside the filter. Click an inactive block to open its Details view and click Activate Block .
Recalculate
When reachability blocks need to be updated, they can be recalculated. Recalculation runs the selected blocks through the call chain again to make sure all updates are applied. If there were no changes in the modules or the implementation of reachability analysis, recalculation should have no effect and leave the reachability block as-is. Outdated and removed reachability blocks cannot be recalculated.
Recalculation for individual block
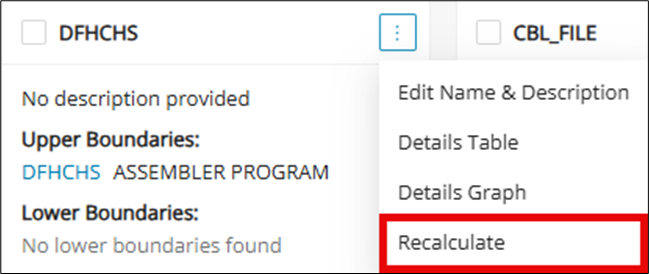
Click the menu icon of the block to be recalculated and then click Recalculate from the drop-down.
Recalculation for multiple blocks
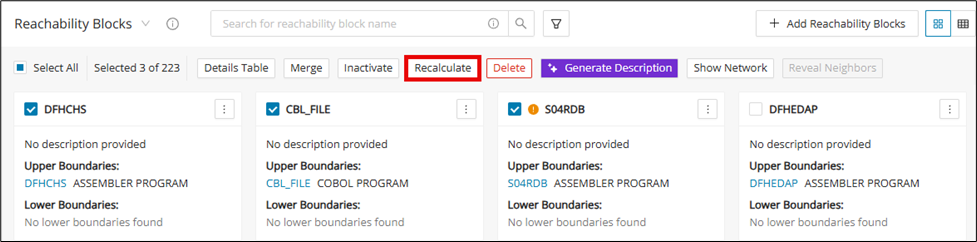
Select the reachability block(s) on the Block View and then click Recalculate .
Recalculation in network view
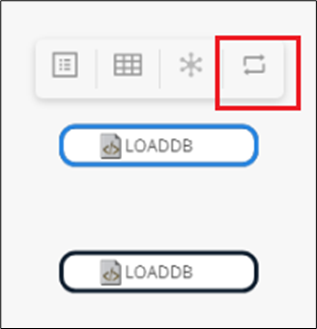
Select any block in network view and click the recalculate icon.
Delete
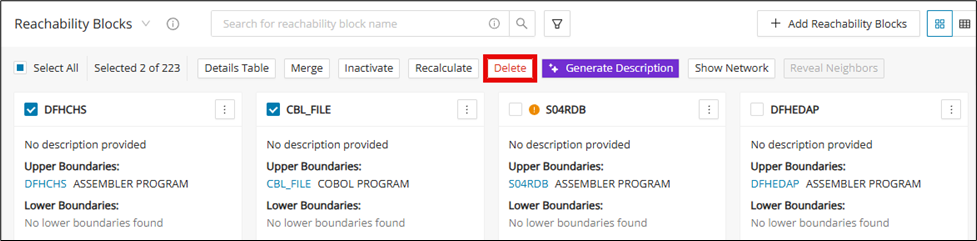
In the Reachability Blocks page, you can delete a reachability block by selecting the upper-left corner box and clicking Delete . Only users with the key cloak role: Admin, Client-Admin, and Manager have the permission to delete Reachability blocks.
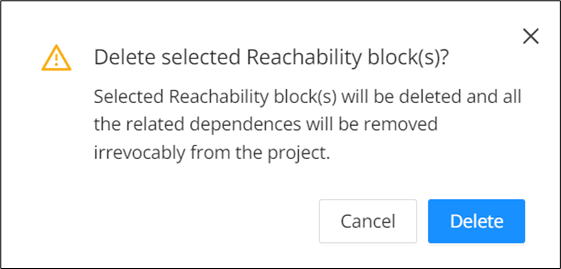
A pop-up warning is displayed when deleting a reachability block(s). Click Delete to confirm the action.
Generate description
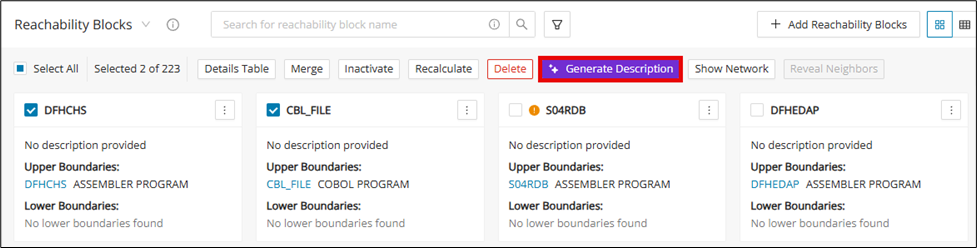
Navigate to the Reachability Blocks overview screen, select a few reachability blocks, and click Generate Description .
Module descriptions should be available for the modules available in reachability blocks while generating descriptions using Gen AI. If description is not present, then generate missing module descriptions checkbox should be checked.
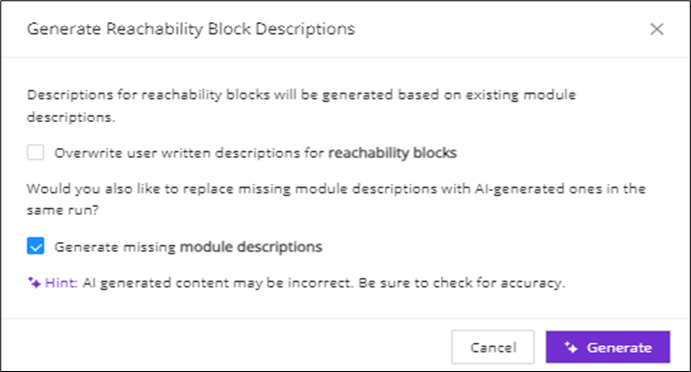
To override any reachability block description, check the "Overwrite user-written descriptions for reachability blocks" checkbox while generating using Gen AI.
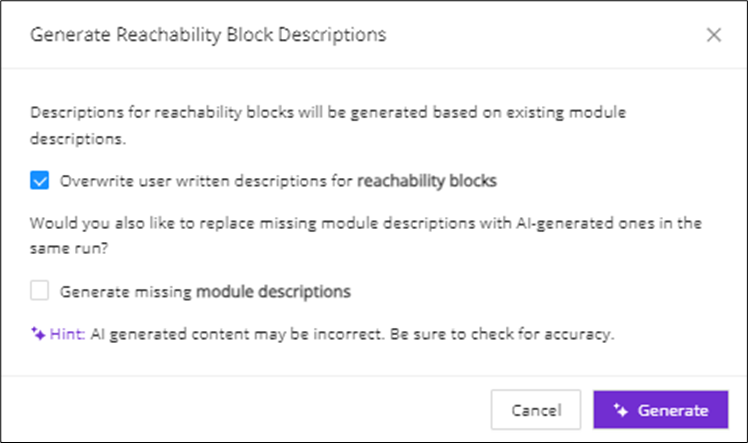
Click Generate to generate the reachability blocks description.
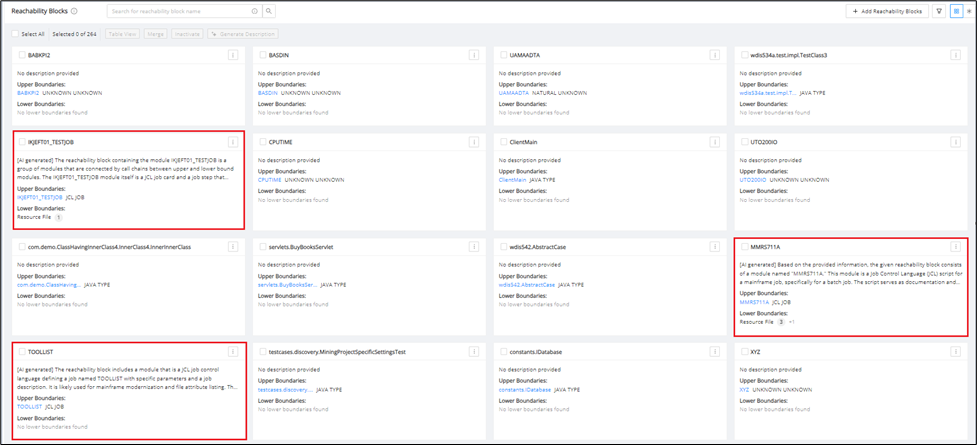
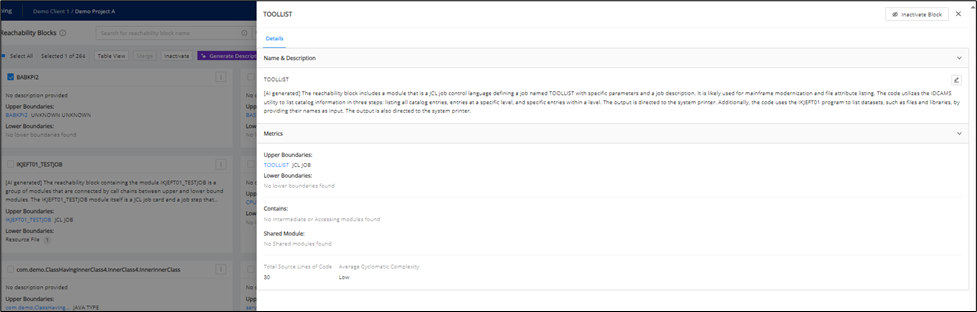
Descriptions can be seen in the reachability overview screen as well as in the view details.
Show network
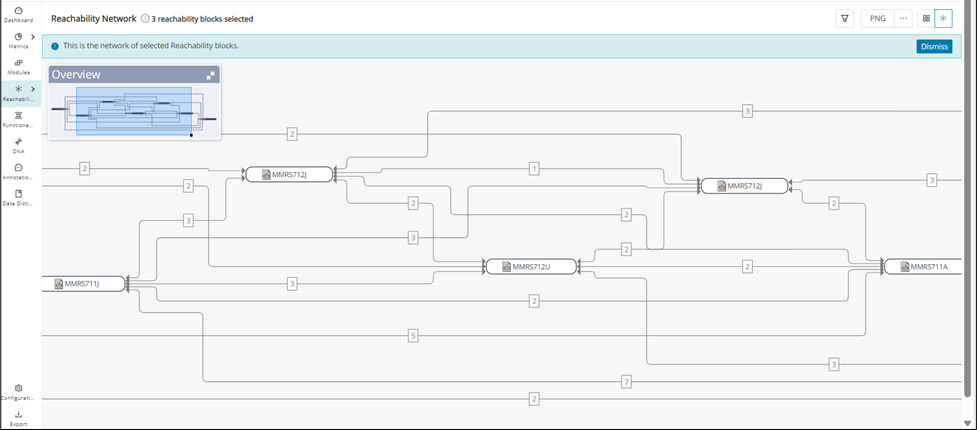
A reachability network is a dependency graph, illustrating connections between all reachability blocks via shared lower bounds. The direction of the arrows indicates a producer-consumer relationship, that is, a producer block writes into a shared lower bound, which is then consumed or read by the consumer block. A bi-directional connection means both of the blocks are either producers, consumers or both.
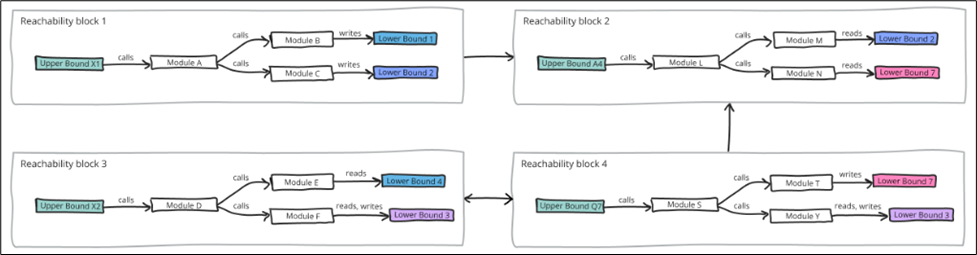
Furthermore, you can also see the actual job dependencies between the blocks by importing scheduler data under Configuration.

Show predecessor/successor
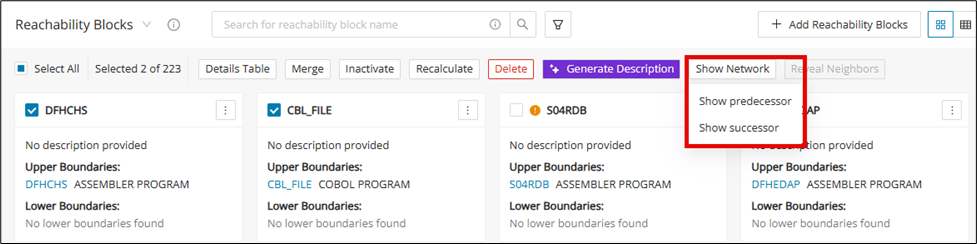
After creating reachability blocks, it is possible to display their reachability network by clicking the Show Network drop-down menu. From here, the options to Show predecessor and Show successor are available.
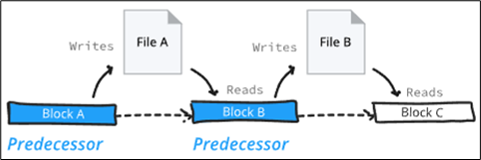
- Predecessors are blocks that provide data to the selected block. In the diagram below, Blocks A and B are predecessors of Block C, as the data produced by these 2 blocks is used by Block C to write to its own lower bound.
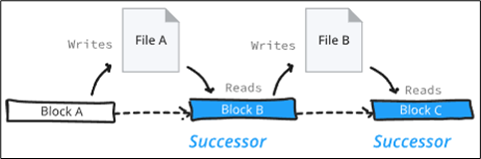
- Successors are blocks that receive data from the selected block. In the diagram below, Blocks B and C are successors of Block A, as the data produced by Block A is consumed by Block B and further by Block C to update or write into their own lower bounds.
Click Show predecessor or Show successor to provide the network view of the selected blocks.
After clicking Show predecessor or Show successor , a pop-up window related to the selected reachability blocks will be shown. Each row represents a lower bound of the selected reachability block, and when selected, it will be included in the network view shown. At the bottom of the window, select the specific file types of the lower bounds to further narrow down the network view. Select the lower bounds and click Proceed to produce the network view.
Network View offers similar functionalities to Block View. Four buttons will be shown by clicking each reachability block:
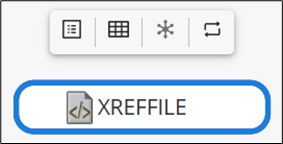
| Icon | Description |
|---|---|
| View Details: opens the details panel for the selected reachability block. | |
| Details Table: opens the Details Table for the selected reachability block. | |
| Details Graph: displays the graphical representation of how each modules are connected within the selected reachability block. | |
| Recalculate: reruns the call chain to update the reachability block |
Reachability Blocks network view
The Reachability Blocks Network View provides access to the complete network view of the connections of all the reachability blocks. To access this view, you must enable the reachabilityResourceNetwork feature toggle, which replaces the Show Network button with a dedicated Network View icon in the top right corner of the interface.
Configuration
To use this feature the reachabilityResourceNetwork feature toggle must be enabled.
From the Block View, navigate to the page header and click the Network View icon to switch between the block and network view.

If two reachability blocks share the same lower bound, then they will be linked in the network.
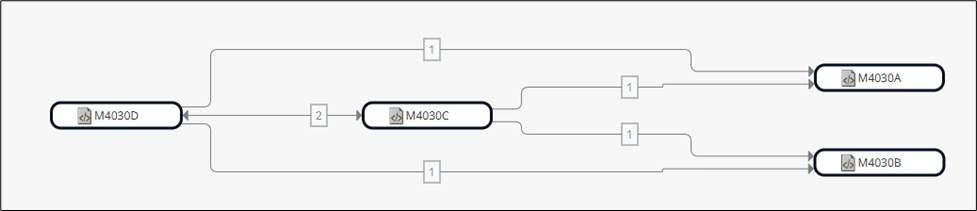
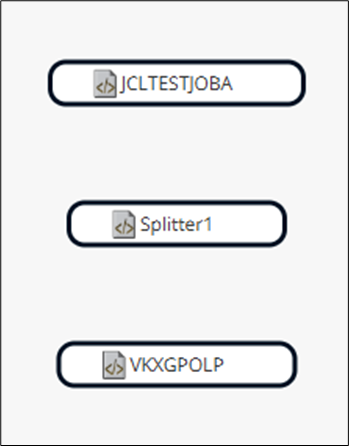
Otherwise, reachability blocks that do not share a lower bound will not be connected in the network view. Blocks without any connections can even be isolated, like in the picture below.
Merge blocks from Network View
Multiple Reachability Blocks can be selected and then merged, similar to the Merge feature in the Block View.
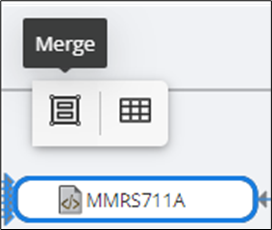
Select two or more nodes in the network view using Ctrl+Click (on Windows) or Cmd+Click (on Mac). Then click on the Merge icon.
Info
The Merge icon will only be displayed when selecting two or more nodes.
Step 3:
A Merge Reachability Blocks dialog is displayed. Enter the block name and description and click Merge. Once merged, the network is recalculated, and the links are rearranged with respect to the merged block.
Reachability Network View filters
This function allows you to filter out reachability blocks and their edges in the reachability network to view the most important information needed for analysis.
The reachability network view window displays filters for:
Edge filtering:
Shared lower bound technology and type filter:
Filter modules by technology and type of the shared lower bound. For example, if you enter either a technology or a type of the shared lower bound, all possible technology-type combinations of the supported lower bound will be shown so that you can select the most suitable combination.
Values for the dropdown:
Populate the lower bound technology and type values for all existing reachability blocks in the screen. If a new reachability block gets created with a new lower bound technology and type, this list will grow and show the new technology and type for the newly created reachability block.
Multiple options can be selected from the filter drop-down lists.
Step 1:
Click the filter icon.

The reachability network view displays all of the filter options.
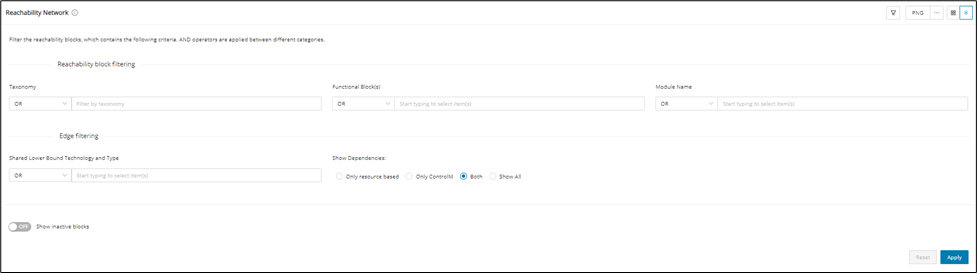
Step 2:
Filter Shared Lower Bound Technology and Type as "Resource File".
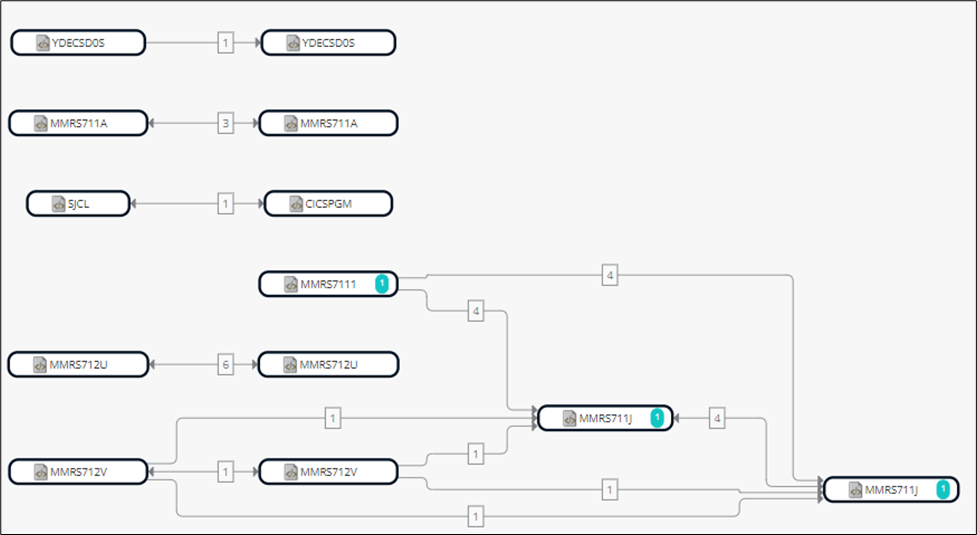
Reveal neighbors
The “Reveal Neighbors” feature provides miners with hints about unrevealed blocks that are not immediately visible during the initial analysis due to predefined criteria. This ensures miners can access crucial information in neighboring blocks, leading to a more comprehensive understanding of the blockchain structure.
Info
Note that the icon, which, when hovered, indicates if a block contains hidden neighbors.
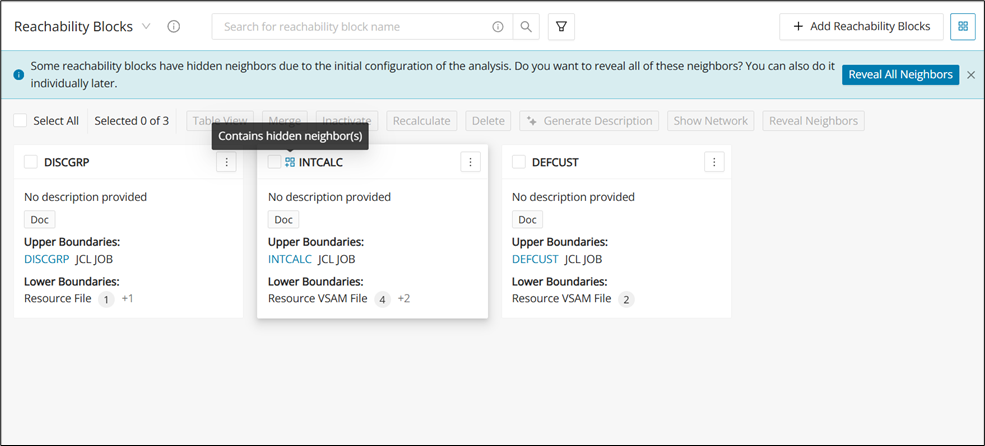
Select at least one block with undiscovered neighbors and then click Reveal Neighbors.
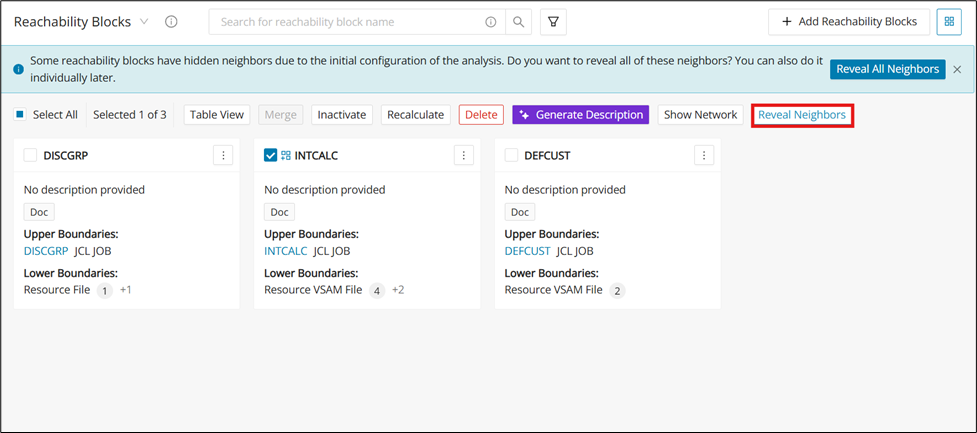
Or just click Reveal All Neighbors located on the banner at the top, which will act on all blocks with hidden neighbors.
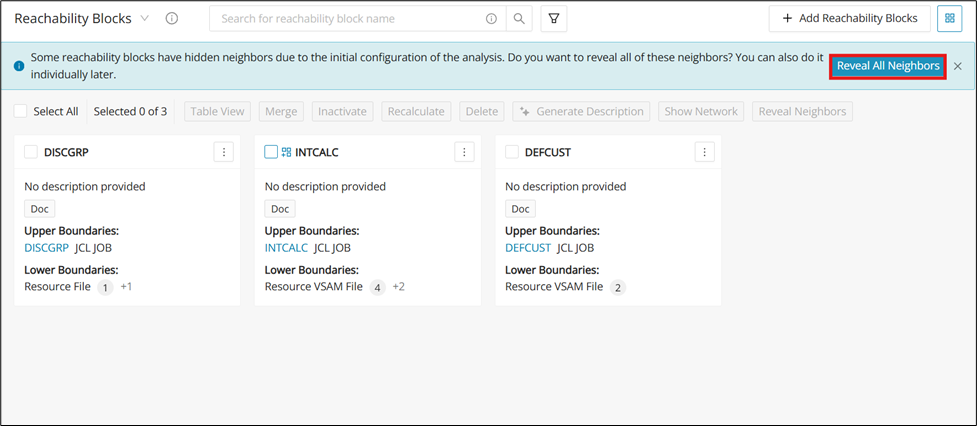
You can also reveal neighbors from the Network View.
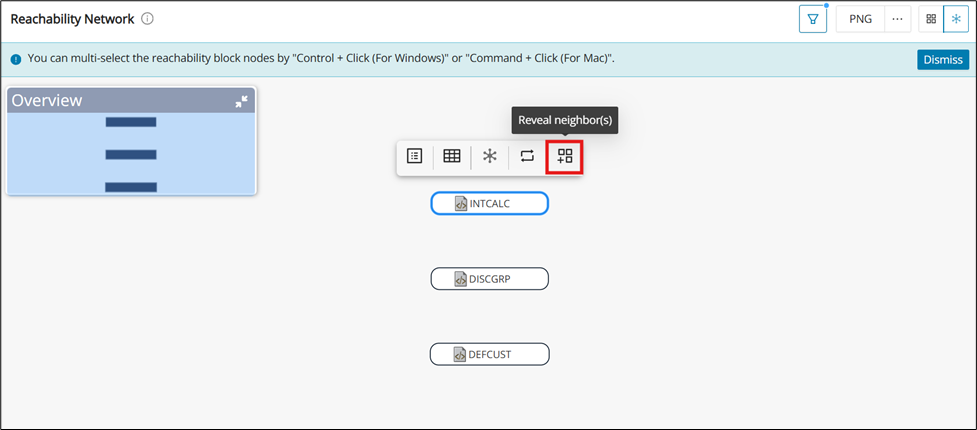
Examples
The following examples show how reachability features are applied in common analysis scenarios. Use them to understand how the overview, details table, and taxonomy actions work together in practice. Each example focuses on a concrete workflow you can reproduce in the UI.
Taxonomy assignment in Reachability Block(s) based on upper bound taxonomy
For a single reachability block in a Details Table, an option is provided to choose and apply the upper bound taxonomy to the lower bound modules, as well as all the underlying modules in the call chain, based on the Intermediate module details and whether the lower bound module is a read edge or a write edge module.
Step 1:
Navigate to the Reachability Blocks overview and find the desired reachability block. Check Select All and then click Details Table to populate the upper and lower bound taxonomies.
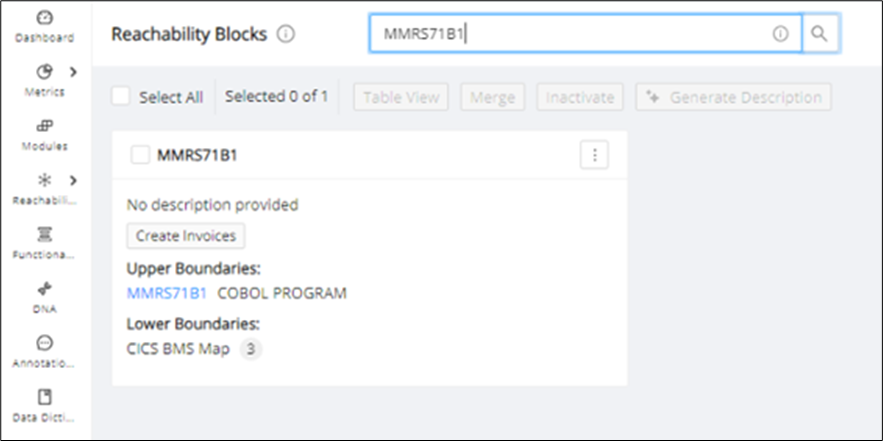
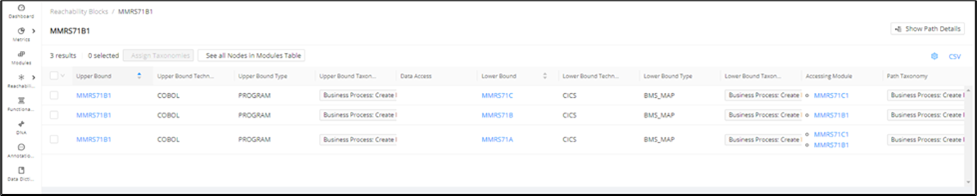
Step 2:
After clicking the select box of the desired reachability block, the Assign Taxonomies button will be enabled. Click Assign Taxonomies .
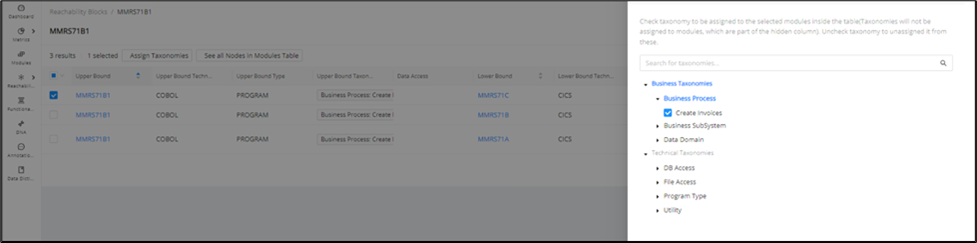
Step 3:
After assigning the taxonomies, they will be applied to all modules selected in the table row.


Step 4:
Changes to the taxonomies will also be reflected on the module details page and search for the modules.
Click CSV to download the CSV file. The updated taxonomies will be available in the CSV export in the Lower and Upper bound taxonomy columns.

Reachability Block datapoint in Modules table
Filter modules by reachability block to display the modules that are included in the reachability block.
Step 1:
Navigate to the Modules page, click the settings icon, search for “Reachability Block Name”, and select the checkbox. A new column will then be added to the table.
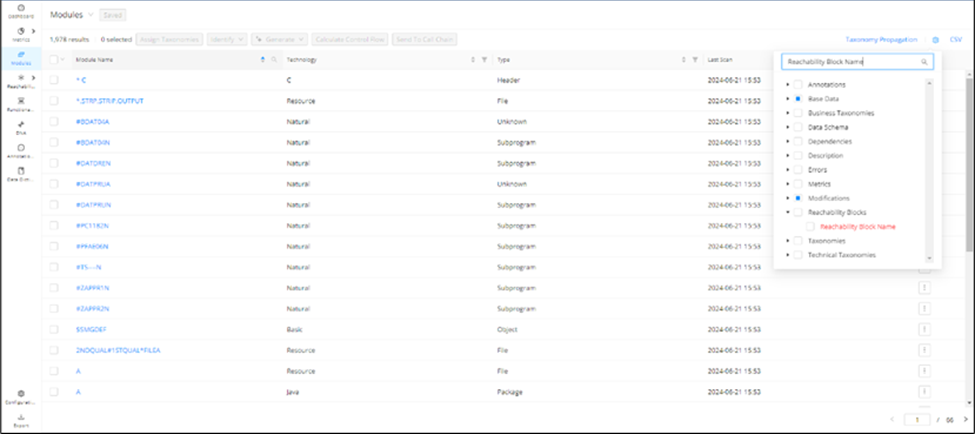
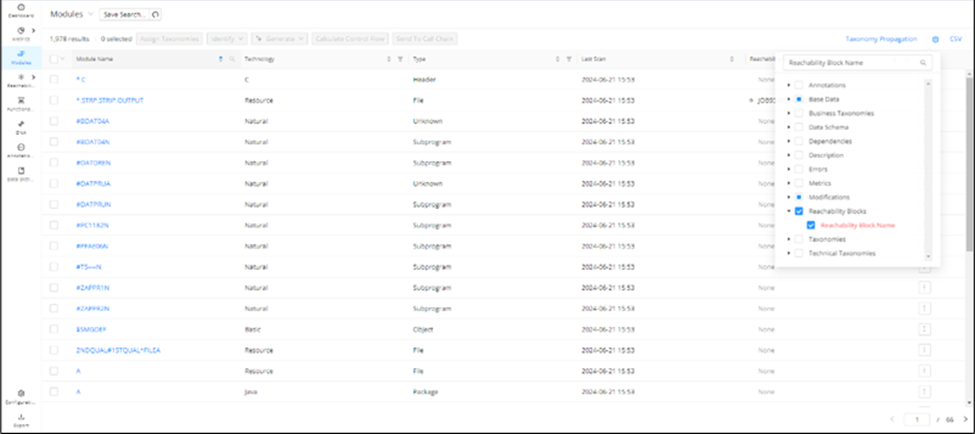
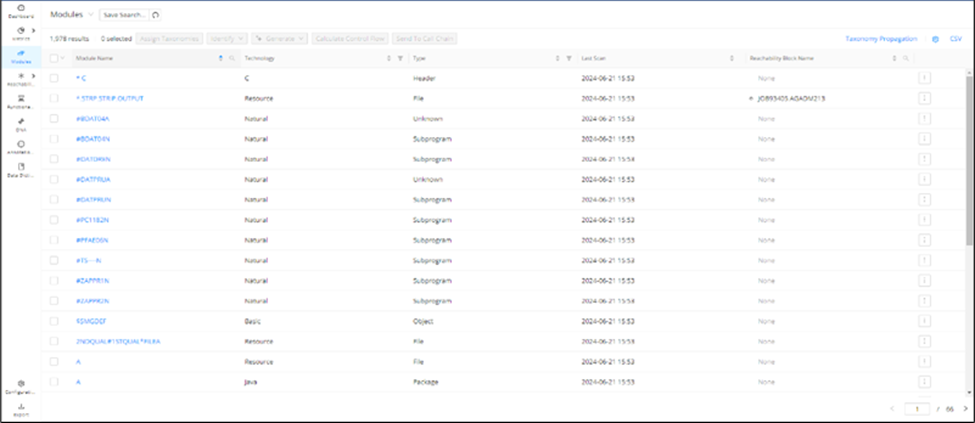
Step 2:
Click the search icon in the “Reachability Block Name” column. The info icon is present in the search field with a tooltip shown below. The user can search reachability blocks with either the full name or with wildcards.
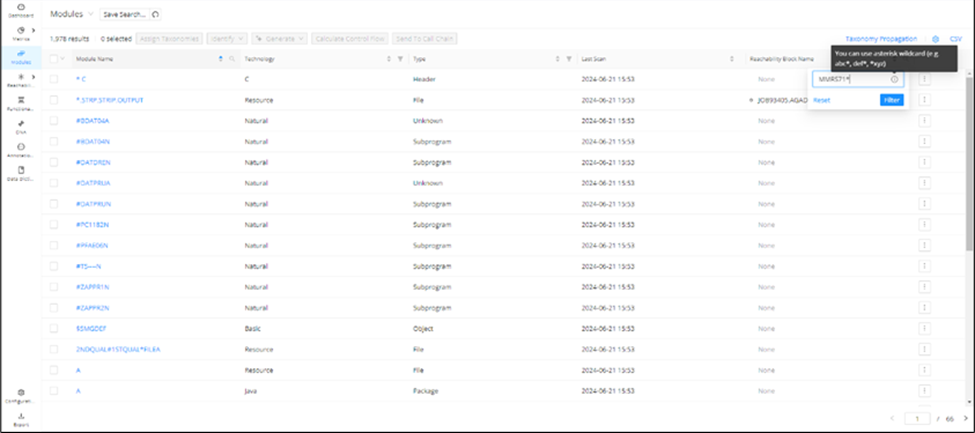
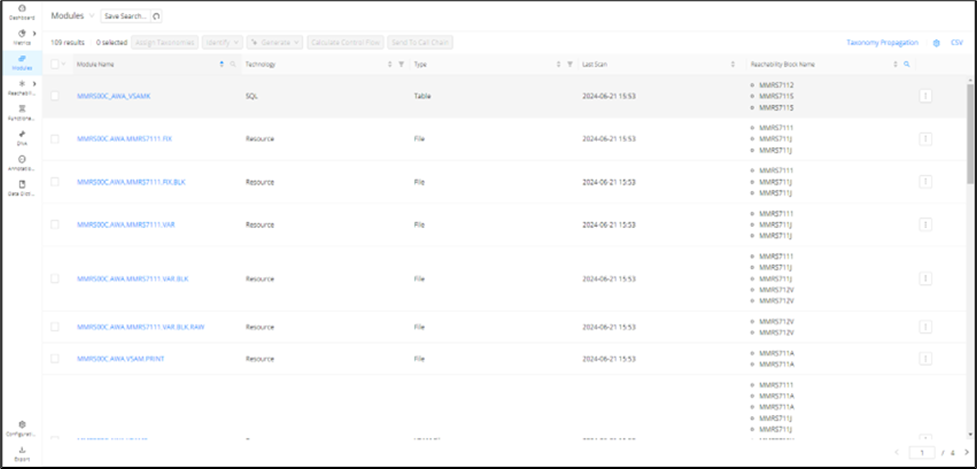
The reachability block names will appear in alphabetical order as a list in case there is more than one reachability block name appearing per cell.
Shared lower bound information
A Shared Lower Boundary is when two reachability blocks have both read and write access to the same lower boundary. In the network view of the reachability blocks, you can see the shared lower bound information on the edge linking the two reachability blocks.
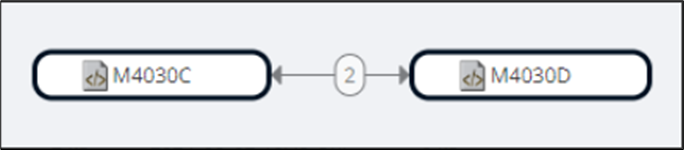
The number on the edge indicates how many lower bounds are being shared between the two reachability blocks. This number is clickable and will indicate the number of common lower bounds when it is hovered over.

Clicking the number opens the "Common Lower Bound(s) Details" dialog on the right side of the screen.
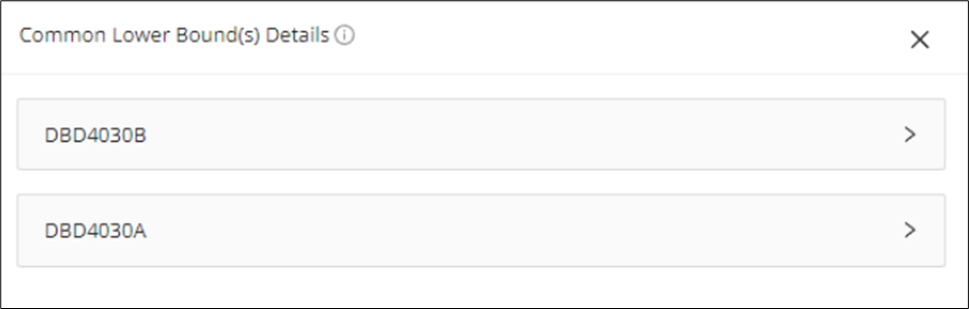
Next to the "Common Lower Bound(s) Details," there is an info icon. Hovering over it shows a pop-up with information about shared lower boundaries.
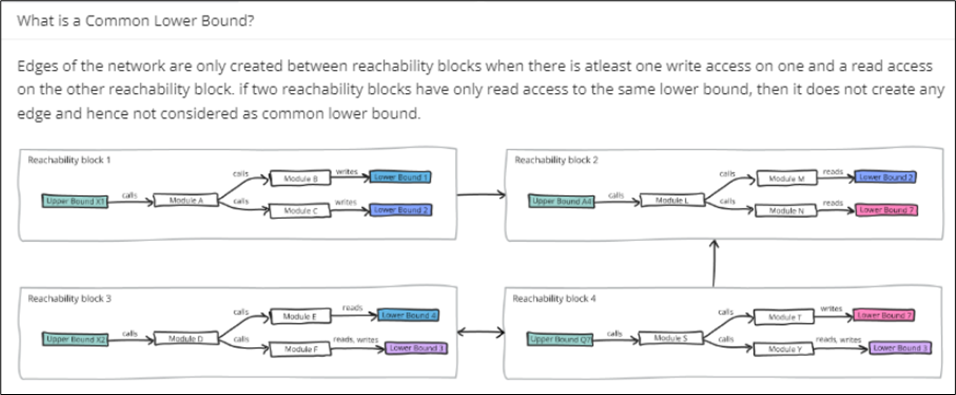
Shared lower boundaries are visible and are collapsed by default. The name of the shared lower boundary is visible as a header. When expanded, the following information is displayed:
-
Technology
-
Type
-
Access Types
-
Taxonomies
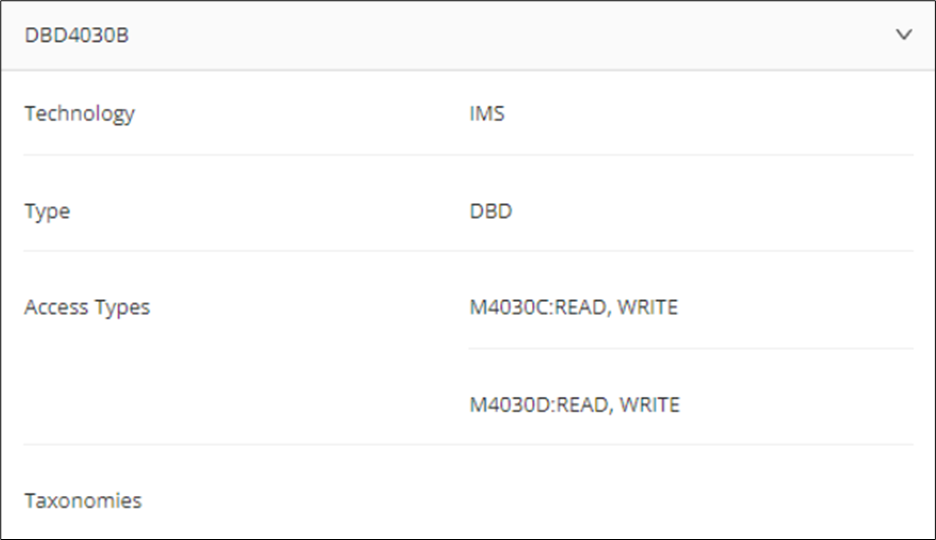
In the Access Types section, it shows that both reachability blocks have read and write access to the shared lower boundary. The same information about the shared lower boundary and block access types is available in the reachability block Details Table.
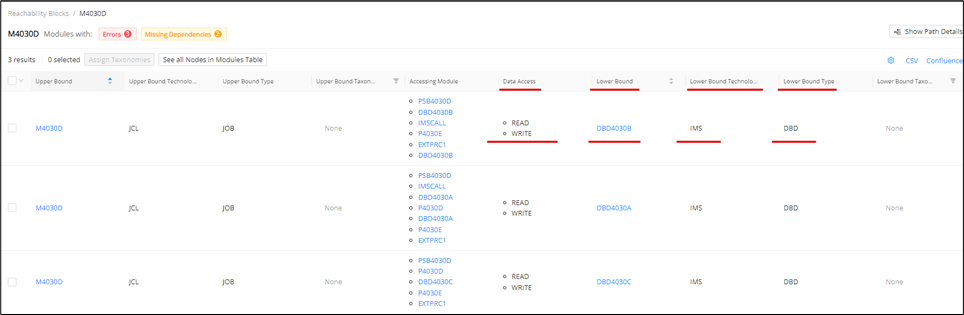
Upper/lower bound taxonomies in the Details Table
The Details Table features are as follows:
- The Detail Table displays all information for the reachability block(s), even if no lower bound modules are present.
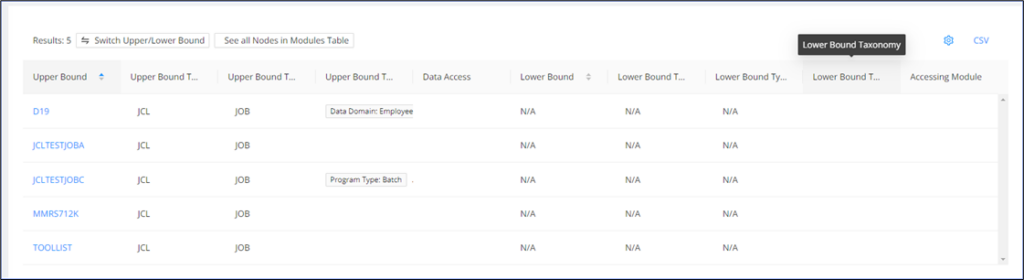
-
All taxonomies assigned to the upper and lower bound modules can be viewed along with their respective taxonomy terms in two separate columns:
-
Upper Bound Taxonomy
-
Lower Bound Taxonomy
-
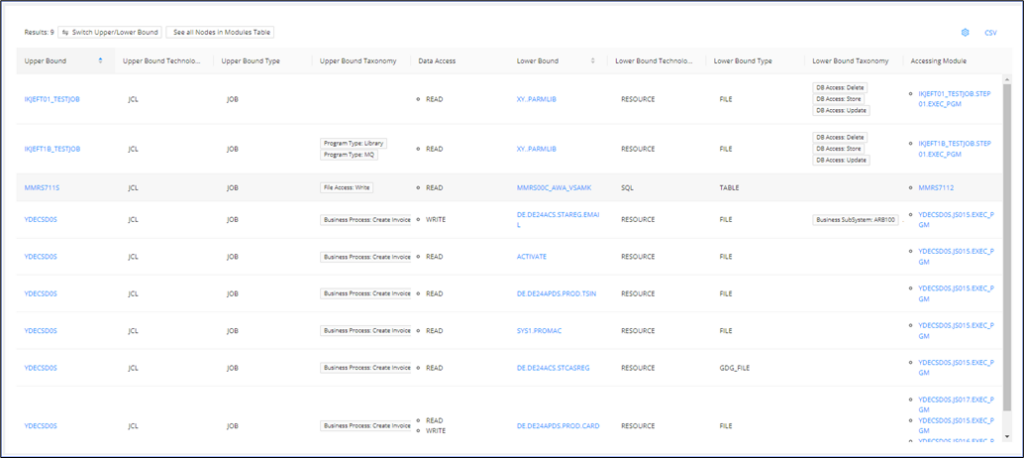
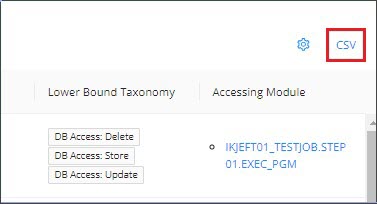
- To export the table, click CSV in the top right corner of the table.
-
The export will download as a CSV file named reachabilityData.
-
The CSV file contains the same taxonomies in the respective columns as they are displayed in the UI Details Table.

Filter for taxonomy columns in the Reachability Block Details Table screen
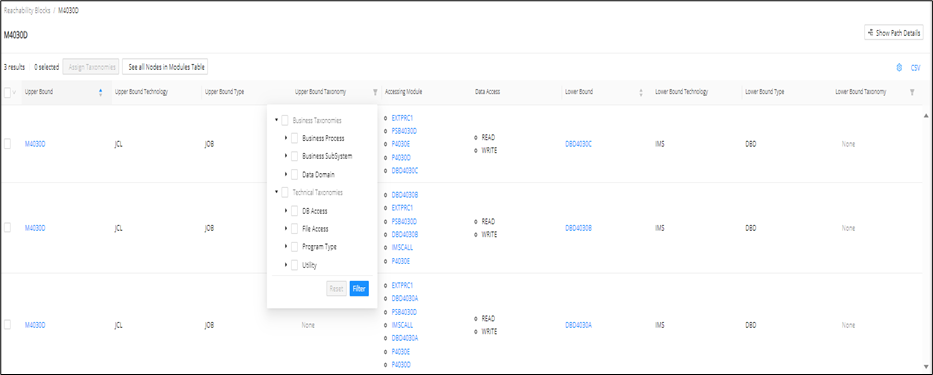
Navigate to the Reachability Blocks overview and find the desired reachability block. Select all of the blocks then click Details Table to populate the upper and lower bound taxonomies. Click the settings icon and select Path Taxonomy to view Path taxonomies.
The following columns have filter and reset capabilities when clicking the filter icon next to the column name:
-
Upper Bound Name
-
Upper Bound Technology
-
Upper Bound Type
-
Intermediate Module Name
-
Accessing Module Name
-
Data Access
-
Lower Bound Name
-
Lower Bound Technology
-
Lower Bound Type
Info
The columns that support wildcard search are: Upper Bound Name, Lower Bound Name, Intermediate Module Name, Accessing Module Name.
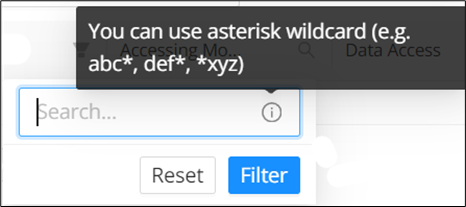
The Upper Bound Technology, Upper Bound Type, Lower Bound Technology, and Lower Bound Type columns have a multiple-choice filter that lists all of the technologies and Types present in the column of the reachability block.
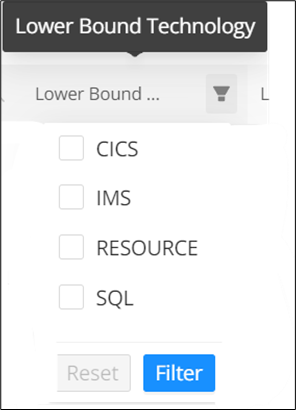
The filter for "Data Access" gives the list of all data accesses present in the column.