Environment setup
This chapter focuses on Code Discovery & Mining server configuration, setting up the server connection, and configuring logging. It includes detailed information about user and access management for system administrators.
Info
Code Discovery & Mining is not compatible with the IBM AIX operating system and the IBM JRE.
Postgres setup
The following section covers the setup for Postgres. It summarizes the base database tasks that Mining depends on, including cluster initialization, server startup, and initial user creation. Use the platform-specific steps below to prepare a Postgres instance before connecting the rest of the Mining components.
Windows
Perform the steps below to set up Postgres on a Windows machine.
Step 1:
Download and unpack server binaries.
-
Download the ZIP with the binaries (not the installer) from https://www.enterprisedb.com/download-postgresql-binaries.
-
Unpack the server binaries to a location of your choice (for example.
<home>/Development/postgresql). From the ZIP file, you will get a folder named pgsql ().
Step 2:
Create and initialize a new database cluster.
-
Choose a folder for creating a new database "cluster" (
). This will contain all the databases managed by a server instance along with its configuration. -
Initialize the data cluster. From the command prompt, run the code below. Note that
and should contain the absolute paths.
<pgsql>\bin\initdb --no-locale –-encoding=UTF8 <pgdata> -
After initialization, you will find the following configuration files in
. (No change is required in these files when starting the server locally.) -
postgresql.confContains basic server settings like the TCP port (5432 by default), load, and memory limits. -
pg_hba.confDefines access restrictions. By default, administrative access is allowed without authentication from localhost only.
-
Step 3:
Start the database server.
-
From a command prompt, run:
<pgsql>\bin\postgres -D <pgdata>
The server log will be printed to the terminal in real-time.Alternatively, the server can be started using a batch file as:
<pgsql>\bin\postgres.exe -D <pgdata>
Step 4:
Create an application user and a database.
-
With the server up and running, from a command prompt, run:
<pgsql>/bin/psql postgres
The server admin prompt shown below will be displayed:
postgres=+ -
From this command prompt,
-
Create a role "mining" as below:
CREATE ROLE mining WITH LOGIN; -
Then create the database "mining" with the role created above:
CREATE DATABASE mining WITH OWNER = mining;
-
Linux
Set up using Docker PostgreSQL image
Step 1:
Pull the latest or version 15 and above Postgres image using the command:
Step 2:
Create a Postgres container, copy the backup into it, and start the container as described below:
Step 3:
Delete and recreate the database and role:
Step 4:
Restore the backup using the following command:
Prerequisites (if Postgres image is not used)
Follow the steps below to manually install Postgres on a Linux machine:
Step 1:
Log in as a root user.
Step 2:
Install Postgres.
-
Install the repository RPM:
dnf install -y https://download.postgresql.org/pub/repos/yum/reporpms/EL-8-x86_64/pgdg-redhat -
Disable the built-in PostgreSQL module:
dnf -qy module disable postgresql -
Install PostgreSQL:
dnf install -y postgresql15-server
Step 3:
A pgsql-15 folder is visible in the "usr" directory.
Step 4:
Create a directory "postgresql" and a data directory "data15" within postgresql and assign the necessary permissions.
Step 5:
Copy the pgsql-15 folder and paste it into the postgresql directory:
cp -r /usr/pgsql-15 /usr/postgresql/pgsql-15
Step 6:
Log in as Postgres user, set the library path, and initialize the database cluster/directory:
Step 7:
After initialization, you will find the following configuration files in data15:
-
postgresql.conf -
pg_hba.conf
Step 8:
Open postgresql.conf, uncomment the following lines and add the IP address of the host machine against listen_addresses:
Step 9:
Open pg_hba.conf and add another IP address of the host machine under the section "IPv4 local connections":
Set up Postgres via Groovy script
Perform the following steps to set up Postgres via a Groovy Script.
Step 1:
Create a directory "postgres" inside the jobWorkspace and modify the permissions (chmod -R 777) of that directory.
Step 2:
Create a container with username and password, mount the volume from "<jobWorkspace>/postgres" to "/var/lib/postgresql/data15", and start the container with port 5432 and image postgres.
Step 3:
Copy the data directory (data15) from the host system and paste it into the container.
Step 4:
Start the Postgres container.
Step 5:
Verify that Postgres is running.
Step 6:
Create the application user and database as follows.
Step 7:
Add the JDBC URL in the command to start the API server.
AWS EC2 Instance
Add the following commands to the Postgres launch template in the User Data section:
Code Discovery & Mining API server configuration
This section gives an overview of the fundamentals of Mining API server configuration. It explains the default packaging model, the main startup options, and where to place customer-specific overrides. Use it to understand which settings must be supplied externally and which ones can remain at their defaults.
Configuration
The Mining API Server is delivered as a self-contained JAR file with a built-in default configuration. It is usually configured to customer specifications during the initial setup by the Deloitte project team.
Configuration
On Linux hosts, the fontconfig package must be installed as a requirement for the Excel file generation during Discovery.
Starting the Mining API server
The Mining API Server JAR only requires the Java JRE to run, and can be executed via command line interface (CLI) with the following command:
The server configuration can be adjusted by appending command-line options, for example, for application and log configuration.
Application configuration
The application's configuration can be adjusted by providing a customized YML file via the jar command line parameter --spring.config.additional-location:
Configuration options range from server details, database connection, and spring profile parameters to Job API (see Mining Job API) and Keycloak settings.
Configuration
The default YML configuration can be extracted from the server JAR file at mining-api-server-dist-<version>.jar\BOOT-INF\classes\application-default.yml and used as a template.
To simplify updating your Mining version, it is recommended to remove everything from the default YML, except for the configuration values that you need to customize.
For example, to configure the database URL and credentials, the following YML file content should suffice:
Task thread limit
For testing and debugging, it is possible to limit the number of concurrent tasks for the job execution.
In the application configuration YML file, adjust the block maximumLocalTaskThreads: under job-api::
Job thread limit
A job may initiate another job and wait for its completion. Therefore, the configurable number of concurrent jobs has been constrained to a minimum of 4. This helps to avoid a job causing a deadlock when another job is waiting or cannot run in parallel. To change the limit on the number of concurrent jobs, adjust the following property in the configuration YML file:
Warning
Setting the thread count below 4 will fail to start the server, and the corresponding error message: "APPLICATION FAILED TO START".
Discovery cache sizes
To optimize memory usage for Discover Code and Discover Metrics executions, the number of entries kept in memory for various tasks can be configured. To adjust cache sizes, adjust the following properties in the configuration YML file:
To restore the previous behavior, use the following setting, since caches use strong references:
Configuration
Reduce the result cache size if you are encountering OutOfMemory errors during Discovery.
Discovery upload size limit
During Discover Code operations, the project source code is uploaded in the background. The source upload has a default limit of 10,000,000,000 uncompressed bytes. The value is configurable to enable projects to upload archives that contain larger amounts of data via the discovery-source-upload-maximum-size parameter in the configuration YML file:
Call chain export options
Maximum CSV export lines
The CSV export of call chains is limited in the spring configuration to 5,000,000 lines by default. The value can be configured in the application.yaml file in the configuration section to improve call chain export performance:
Maximum export threads
It is possible to specify the maximum number of task threads for call chain computation.
The default value is 8. A value less than 1 will allow the runtime to use all available processors.
The value can be configured in the application.yaml file in the configuration section to improve call chain export performance:
Cookie consent
The Mining Web UI can be configured to prompt the user to consent to cookies before logging in.
The mining.cookieId property must be set at the time of deployment to enable or disable this feature.
Info
Cookie IDs are generated specifically for each client and are provided to the respective Deloitte project admin.
This property can be set in three ways:
Option 1:
Adjust the configuration YML file.
Option 2:
Pass the property as a start parameter in the server startup command.
Option 3:
Set the property as an environment variable.
Warning
For non-production environments, the cookie consent prompt can be disabled by assigning the value "DISABLED", for example. -mining.cookieId=DISABLED.
Authentication
The primary authentication approach is by default Keycloak authentication. However, for users opting for legacy authentication, they can activate the legacy authentication profile by appending --spring.profiles.active=legacy-auth when running the project. Pass the property as a start command in the api server startup command.
Alternatively, it can be configured in the application configuration YML file:
Set category for GenAI knowledge-service retrieval
You are allowed to specify the category/index to be used for querying the knowledge service by setting its value to the mining.genAI.annotationKnowledgeCategory property when running the project. This property is used for querying the OpenSearch database in the backend. The default value is VARIABLE_DESCRIPTION. This property can be passed along when starting the API server with the following command:
Alternatively, it can be configured in the application configuration YML file:
Introduced LLM response
The response format (for example, TEXT, JSON) of the configured model can now be specified via the responseFormat parameter inside the application.yaml. The default response format for Annotation Description generation is now JSON.
Warning
Make sure that the plugin specified in your application.yaml file supports JSON response format
Important: If the specified plugin does not support the JSON response format, make sure to change the responseFormat to “TEXT” in the application.yaml file.
For example, check Azure AI for endpoints hosted on Azure Cloud.
The following models (and newer) should support JSON mode:
-
gpt-35-turbo(1106)
-
gpt-35-turbo(0125)
-
gpt-4(1106-Preview)
-
gpt-4(0125-Preview)
Keycloak configuration
When the Mining API Server is to be used in conjunction with Keycloak, the authorized-access spring profile needs to be used. Otherwise, the server will fall back on the integrated default authentication without Keycloak. The application YML file should therefore contain the following content:
The HTML Display name and the Redirect URIs in the Keycloak Realm Client need to be adjusted to point to the Mining API server. This can be done in your Realm's client configuration via the Keycloak Admin UI.
The following example shows the required configuration for the HTML display name, backend, and web clients, assuming that the Mining API server is deployed to http://127.0.0.1:8080.
General configuration

Backend client configuration

Web client configuration

Info
Note that the URI http://127.0.0.1:4200 is also listed in the setting above. Port 4200 is the preconfigured default port for the Mining UI.
To support the Mining access matrix (see Access Matrix), a client-specific role mapping needs to be configured. Keycloak supports the integration of various identity providers and user federation systems. Therefore, your Mining setup can be interconnected with your Single-Sign-On (SSO) or Active Directory (AD) system.
For detailed information about individual options and Keycloak configurations, please refer to the official Keycloak documentation:
Keycloak version 22 upgrade
Building a Docker image
Step 1:
Log in to the Docker registry
Step 2:
Build the Docker image with the upgraded Keycloak jar (with the help of a Docker File) and tag it with the build version
Step 3:
Push the newly built image to the Docker registry
Keycloak URL
The /auth from the keycloak URL is removed and the new URL is changed to http://
Keycloak directory path
The path of the Keycloak directory to create/assign roles and users via the Keycloak Admin CLI has been changed to /opt/keycloak/bin/kcadm.sh
Connecting to an AWS Aurora Postgres database
You can use AWS Aurora as the "postgres" database. When authenticating with username/password, you can use the standard PostgreSQL driver, and no special configuration is needed. However, when you want to use AWS IAM authentication to access the database, you must use a special JDBC driver provided by AWS and a special configuration.
The documentation on the JDBC driver can be found here:
Note that setting the "classpath" argument on the command line does not have the desired effect for spring-boot jars. To load the JDBC driver, you must use the "loader.path" system property like so:
Info
You must put the -Dloader.path argument before the class argument (org.springframework.boot.loader.PropertiesLauncher), otherwise it doesn't work.
When the driver is loaded properly, you can use this configuration to set up IAM authentication:
Log configuration
Logging can be configured by providing a customized log4j2.xml file via the java system property -Dlogging.config:
Configuration
The default log configuration can be extracted from the server JAR file at mining-api-server-dist-<version>.jar\BOOT-INF\classes\log4j2.xml and used as a template.
Info
The existence of a log file depends on the configured log level in the log4j2.xml file. For example, if the log level is set to OFF or ERROR, no log file is created when only INFO events are triggered.
After a job has been executed from Eclipse (for example, mining > Analysis > Calculate Control Flow), the corresponding server log can be retrieved from the Logs column in Job View:

Clicking the Logs link will trigger a Windows Explorer prompt to save the log file to your desired location.
Temporary log directory
When executing Discovery jobs (Discover Code, Discover Metrics, etc.), the log output from these jobs is recorded in a temporary file, which is then automatically downloaded to the Eclipse workspace after the job finishes.
The location of the temporary folder can be reconfigured with the following adjustments:
In the application configuration YML file, add a child block log: under job-api::
A matching change must be applied to the log configuration. In the log configuration XML file, search for the appender with name="jobAppender-${ctx:job-id:-unknown}" and modify it as follows:
Mining Extensions
Mining extensions are Java classes that implement a certain interface and register some additional functionality for the Mining product. They are provided as .jar files by the Mining development team.
Extensions are registered automatically at runtime if they are put on the classpath of the Mining API server.
The following example outlines how to integrate the Decompose export extension.
The API server start command needs to be adjusted to include the library:
Additional launch parameters and escaping might apply, especially in the case of remote or automated deployments.
Mining API server connection
To work with most Mining functions, your local project must be connected to the Mining server. This can be done with or without Keycloak.
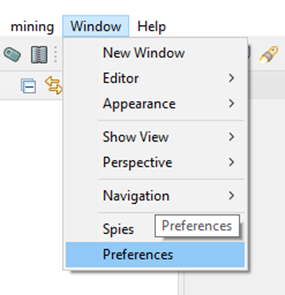
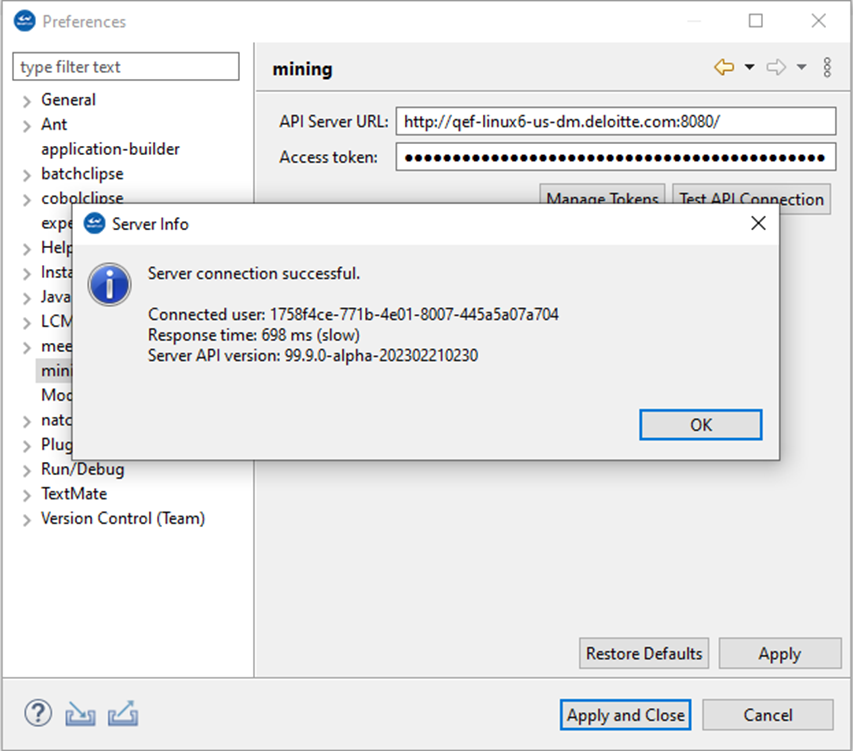
To connect to the server, navigate to Window > Preferences > mining and perform the steps for Option A: Connect with Keycloak or Option B: Connect without Keycloak, as the case may be:
Option A: Connect with Keycloak
Step 1:
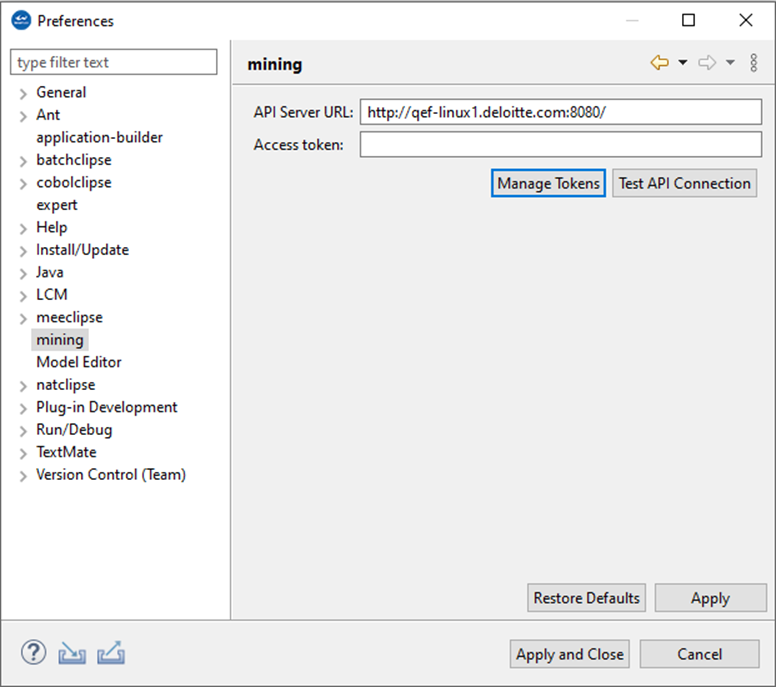
In the project or workspace Preferences, enter the correct API server URL and select Manage Tokens on the mining tab.
Step 2:
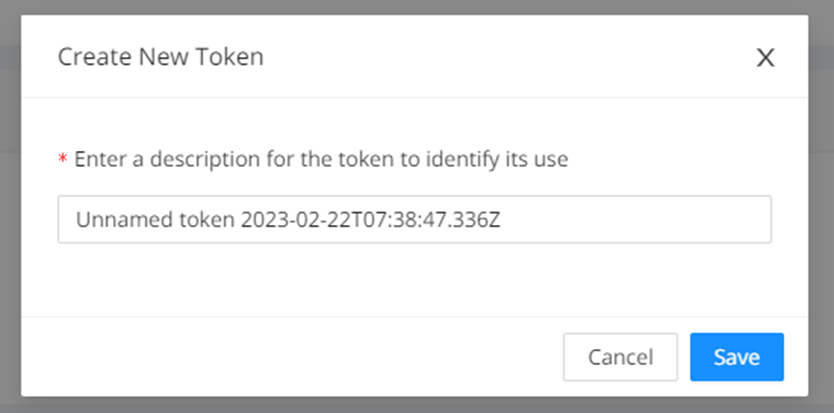
After selecting Manage Tokens , a browser opens automatically. Log on to that browser, and then click the + New Token . Enter a description (optional) in the Create New Token window. Then click Save .
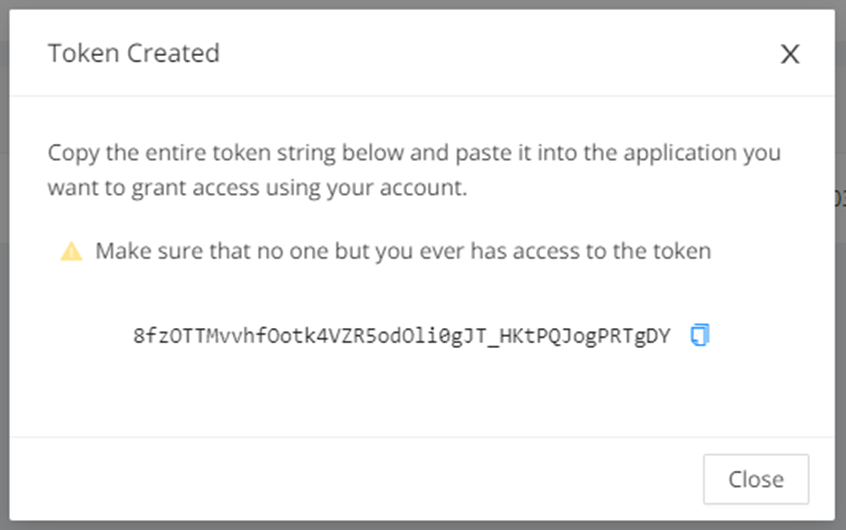
Within a couple of seconds, the “Token Created” window appears with the access token. Copy the access token and close the window.
Step 3: Paste the access token in the Preferences window (see Step 1 above), click Apply , and then click the TEST API Connection . A “Server connection successful” message will be displayed along with information on the connected user, the response time, and the server API version.
Option B: Connect without Keycloak
Step 1:
Enter the URL of the API server you wish to connect with, and then enter the access token ff93340a-af6c-4fcd-90bb-426448fa1597 in the Access token field.
Step 2:
Click Apply .
To check whether the connection to the server has been established, you can click Test API Connection . If the connection exists, the “Server connection successful” message will be displayed. The message also shows the connected user, the response time, and the server API version.
Step 3:
Click Apply and Close .
Logging
Logging helps you verify that the Eclipse-based tooling and server connection are working as expected. The sections below show where Mining writes diagnostic information and how you can review it inside the IDE. Use these logs first when you need to investigate warnings, errors, or connectivity issues.
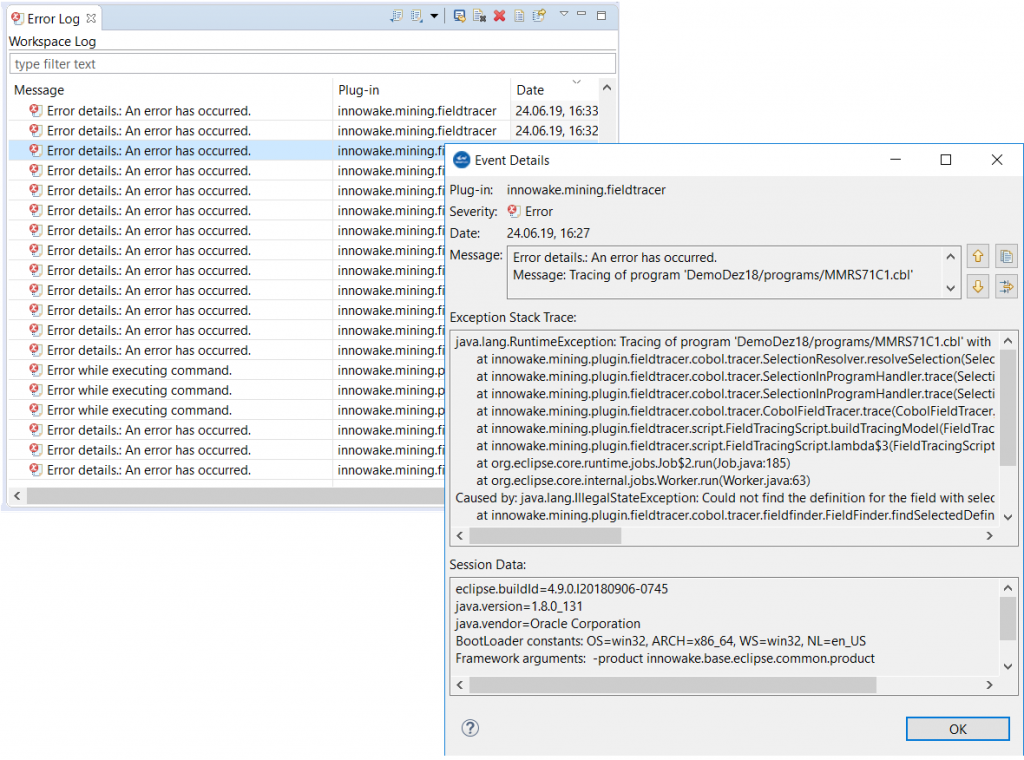
Workspace log
Logs are written to the Workspace Log. It is located in your Eclipse workspace in the .metadata folder and is named .log.
Error log view
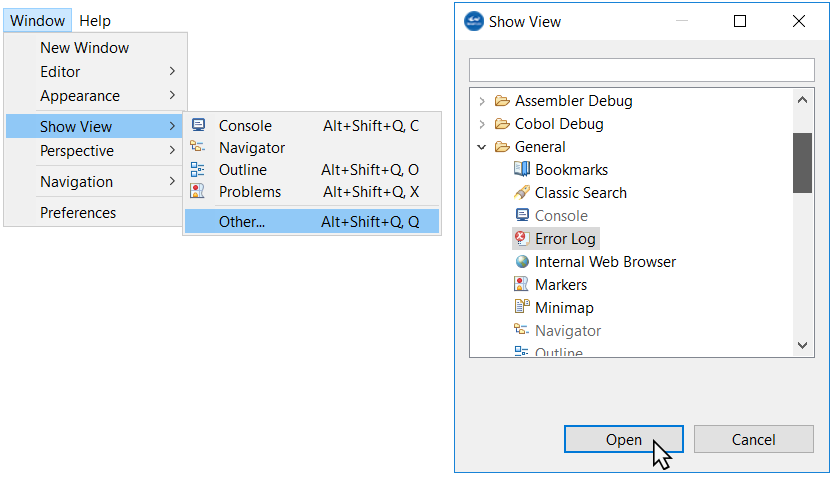
The error messages and warnings listed in the Workspace Log are also shown in the Error Log view in Eclipse. To display the Error Log, navigate to Window > Show View > Error Log and click Open .
To view details, double-click the corresponding entry.
User management without Keycloak - Information for system administrators
The following sections provide information for system administrators. They describe the built-in user and token model that is available when Keycloak is not part of the deployment. Use this information to review default access and to provision additional users in older or simplified environments.
User and OAuth access
The database schema comes loaded with an administrator (Username: admin) user with the following access token:
| admin user access token |
|---|
| 6c2000c1-d9a8-4d87-92f0-0a11139a037e |
If multiple miners will be using the Mining API server, additional users should be created according to the instructions in the section below.
Creating a new user
Warning
This section is for OrientDB only and is deprecated for the newest version of Code Discovery & Mining
Complete the following steps to create a new user:
Step 1:
Generate the user password hash by starting the Mining server with the argument "hashpw"
Step 2:
When prompted, enter the user password to hash. Find the hashed password in the next line.
Step 3:
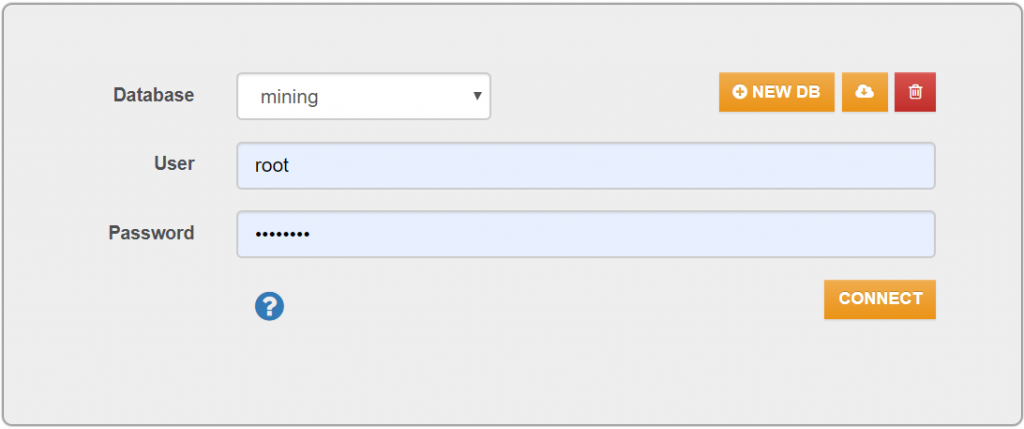
In a web browser, enter the URL on which the database is running, followed by a colon, followed by the port (always 2480), for example. localhost:2480.
Step 4:
In the window that opens:
-
For Database, select mining from the drop-down list
-
Enter the credentials of the database and root user
-
Click CONNECT
Step 5:
An OrientDB window opens. In the top field, create the new user by executing the following SQL with the new user name and the password hash that you created before.
Step 6:
Click RUN .
Step 7:
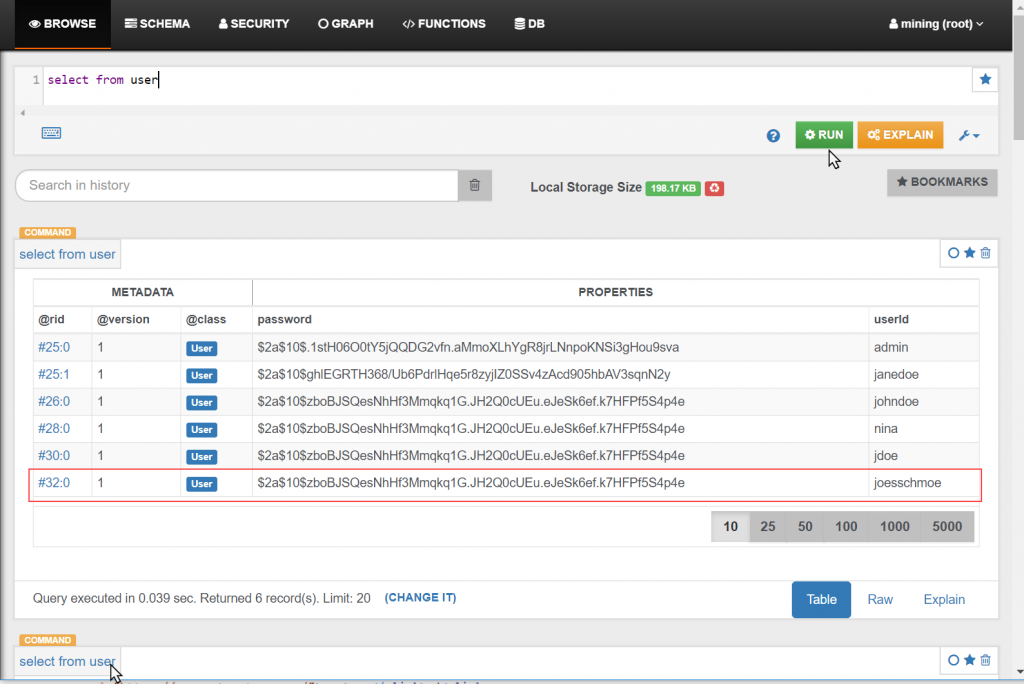
Verify the creation by running select from user. Now the user is displayed in the user table.
Creating the access token
Follow these steps to create an access token:
Step 1:
Create the access token by using the OAuth service with Postman as follows. On the landing page, click GET STARTED .
Step 2:
The download page will open. From the drop-down menu, select Windows 64-bit.
Step 3:
On the page that opens, beneath "Untitled Request", select POST from the drop-down menu and enter localhost:8080.
Step 4:
Navigate to the Authorization tab and select Basic Auth.
Step 5:
Navigate to the BODY tab and select the x-www-form-urlencoded radio button.
Successful result:
Step 6:
Use the provided access token in the mining-plugin preferences or on any mining-server call as url argument "access_token".
Example:
http://server:port/?access_token=f4be410d-996e-455d-b95e-19465d525ad9
Identity and access management IAM with Keycloak
The IAM feature allows administrators to manage user privileges by means of role-based access control (RBAC). While Identity Management covers authentication (for example, signup, login, password reset, etc.), access management deals with the authorization of the access levels to features in the Mining platform.
Authentication takes place via Keycloak. Keycloak is an external tool that is integrated into Mining. For more information, see the official Keycloak documentation at https://www.keycloak.org/docs/latest/.
Users can only be created via Keycloak; however, the user "Admin" ("god mode" admin) can access the page for creating users in Keycloak via the Global menu in the web UI (Global > Users).
Roles and definitions
The following table describes the available roles and access levels.
| Role | Description |
|---|---|
| Admin | The highest role in the user hierarchy, can also understood as "super user", "root", or "god mode". A general characteristic of admin role is that this role holds rights to manipulate data structures (for example, executing SQL commands). A user with a "admin" role has no restrictions and must be assigned to users wisely. |
| Client Admin | The Client Admin role provides similar rights to an Admin, but is scoped to a defined client. It can be understood as an Account Manager. Like the Admin role, one of the features of the Client Admin is the right to manipulate data structures of projects, such as modifying annotation categories or taxonomies. |
| Manager | The Manager role is provided for the project leads and allows manipulation of the mining baseline data. This is typically a person from the business function, that is, a person who is capable of understanding and approving the mined data. |
| Editor | Users with the Editor role have basic editing rights needed to work with Mining effectively, such as creating annotations, assigning taxonomies, creating descriptions, etc. |
| Viewer | The Viewer role is effectively a read-only role that can access and view features but can not add or modify data. This role is designed to allow an insight into the delivery and service process as a spectator, and to ensure that this user cannot edit data. |
Access matrix
The following matrix represents the various access levels and permissions.
| Project Nature | Client Admin (Restricted to specific client) |
Admin | Manager (Restricted to assigned project) |
Editor (Restricted to assigned project) |
Viewer (Restricted to assigned project) |
|
|---|---|---|---|---|---|---|
| Users | ||||||
| Assign "Admin" role (via Keycloak) |
n/a | ❌ | ❌ | ❌ | ❌ | ❌ |
| Assign "Client Admin" role | n/a | ✅ | ✅ | ❌ | ❌ | ❌ |
| Clients | ||||||
| See/Read | n/a | Only those clients from which projects the current user is assigned to | ✅ | ✅ | ✅ | ✅ |
| Add, Edit, Delete | n/a | ❌ | ✅ | ❌ | ❌ | ❌ |
| Projects | ||||||
| See/Read | n/a | All of specific client | ✅ | ✅ | ✅ | ✅ |
| Add, Edit, Delete | n/a | ✅ | ✅ | ❌ | ❌ | ❌ |
| Assign Members with Regular Roles (Manager, Editor, Viewer) |
n/a | ✅ | ✅ | ❌ | ❌ | ❌ |
| Override Project Nature on User (for example, access Mining features in a Discovery-only project) |
n/a | ❌ | ✅ | ❌ | ❌ | ❌ |
| Legacy Discovery Import | ||||||
| Server-side Import Discovery Excel/CSV Legacy |
Mining | ✅ | ✅ | ✅ | ❌ | ❌ |
| Discovery on Mining | ||||||
| Discover Code on selection |
Discovery Mining | ✅ | ✅ | ✅ | ❌ | ❌ |
| Discover Metrics on selection |
Discovery Mining | ✅ | ✅ | ✅ | ❌ | ❌ |
| Discover DNA on selection |
Discovery Mining | ✅ | ✅ | ✅ | ❌ | ❌ |
| Upload Source Code Files (Advanced) |
Discovery Mining | ✅ | ✅ | ✅ | ❌ | ❌ |
| Download Source Code Files (Advanced) |
Discovery Mining | ✅ | ✅ | ✅ | ✅ | ✅ |
| Upload Configuration (Advanced) |
Discovery Mining | ✅ | ✅ | ✅ | ❌ | ❌ |
| Download Configuration (Advanced) |
Discovery Mining | ✅ | ✅ | ✅ | ✅ | ✅ |
| Export Discovery Excel/CSV | Discovery Mining | ✅ | ✅ | ✅ | ❌ | ❌ |
| Export Summary Effort Excel | Discovery Mining | ✅ | ✅ | ✅ | ❌ | ❌ |
| Annotations | ||||||
| See/Read Annotations on Code | Mining | ✅ | ✅ | ✅ | ✅ | ✅ |
| Add, Edit, Delete Annotations on Code | Mining | ✅ | ✅ | ✅ | ✅ | ❌ |
| Set status to "Approved" | Mining | ✅ | ✅ | ✅ | ❌ | ❌ |
| Maintain Annotation Categories (project specific) | Mining | ✅ | ✅ | ✅ | ❌ | ❌ |
| Bulk Deletion | Mining | ✅ | ✅ | ✅ | ❌ | ❌ |
| Data Dictionary | ||||||
| See/Read Entries | Mining | ✅ | ✅ | ✅ | ✅ | ✅ |
| Add, Edit, Delete Entries | Mining | ✅ | ✅ | ✅ | ✅ | ❌ |
| Validate Text Selection | Mining | ✅ | ✅ | ✅ | ✅ | ❌ |
| Bulk Deletion | Mining | ✅ | ✅ | ✅ | ✅ | ❌ |
| Module Description | ||||||
| See/Read | Mining | ✅ | ✅ | ✅ | ✅ | ✅ |
| Edit/Delete | Mining | ✅ | ✅ | ✅ | ✅ | ❌ |
| Taxonomy | ||||||
| See/Read Taxonomies | Mining | ✅ | ✅ | ✅ | ✅ | ✅ |
| Add, Edit, Delete Taxonomies | Mining | ✅ | ✅ | ✅ | ❌ | ❌ |
| Assign, Bulk Assign / Propagate Taxonomy to Module | Mining | ✅ | ✅ | ✅ | ❌ | ❌ |
| Job Framework | ||||||
| See Jobs and Results | Mining | All of specific client | ✅ | ✅ | ✅ | ❌ |
| Cancel/Delete Job | Mining | All of specific client | ✅ | ✅ | ✅ | ❌ |
| Entity Meta Model (Custom Properties) | ||||||
| See/Read/"Use" properties | Mining | ✅ | ✅ | ✅ | ✅ | ✅ |
| Create/edit/delete properties | Mining | ❌ | ✅ | ❌ | ❌ | ❌ |
| Automated Analyses | ||||||
| Candidate Item Identification | Mining | ✅ | ✅ | ✅ | ❌ | ❌ |
| Technical Taxonomy | Mining | ✅ | ✅ | ✅ | ❌ | ❌ |
| Module Description | Mining | ✅ | ✅ | ✅ | ❌ | ❌ |
| GenAI | ||||||
| Bulk Generation of Annotation Descriptions | Mining | ✅ | ✅ | ✅ | ❌ | ❌ |
| Generate Single Reachability Block Description | Mining | ✅ | ✅ | ✅ | ❌ | ❌ |
| Bulk Generate Reachability Block Description | Mining | ✅ | ✅ | ✅ | ❌ | ❌ |
| Bulk Generate Module Description | Mining | ✅ | ✅ | ✅ | ❌ | ❌ |
| Reachability Analysis | ||||||
| Initiate Reachability Analysis | Mining | ✅ | ✅ | ✅ | ❌ | ❌ |
| Edit Name and Description of Single Reachability Block | Mining | ✅ | ✅ | ✅ | ✅ | ❌ |
| Activate/ Inactivate Single Reachability Block | Mining | ✅ | ✅ | ✅ | ✅ | ❌ |
| Merge / Un-Merge Reachability Blocks | Mining | ✅ | ✅ | ✅ | ✅ | ❌ |
| Bulk Inactivate Reachability Blocks | Mining | ✅ | ✅ | ✅ | ❌ | ❌ |
| Download CSV Data from RB Table View | Mining | ✅ | ✅ | ✅ | ✅ | ✅ |
| Dismiss Removed Reachability Blocks | Mining | ✅ | ✅ | ✅ | ✅ | ❌ |
| Sort Reachability blocks in Overview screen (Table View) | Mining | ✅ | ✅ | ✅ | ✅ | ✅ |
| Download Graph Views for Single Reachability Block | Mining | ✅ | ✅ | ✅ | ✅ | ✅ |
| Taxonomy Assignment to Modules within Reachability Blocks | Mining | ✅ | ✅ | ✅ | ❌ | ❌ |
| Recalculate Reachability Blocks | Mining | ✅ | ✅ | ✅ | ❌ | ❌ |
| Reveal Neighbors of Reachability Blocks | Mining | ✅ | ✅ | ✅ | ✅ | ❌ |
| Others | ||||||
| Initiate AST/Control Flow Calculation | Mining | ✅ | ✅ | ✅ | ✅ | ✅ |
| SQL REST-Endpoints | n/a | ❌ | ✅ | ❌ | ❌ | ❌ |
| Feature Console/Toggle | n/a | ❌ | ✅ | ❌ | ❌ | ❌ |
| Export (for example, CSV, Export Extensions) |
Mining | ✅ | ✅ | ✅ | ✅ | ✅ |
AWS Mining setup
This chapter outlines the recommended setup and configurations for Mining with Amazon Web Services (AWS) components. The goal is to separate the API, database, identity, and shared storage layers so the environment can scale and be managed independently. The EC2 instances are designed to be launched from reusable machine images and connected through the AWS services listed below.
-
A cluster of EC2 instances with Elastic Block Stores (EBS) for Mining API servers
-
One or more EC2 instances with Elastic Block Stores (EBS) for the Postgres database
-
An Elastic File System (EFS) as a shared location for Mining server artifacts and logs
-
Auto Scaling groups to launch above EC2 instances as required from Amazon Machine Images
-
An EC2 instance hosting KeyCloak
-
An Application Load Balancer
AWS architecture diagram
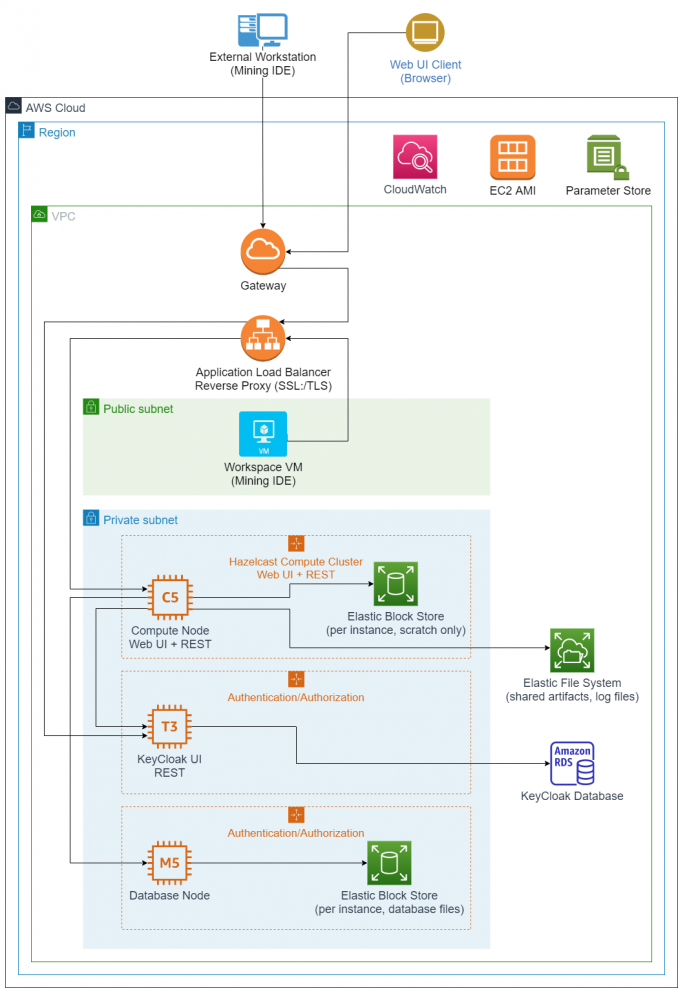
The following diagram provides an overview of a suggested Discovery and Mining AWS setup:
Info
All compute node instances form one Hazelcast compute cluster with significant traffic between them. Auto scaling for KeyCloak is an option, but one instance is expected to be sufficient. The database cluster uses Hazelcast for replication across all nodes with significant traffic between them.
Mining IDE
Configuration
Java 11 or 17 (or higher) must be installed on the machine hosting the Mining IDE. The machine must be able to make a network connection to the Mining API server, KeyCloak server and Postgres database instances.
The Eclipse-based Mining IDE is delivered in the form of an archive file in ZIP format, which needs to be extracted.
The ZIP archive contains all of the necessary files and executables. As far as installation goes, this is the only step.
To start the Mining IDE, a user needs to log in to the machine and run the Eclipse executable, eclipse.exe.
The required innoWake.lic license file is bundled into the ZIP archive in the appropriate location.
When setting up a Windows machine image in AWS, it is recommended that the default TCP RDP port 3389 be open so a user can log in. The user will need the Administrator login and password from AWS to be able to log in at first. Afterwards, they can create additional users if needed.
The Mining IDE will connect to the Mining server and authenticate with the KeyCloak server. Therefore, it requires the proper Security Group configuration in AWS.
Keycloak server
Configuration
Java 8 (or higher) must be installed on the machine before starting the KeyCloak application, as it runs in the JVM.
The KeyCloak server is delivered in the form of an archive file in ZIP format, which needs to be extracted. The archive includes all necessary files and configurations needed.
To extract the file, transfer the archive file to the machine and run the following command via an appropriate CLI:
KeyCloak exposes the admin console UI on port 8080 by default. This port can be changed if needed by adjusting the following line in the file /standalone/configuration/standalone.xml:
Configuration
If port 8080 is changed it needs to be reflected in the Mining server’s Spring configuration. This configuration value can be passed in as an argument when starting the Mining server: --keycloak.auth-server-url=http://<url>:<port>/auth.
The ZIP archive includes a Mining theme and extension for the KeyCloak configuration, which need to be moved to dedicated locations:
-
Copy
mining-keycloak-theme-*.jarto/standalone/deployments/ -
Copy
mining-keycloak-extension-*.jarto/standalone/deployments/
The Mining theme needs to be selected manually once after setup via the KeyCloak Admin UI.
Start KeyCloak by executing the following command via an appropriate CLI:
Info
The standalone.bat/sh should start with the -b=0.0.0.0 parameter to allow non-local connections, that is, connections from another machine.
Warning
KeyCloak uses an embedded H2 (in-memory) database by default. While H2 can be persisted to disk it is highly recommended to connect this to a persistent RDBMS. KeyCloak’s documentation best describes this setup: https://www.keycloak.org/docs/latest/server_installation/index.html#_database The choice and setup of the RDBMS is left to the administrator.
A set of commands needs to be executed in the <KEYCLOAK-INSTALLATION-DIRECTOR>/bin directory to set up the server.
The following commands use default values for the admin user, password, and server port. Please adjust these appropriately where needed. The admin user needs to be set up manually so they will be able to log in to the KeyCloak UI and perform the configuration for any identity management integration.
Configuration
If these default values are changed, they need to be reflected in the Mining server’s Spring configuration. This configuration value can be passed in as an argument when starting the Mining server: --keycloak.auth-server-url=http://<url>:<port>/auth.
After this has been set up, the web application should be available by navigating to the admin console in a browser at <IP of KeyCloak server>:<port>/auth. Log in with the admin credentials used in the command above.
The Deloitte Mining product uses KeyCloak for most of its base functionality. For further details, please refer to KeyCloak's documentation (https://www.keycloak.org/documentation).
Single sign on (SSO)
Info
This section covers the basic setup for SSO. It is possible that further steps are required for your internal systems.
A proper SSL setup of the backend application is mandatory.
The following points need to be considered:
-
Self-signed certificates are prohibited.
-
A DNS record needs to be requested to acquire a public signed certificate.
-
On AWS, an application load balancer can provide SSL termination and a static URL.
-
The URL the SSO solution should redirect to after login has to be activated upon request.
-
The SSO administrator will then provide configuration parameters (for example, "client ID", "client secret"), which need to be specified in the KeyCloak Admin UI.
The SSO settings in KeyCloak itself can be configured entirely via the KeyCloak Admin UI.
Mining API server
Configuration
Java 17 must be installed on the machine before starting the application server, as it runs in the JVM.
The KeyCloak server is delivered in the form of an archive file in ZIP format, which needs to be extracted. The archive includes all necessary files and configuration needed.
To extract the file, transfer the archive file to the machine and run the following command via an appropriate CLI:
Inside the archive is the Java Spring Boot JAR and a Spring configuration file application-config.yml. The application-config.yml file needs to be updated with the correct IP addresses and ports for the Postgres database and the KeyCloak server. It also needs to be updated with appropriate performance settings based on the machine’s resources.
Settings to be modified in the Spring config are:
Warning
KeyCloak and the Postgres database must be up and running, configured, and available for connection before starting the Mining API server; otherwise, it will fail to start.
Start the Mining API server by executing the following command via an appropriate CLI:
Info
Percentages values here are based on the machine’s total memory, assuming the machine is dedicated to running this server. Example for a machine with 128GB total memory: -Xms50G -Xmx100G.
Example start command for a machine with 64vCPU and 128GB RAM
Alternatively, to the inline Spring configuration options, Deloitte can provide a default spring-configuration.yml file that can be bundled within the Mining API server zip file. This file contains the full properties used for Spring and can be modified as mentioned above. To use the Spring configuration file, adjust the jar command:
In addition, the server start can be set up as a service in a Linux system by creating a systemd service. This provides benefits like automatic restart and service control via systemctl.
Instructions for this step are intentionally left out, as it is within the administrator's discretion to configure system services.
Clustered Mining environment with AWS ASG
This section will outline the setup of a full-fledged auto-scaled Mining API server cluster on EC2, with full integration of the API server into the Auto scaling life cycle for graceful instance termination and central log and job result storage via an EFS (Elastic File System).
Simple Notification Service (SNS)
An SNS is required to enable the Auto Scaling group to send life cycle messages to the Simple Queue Service (SQS) queue created in the next step.
Step 1:
In the Amazon SNS Console, choose Topics and select Create Topic.
Step 2:
Type select Standard.
Give the topic a meaningful name click Create Topic to finalize the SNS setup.
Simple Queue Service (SQS)
A queue will be used by the Auto Scaling group to send life cycle notifications to be processed by the Mining API server instances.
Step 1:
In the Amazon SQS Console, select Create Queue.
Step 2:
Type select Standard.
Step 3:
Under Configuration, customize the SQS queue according to your needs.
Step 4:
Under Access policy, enter your AWS account number and the ARN of the IAM role that will be assigned to the EC2 instances.
Required permissions in addition to the default clustering permissions are "sqs:GetQueueUrl", "sqs:ReceiveMessage" and "sqs:DeleteMessage".
Step 5:
Apply further configurations as needed (for example, encryption). Then select Create Queue.
Step 6:
In the queue overview page, select Subscribe to Amazon SNS topic and select the previously created SNS topic.
Elastic File System (EFS)
An EFS (Elastic File System) storage mounted into each EC2 instance enables us to store all log files created by all instances at a central location, even after they are terminated.
A centralized EFS for logging is required for Discovery if the API server is clustered. This way the log files can be returned to the Mining IDE once a code scanning job has finished.
Step 1:
Create a dedicated EFS and customize it according to your needs (automatic backups, life cycle management, encryption, etc.).
Step 2:
For the network access settings, ensure that the same subnet is selected that will also be used by your cluster or Auto Scaling setup. Otherwise, the EC2 machines won't be able to mount the EFS storage. Remove the default security groups that may have already been applied, and select a security group that is different from the one that will be used for the EC2 instances.
Info
The security group used for the EFS needs an inbound rule that allows NFS traffic with the source being the security group used for the EC2 machines. While the security group for the EC2 machines needs an outbound rule allowing NFS traffic with the destination being the security group of the EFS.
Info
An EFS storage can be mounted in different ways. Choose your created file system and click Attach to see the possible commands. When mounting via DNS you have to make sure that DNS lookups are enabled and working in your VPC.
Amazon Machine Image (AMI)
Every machine started by the Auto Scaling Group will use the same AMI that must already contain all required resources for the machine to participate.
Step 1:
Set up a machine as described above in the Mining API Server.
All resources must be copied to the instance, like the Mining API server jar, application config YML, and log4j configuration. The application config must contain the following properties:
tagKeyandtagValuethat contain a unique key and value pair to make sure that only machines using the same key/value pair are eligible to form a cluster (the values chosen here are required later on when creating the launch template). Use a meaningful value, especially fortagValue.
Warning
If you do not set this tag, then all api-server instances on all machines in the region of your AWS account will be used to form a cluster, which is not recommended for this Auto Scaling setup.
-
lifecycleQueueName: Provide the name of the SQS queue created previously. -
jobResultFolder: Since all job results should be stored in the centralized EFS storage, provide the path of the mount point where the EFS storage will be mounted to during the EC2 instance launch. -
logFolder: Since all logs should be stored in the centralized EFS storage, provide the path of the mount point where the EFS storage will be mounted to during the EC2 instance launch.
Example configuration in YML application config
Step 2:
Provide any other AWS properties you may need for your setup as described in Mining Job API - AWS.
Step 3:
In the Amazon EC2 Instances Console, select the machine that you have set up. Choose Actions → Image and templates → Create image to create your Mining Server AMI.
Launch template
The launch template will be used by the Auto Scaling group to launch the EC2 instances.
Step 1:
Create a Launch Template for the AMI created above.
Step 2:
For Resource tags, add the following, while making sure to set Resource types to both Instances and Volumes:
-
Key="Name" and Value="
". -
Additionally the
tagKeyandtagValuepair that you already entered in the application config above during your AMI setup. Based on the example above Key="api-server-cluster" and Value="mining-autoscaling-cluster"
Step 3:
For Advanced details, set the following:
-
IAM instance profile should be set to the cluster and SQS-capable IAM role used during the SQS queue creation.
-
In User data, enter everything that should be executed when a new EC2 instance is launched.
Example Java launch command for the Mining API server
This installs the Amazon EFS utils, creates a mount point, actually mounts the EFS storage, and changes the owner of the mount point to ensure that the API server can write to the mount point. The mount point used here is "/mnt/efs", as already configured in the application config above. The IP "10.195.130.75" for the mount command should be replaced with the IP of your previously created EFS storage.
Finally, we switch to the directory that contains all Mining API server resources and execute the Java command to start it. The example above expects an explicit log4j2 configuration to be present in this location, along with the spring configuration file.
Step 4:
Finalize the launch template by customizing it according to your needs.
Load balancer
Before creating the Auto Scaling group, we will create a load balancer. Technically, this could also be directly created as part of the Auto Scaling group creation, but this way more fine-grained configuration can be done.
Step 1:
Create an Application Load Balancer and configure the name, scheme, HTTP port, availability zones with subnets, and security groups according to your needs.
Step 2:
Give the target group a descriptive name, set Target Type to Instance, set the protocol to HTTP, and the port to the one where your API server is configured to listen on (8080 by default).
Step 3:
Don't register any target and directly click Next: Review, and finally Create.
Auto Scaling Group
The final step is to create the Auto Scaling group for the Mining API server cluster.
Step 1:
Create an Auto Scaling group and choose the launch template created in the previous steps. Make sure to select Latest for the Version. This way, the auto scaling group will always automatically pick up the latest changes made to the launch template. Then click Next.
Step 2:
For Network, select the same subnet chosen during the load balancer creation.
Step 3:
Select Attach to an existing load balancer and choose the one created in the previous step.
Step 4:
Check Enable group metrics collection within CloudWatch and click Next.
Step 5:
Enter the capacities for your Auto Scaling group in the Group size section. Make sure that the Desired capacity and Minimum capacity should have a minimum value of 1. Otherwise, no machine will be started.
Keep Scaling policies at None and click Next.
Step 6:
Click Add Notification and select the SNS topic created in the previous step.
Step 7:
Finalize the creation of your Auto Scaling group by customizing it according to your needs, for example, with additional tags.
Step 8:
Create the policies that decide when to scale out/in the number of possible machines in the Auto Scaling group.
Ensure the following settings when creating policies:
-
For the Policy type, select Simple scaling.
-
Either use an existing CloudWatch alarm or create a new one.
-
To take the action, select Add 1 capacity units for the scale-out policy and Remove 1 capacity units for the scale-in policy.
Warning
Whatever type of policy you define, you have to make sure that your policy never reduces more than 1 machine per execution. This ensures that no more than one machine is being terminated at a time. Otherwise, the Hazelcast cluster may get into a corrupt state. Data may be corrupted when two machines are being terminated that both hold the primary and backup copies of a specific data structure.
Step 9:
Create the life cycle hooks that will send the life cycle events of the Auto Scaling group to your SQS queue, so that the API server can react. The type of life cycle hooks required cannot be created from within the AWS management console, but only from a Command Line Interface (CLI).
Access one of the EC2 instances initialized by the Auto Scaling group via SSH, open a CLI and and enter the following two commands to create two life cycle hooks.
The first command is for the EC2_INSTANCE_LAUNCHING event when additional instances are about to be launched, while the second one handles the EC2_INSTANCE_TERMINATING event when an instance is no longer required and should be terminated.
Replace the command parameters:
-
<your-life cycle-hook-name>: How the life cycle hook should be called. For example, "Launch_Api-Server_Instance" and "Terminate-Api-Server_Instance". -
<your-autoscaling-group-name>: The name of the Auto Scaling group created above. -
<your-SQS-queue-ARN>: The ARN of the SQS queue created above. -
<IAM-role-ARN>: The ARN of an IAM role that must have a trust policy to the EC2 Auto Scaling Service and the permissions "sqs:SendMessage", "sqs:GetQueueUrl", and "sns:Publish". This must not be the same IAM role that is used by the EC2 instances of the Auto Scaling group or the commands will not succeed. -
<your-region>: The AWS region.
In the Auto Scaling group console, select your group and navigate to Instance management. You should now see the two created life cycle hooks attached to the Auto Scaling group.
Step 10:
In the Amazon SQS Console, select your queue and click Send and Receive Messages.
Select Poll for messages, and you should see at least two messages that have automatically been sent during the creation of the life cycle hooks for testing purposes.
Step 11:
Your Auto Scaling environment is now set up.
You can access the Mining UI and attach the Mining IDE to the Mining API server via the DNS name assigned to the load balancer.
Example specifications
Mining API server
Component
Specifications
EC2 Linux AMI
-
c5.12xlarge (pre auto scaling)
- 48vCPU, 96GB memory
-
c5.12xlarge (pre auto scaling)
- 16vCPU, 32GB memory
EBS
-
gp2
-
100GB
Security Group
- Port 8080: HTTP requests in VPC (For Mining IDE, KeyCloak, Postgres, Users, etc.)
Keycloak
Component
Specifications
EC2 Linux AMI
- t3a.large
- 2vCPU, 8GB memory
Amazon RDS for PostgreSQL
- db.t3.medium
- 2vCPU, 4GB memory
EBS
-
gp2
-
100GB
Security Group
-
Port 8080: HTTP requests to the admin console for configuration
-
Other ports may be necessary for SSL, SSO redirect, etc.
Mining IDE
Component
Specifications
EC2 Windows AMI
- m5.2xlarge
- 8vCPU, 32GB memory
EBS
-
io2
-
150GB
-
5,000 IOPS
-
needed for storing source code files and moving them to the workspace
Security Group
-
Port: 3389 for RDP (Remote Desktop) access
-
Needs to be able to connect to Mining API server and KeyCloak server
OrientDB (deprecated)
Component
Specifications
EC2 Linux AMI
- m5d.8xlarge
- 32vCPU, 256GB memory
Instance store
- 2 x 300GB, NVMe SSD
Security Group
-
Port 2480: HTTP requests in VPC
-
Port 2424: All requests from Mining API server, none otherwise
Backups
- Scheduled job that exports the database to a dedicated S3 location
EFS
-
Standard Storage 350GB/month.
- Can be modified to configure infrequent access if needed to reduce costs.
-
Used for commonly mounted logging locations of the various services (Postgres logs, Mining API server logs, KeyCloak, etc.).
- This needs to be configured for each application to write its logs to this common mounted location instead of a local EBS or instance storage.
S3
- Standard Storage 300GB/month.
- Can be modified for the POST/GET requests count.
Approximate monthly cost estimate
Based on the AWS Pricing Calculator (https://calculator.aws/), using:
-
Pricing Model: EC2 instance savings plan
-
Reservation Term: 1 year
-
Payment option: No Upfront
| Mining Service | AWS Service | Type/Size | Monthly Cost (as of 01/2021) |
|---|---|---|---|
| Mining API Server | EC2 | c5.9xlarge | $700 |
| Mining API Server Storage | EBS | gp2, 100GB (x2) | $20 |
| KeyCloak Server | EC2 | t3a.large | $35 |
| KeyCloak Server Persistence | RDS | db.t3.medium | $50 |
| Common Logs | EFS | 350GB | $105 |
| DB Backup Storage | S3 | 500GB | $10 |
| OrientDB (deprecated) | EC2 | m5.8xlarge | $830 |
| Total | $1,750 |